Amazon Athena as a Target
- 9 Minutes to read
- Print
- DarkLight
- PDF
Amazon Athena as a Target
- 9 Minutes to read
- Print
- DarkLight
- PDF
Article summary
Did you find this summary helpful?
Thank you for your feedback!
This is a step-by-step tutorial for setting Amazon Athena as a Target.
Amazon Athena as a Target is currently in Beta Stage.
Overview
Amazon Athena is an interactive query service that makes it easy to analyze data directly in Amazon S3 using standard SQL. With a few actions in the AWS Management Console, you can point Athena at your data stored in Amazon S3 and begin using standard SQL to run ad-hoc queries and get results in seconds.
Prerequisites
Create Buckets
A bucket is an object container. To store data in Amazon Athena, you must first create a bucket and specify a bucket name as well as an AWS Region. Then you upload your data as objects to that bucket in Amazon Athena. Each object has a key (or key name) that serves as the object's unique identifier within the bucket.
Please Note:
Amazon Athena requires the creation of two buckets, to be configured by applying the policy explained in the upcoming section.
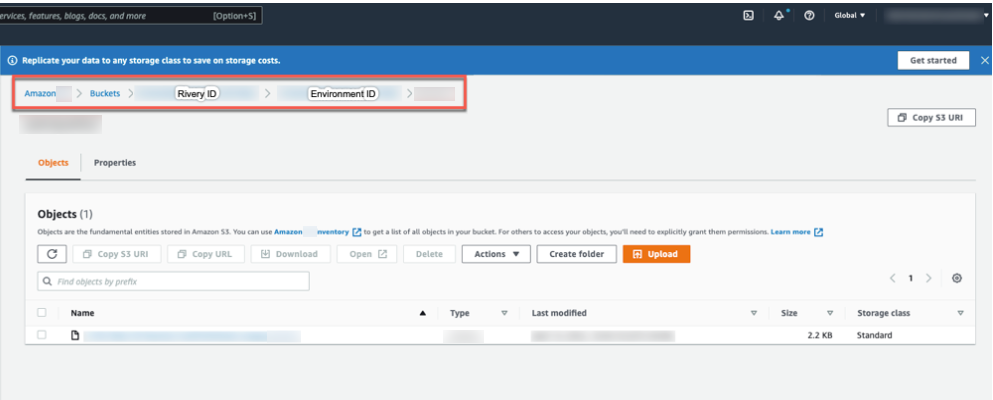
Let's begin by logging into AWS and searching for Buckets:
Note:
This is a tour of the console. Please hover over the rippling dots and read the notes attached to follow through.
Add a Policy
A bucket policy is a resource-based policy that allows you to grant access permissions to your bucket and the objects contained within it.
Now that you've created a bucket, let's add a policy to grant the necessary permissions:
Here's the policy's code:
{
    "Version": "2012-10-17",
    "Statement": [
        {
            "Sid": "RiveryManageFZBucket",
            "Effect": "Allow",
            "Action": [
                "s3:GetBucketCORS",
                "s3:ListBucket",
                "s3:DeleteObject",
                "s3:GetBucketLocation"
            ],
            "Resource": "arn:aws:s3:::*"
        },
        {
           "Sid":"RiveryManageFZObjects",
            "Effect":"Allow",
            "Action":[
                 "s3:ReplicateObject",
                  "s3:PutObject",
                "s3:GetObjectAcl",
                  "s3:GetObject",
                  "s3:PutObjectVersionAcl",
                  "s3:PutObjectAcl",
                  "s3:ListMultipartUploadParts"],
            "Resource":["arn:aws:s3:::<athena_query_results_bucket_name>/*","arn:aws:s3:::<athena_query_results_bucket_name>","arn:aws:s3:::<athena_data_bucket_name>/*","arn:aws:s3:::<athena_data_bucket_name>"]
        },
        {
            "Sid": "AthenaAccess",
            "Effect": "Allow",
            "Action": [
                "athena:*",
                "glue:CreateDatabase",
                "glue:DeleteDatabase",
                "glue:GetDatabase",
                "glue:GetDatabases",
                "glue:UpdateDatabase",
                "glue:CreateTable",
                "glue:DeleteTable",
                "glue:BatchDeleteTable",
                "glue:UpdateTable",
                "glue:GetTable",
                "glue:GetTables",
                "glue:BatchCreatePartition",
                "glue:CreatePartition",
                "glue:DeletePartition",
                "glue:BatchDeletePartition",
                "glue:UpdatePartition",
                "glue:GetPartition",
                "glue:GetPartitions",
                "glue:BatchGetPartition"
            ],
            "Resource": [
                "*"
            ]
        },
        {
            "Sid": "RiveryHeadBucketsAndGetLists",
            "Effect": "Allow",
            "Action": "s3:ListAllMyBuckets",
            "Resource": "*"
        }
    ]
}
Understanding the Need for Two S3 Buckets
When using Athena as a Target, two Amazon S3 buckets are required for different but complementary purposes:
Query Results Bucket: The primary bucket is dedicated to storing the results of the queries you run in Athena. When you execute a query, Athena writes the results to this bucket. This setup is essential because Athena is a serverless query service and does not store data or query results itself. Storing query results in an S3 bucket allows you to easily access, analyze, and download these results.
The Query Results Bucket is about output management. It captures the outcomes of your analyses for later use or further processing.Data Storage Bucket: The second bucket is used for storing the data you want to query with Athena. This bucket holds the actual datasets in formats that Athena can query, such as CSV or JSON. Athena allows you to run SQL queries directly on this data without needing to load it into a traditional database.
The Data Storage Bucket is about data accessibility and organization. It's where your queryable data lives.
Rivery User in AWS
Now, in order to connect to the Amazon Athena (described in the following section) in Rivery console, you must first create an AWS Rivery user:
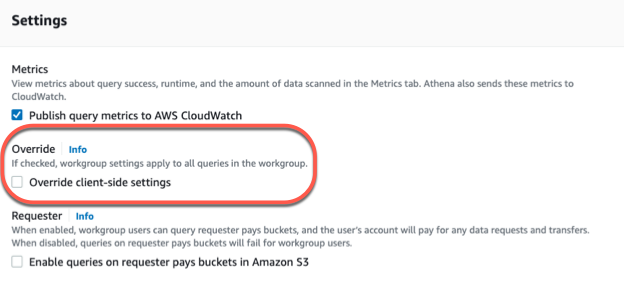
Create a Workgroup in Amazon Athena
Follow the Amazon Athena User Guide to create a Workgroup.
Please Note:
Make sure the Override client-side settings box is not checked.
Establishing a Connection
Enter the Rivery Console and select Connection from the main menu on the left, and Look up 'Athena'.
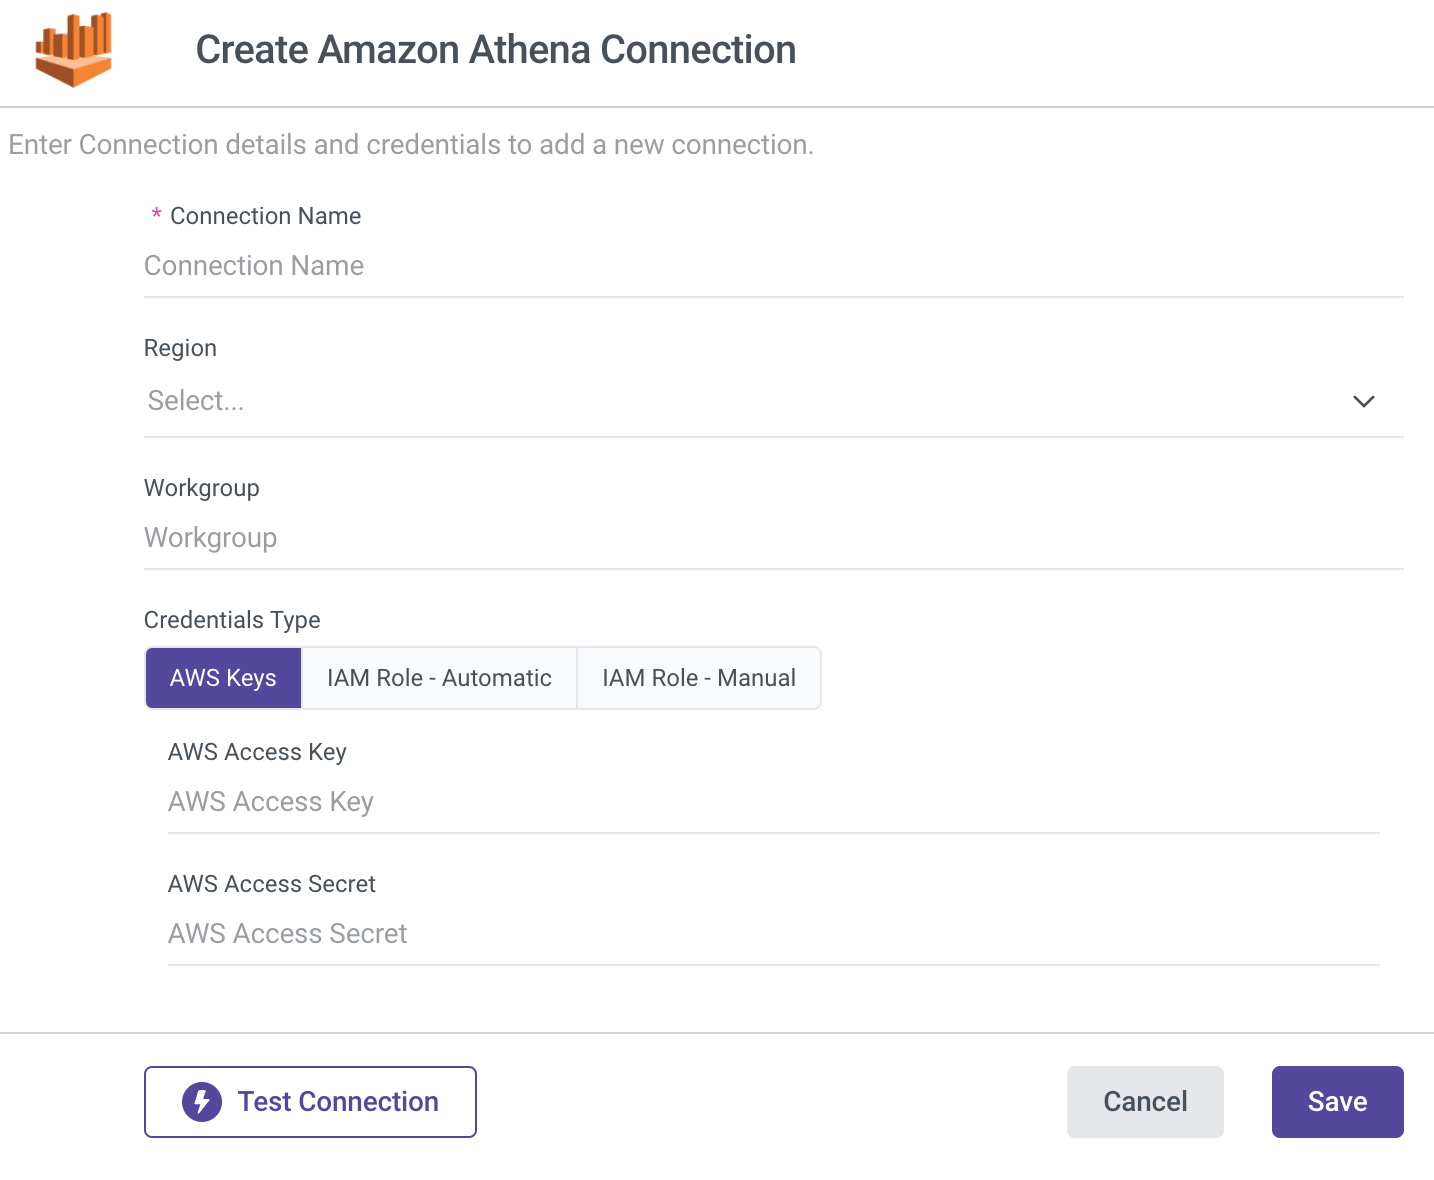
AWS Keys
- Type in the Connection Name.
- From the drop-down menu, choose your Region.
- Enter Workgroup (mandatory).
- Select AWS Keys credentials type.
- Enter Your AWS Access key id and Secret access key.
- Use the Test Connection function to see if your connection is up to the task.
If the connection succeeded, you can now use this connection in Rivery.
IAM Role - Automatic
- Type in the Connection Name.
- From the drop-down menu, choose your Region.
- Enter Workgroup (mandatory).
- Select IAM Role - Automatic credentials type.
- To initiate the AWS CloudFormation Stack, click the Launch Stack button.
- Replace the External ID in the Parameters section with the one you were given in the Rivery console.
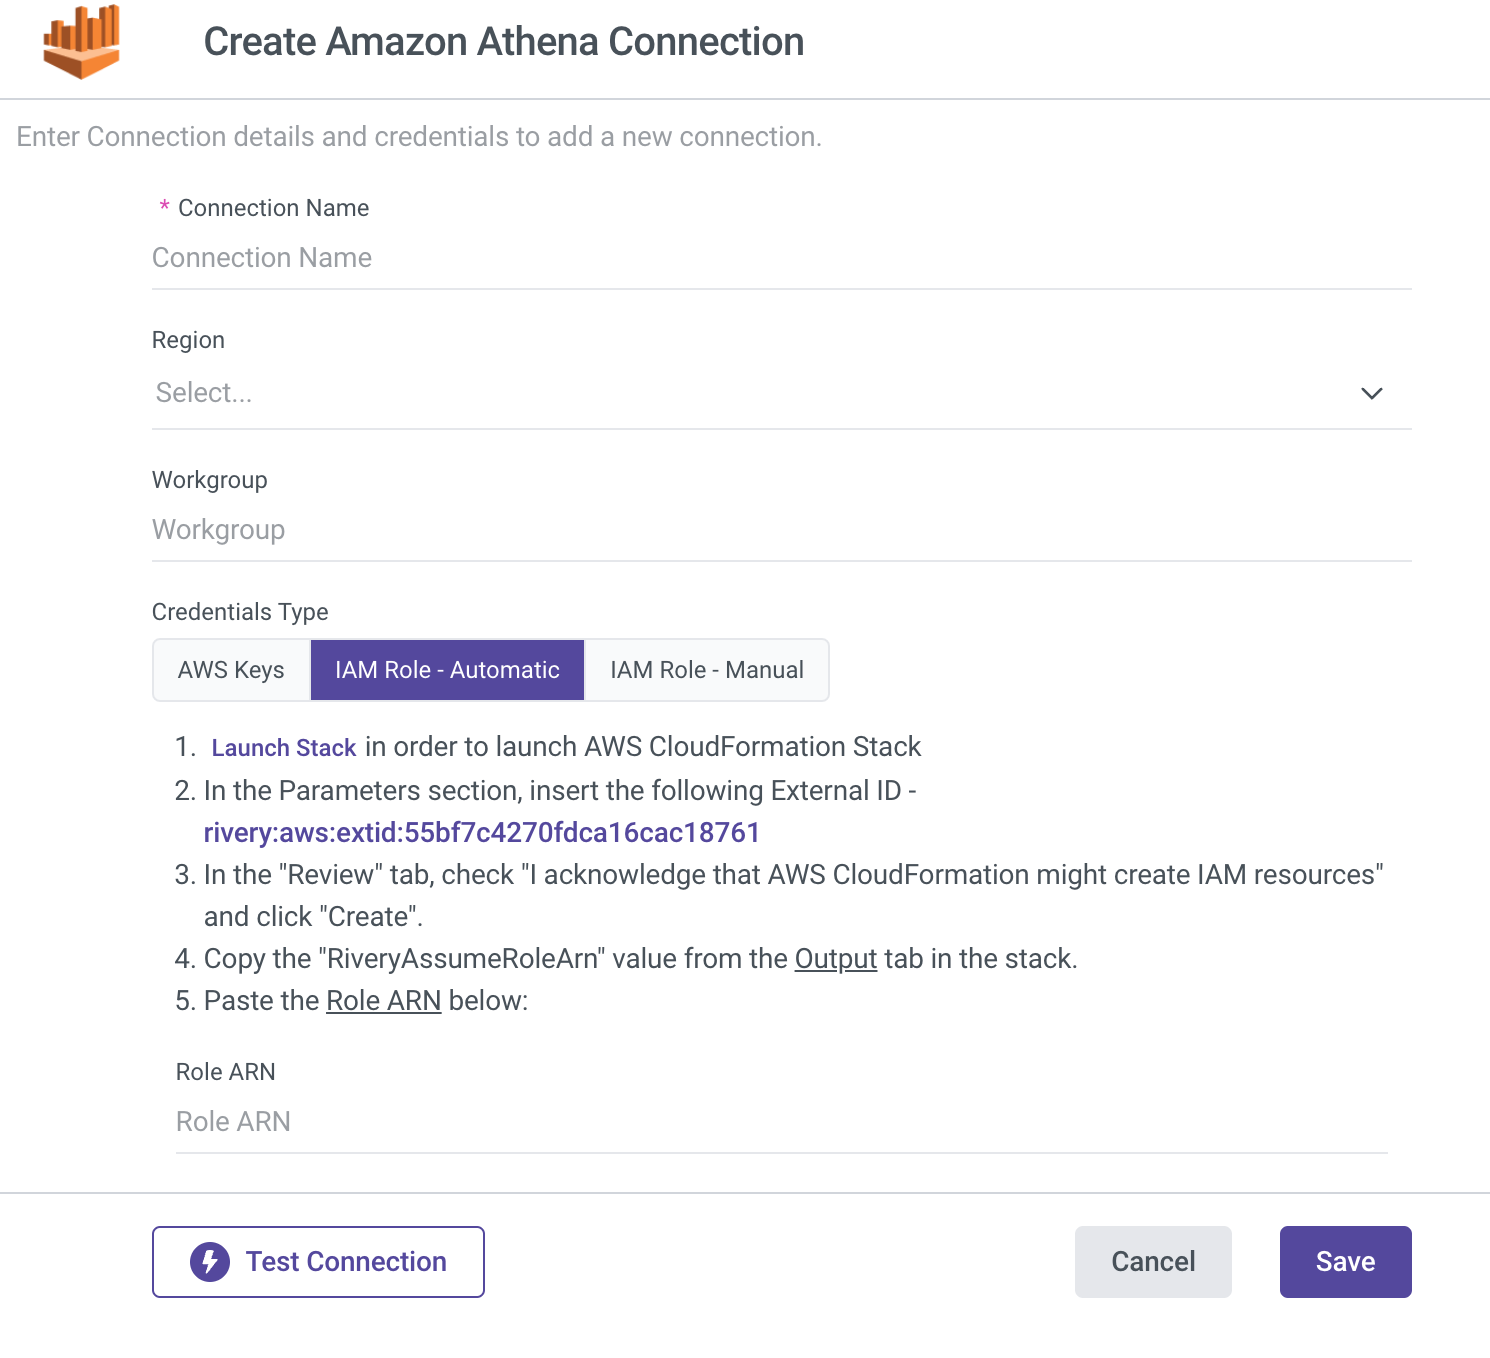
- Check 'I acknowledge that AWS CloudFormation may create IAM resources' in the Review tab, then click Create.
- Copy the value of 'RiveryAssumeRoleArn' from the Output tab in the stack.
- Paste the Role ARN Key.
- Use the Test Connection function to see if your connection is up to the task.
If the connection succeeded, you can now use this connection in Rivery.
IAM Role - Manual
Type in the Connection Name.
From the drop-down menu, choose your Region.
Enter Workgroup (mandatory).
Select IAM Role - Automatic credentials type.
Initiate the AWS IAM console.
Click Policies on the side menu, and select Create Policy.
a. Navigate to the JSON tab.
b. Copy the following policy:
{
    "Version": "2012-10-17",
    "Statement": [
        {
            "Sid": "RiveryManageFZBucket",
            "Effect": "Allow",
            "Action": [
                "s3:GetBucketCORS",
                "s3:ListBucket",
                "s3:GetBucketLocation"
            ],
            "Resource": "arn:aws:s3:::*"
        },
        {
           "Sid":"RiveryManageFZObjects",
            "Effect":"Allow",
            "Action":[
                 "s3:ReplicateObject",
                  "s3:PutObject",
                "s3:GetObjectAcl",
                  "s3:GetObject",
                  "s3:PutObjectVersionAcl",
                  "s3:PutObjectAcl",
                  "s3:ListMultipartUploadParts"],
            "Resource":["arn:aws:s3:::<athena_query_results_bucket_name>/*","arn:aws:s3:::<athena_query_results_bucket_name>","arn:aws:s3:::<athena_data_bucket_name>/*","arn:aws:s3:::<athena_data_bucket_name>"]
        },
        {
            "Sid": "AthenaAccess",
            "Effect": "Allow",
            "Action": [
                "athena:*",
                "glue:CreateDatabase",
                "glue:DeleteDatabase",
                "glue:GetDatabase",
                "glue:GetDatabases",
                "glue:UpdateDatabase",
                "glue:CreateTable",
                "glue:DeleteTable",
                "glue:BatchDeleteTable",
                "glue:UpdateTable",
                "glue:GetTable",
                "glue:GetTables",
                "glue:BatchCreatePartition",
                "glue:CreatePartition",
                "glue:DeletePartition",
                "glue:BatchDeletePartition",
                "glue:UpdatePartition",
                "glue:GetPartition",
                "glue:GetPartitions",
                "glue:BatchGetPartition"
            ],
            "Resource": [
                "*"
            ]
        },
        {
            "Sid": "RiveryHeadBucketsAndGetLists",
            "Effect": "Allow",
            "Action": "s3:ListAllMyBuckets",
            "Resource": "*"
        }
    ]
}
c. Paste the Policy it into the description box, then click Review Policy.
- Name the Policy - 'Rivery-Athena-Policy' and click Create Policy.
- Click Roles on the side menu, and select Create Role.
- Select Another AWS Account and change the Account ID to the one you were given in the Rivery console.
- Check Require External ID, and set External ID to the one you were given in the Rivery console.
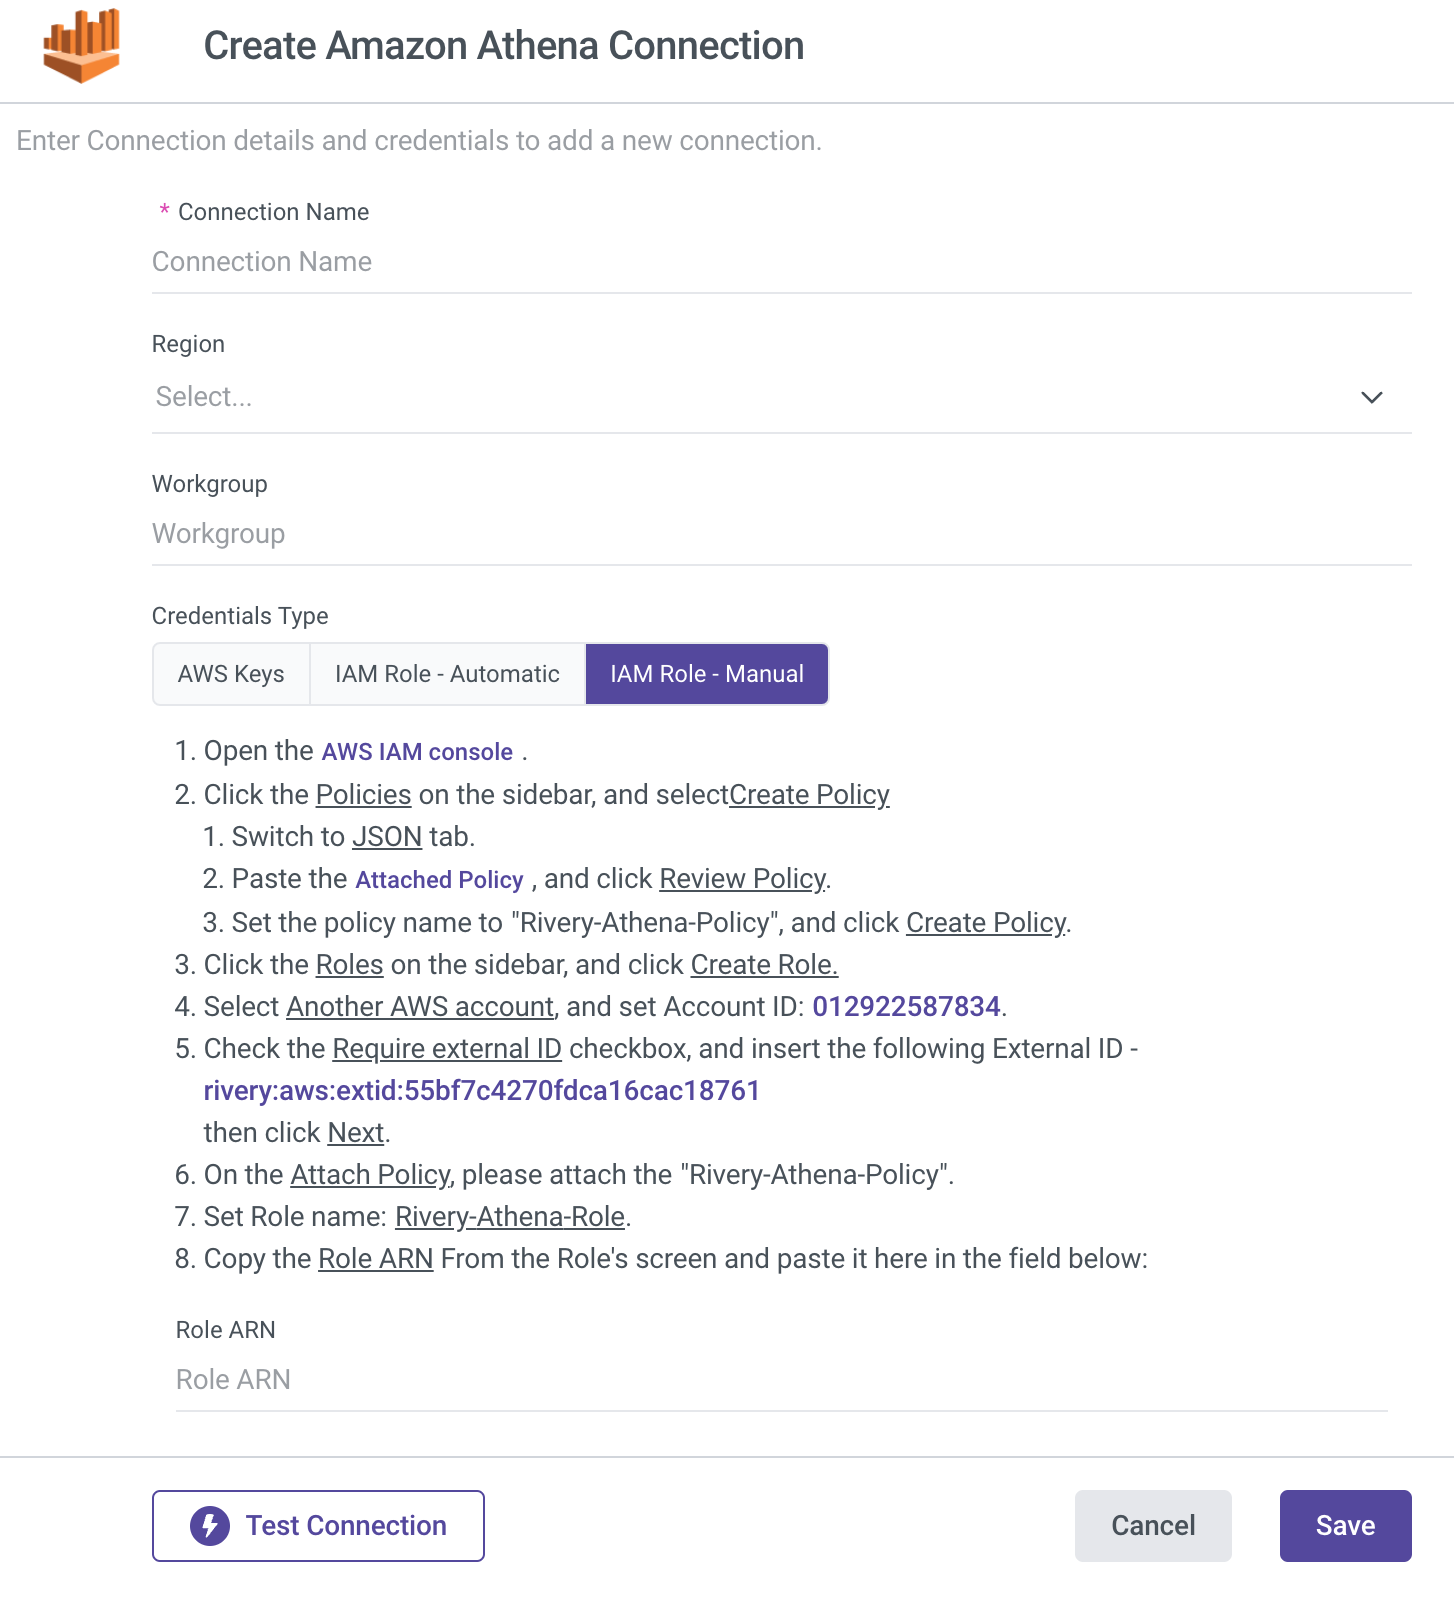
- Click Next.
- Attach the 'Rivery-Athena-Policy' to the Attach Policy form.
- Set 'Rivery-Athena-Role' as the role name.
- Copy the Role ARN From the Role's window and paste it into the field below.
- Use the Test Connection function to see if your connection is up to the task.
If the connection succeeded, you can now use this connection in Rivery.
Configuration Processes
Source to Target River
- Now that you've established a Connection, enter your Connection Name.
- Select your Target Connection from the drop-down list.
- Input the File Name and the FileZone path from your S3 storage. Here's an example:
- Enter the Bucket Name.
The bucket that serves as the Query Results Bucket for storing the Athena Parquet table. - Click the curved arrow next to Schema on the right side of the row. After the refresh is complete, click the row and choose the Schema where the data will be stored.
- Enter the Table Name.
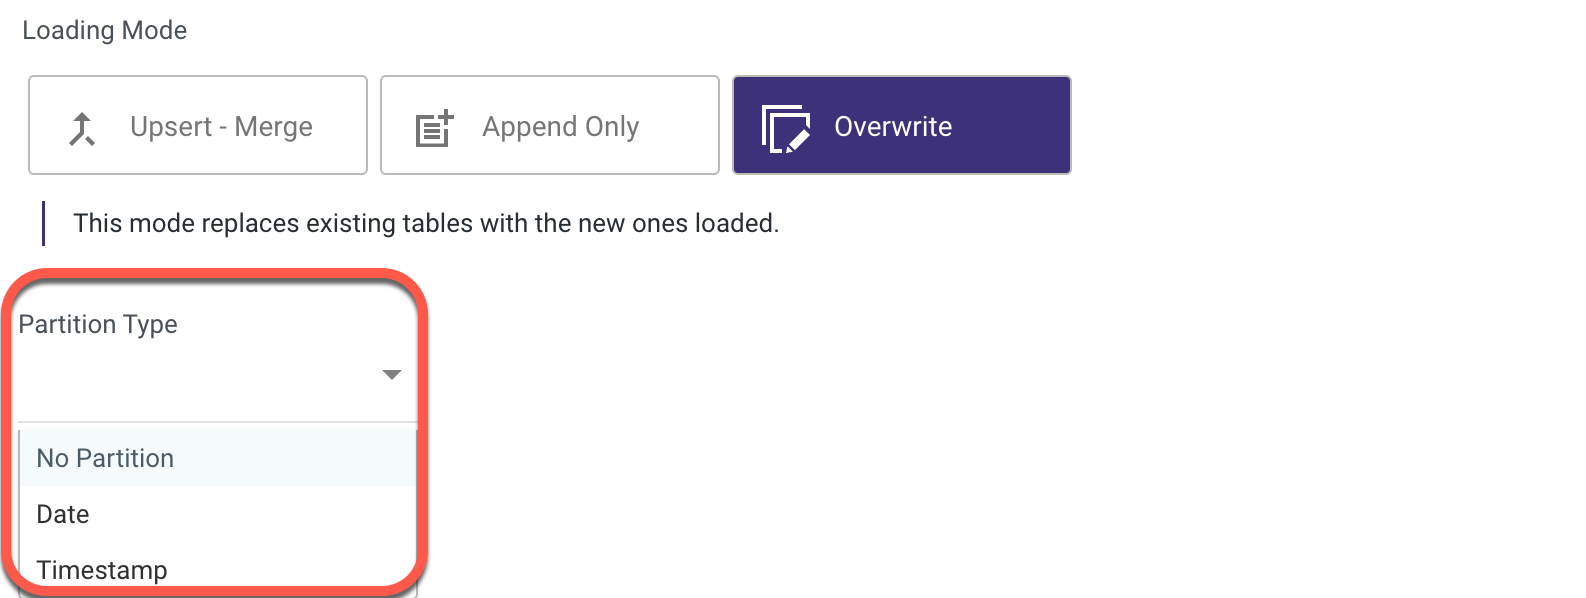
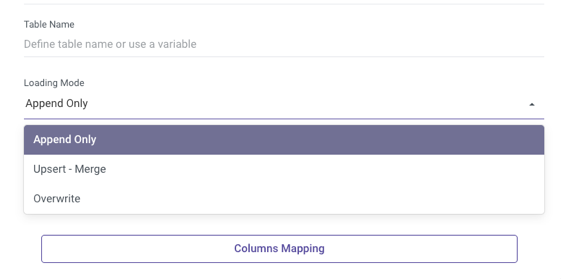
- Set the Loading Mode.
Loading Modes:
Upsert Merge - Based on the keys columns you've selected, the system will match rows and decide whether to replace matching rows, keep unmatched rows, or add new ones.
This mode is recommended for continuous merge runs because it does not retain duplication and creates an index for better performance.
Upsert Merge includes two merge techniques:
Append Only - This will append any new records while keeping all of the current records using INSERT INTO the Target Table (matching on columns).
Overwrite - This will TRUNCATE the old records and INSERT the new records in the target table.

- Set the period partition timeframe.
- Choose the type of file you're using.
- CSV - Be sure to choose the SerDe based on the types of values your data contain.
- JSON - To deserialize JSON data, you can employ SerDe libraries.
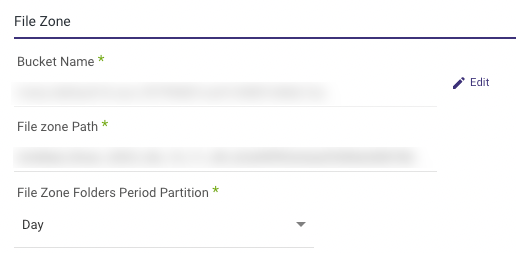
- Provide the name of the second bucket and the path within the File Zone.
This is the Data Storage Bucket where files are retained in their native CSV/JSON format before being transferred to Athena. The Filezone bucket preserves data in its original CSV/JSON structure. - Set the period partition timeframe for a FileZone folder.
Note: You can instruct Rivery to divide the data according to the data insertion day, the Day/Hour, or the Day/Hour/Minute. This means that Rivery will produce data files from your sources under folders that correspond to the correct partition you've selected.
Logic River
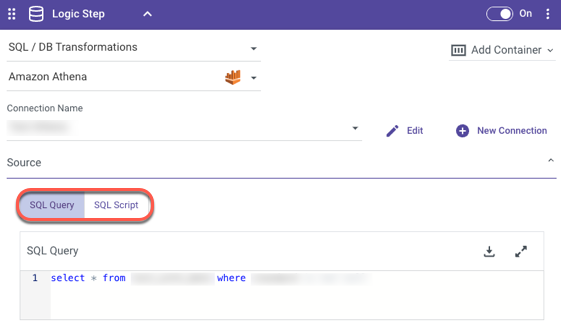
- Now that you've established a Connection, enter your Connection Name.
- In the Source section, type your SQL query or SQL script.
Please Note:
- The SQL script is not encrypted in any way. Please avoid using credentials in the script.
- The SQL script runs according to user configurations. Users are responsible for any changes to the table, schema, or data that occur due to the script.
- in the Target section, select Table or Variable.
- If you selected 'Variable', select the variable's type and then, from the drop-down list, choose the variable you want to use as a Target.
- if 'Table' was your choice, move on to step 5.
- Click the Bucket Name section and pick the bucket you want to load into from the drop-down list.
- Enter the FileZone path from your S3 storage. Here's an example:

- Click the Schema section and select the schema you want from the drop-down list.
- Type in your Table Name.
- Set the Loading Mode.
Loading Modes:
Append Only - This will append any new records while keeping all of the current records using INSERT INTO the Target Table (matching on columns).
Upsert Merge - Based on the keys columns you've selected, the system will match rows and decide whether to replace matching rows, keep unmatched rows, or add new ones.
This mode is recommended for continuous merge runs because it does not retain duplication and creates an index for better performance.
Upsert Merge includes two merge techniques:
Overwrite - This will TRUNCATE the old records and INSERT the new records in the target table.
- Set the period Partition Type and Granularity for a bucket.
Please Note:
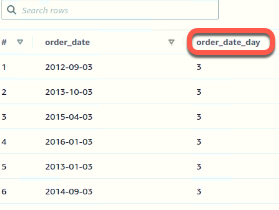
A new column with the selected granularity value will be added to the target table in Athena. Here's an example:
Assume you want to partition data in our mapping with a granularity of one day based on the "order_date" column. This column is of type DATE. After a successful River run on the selected Target table, you should see in the Athena console, a new column with the name "order_date_day" and the value of the day from "order_date." The granularity of this partitioned column will be just the day.
- Now simply click the Column Mapping button.
- Configure the Columns to your preferences as they will appear in your Target.
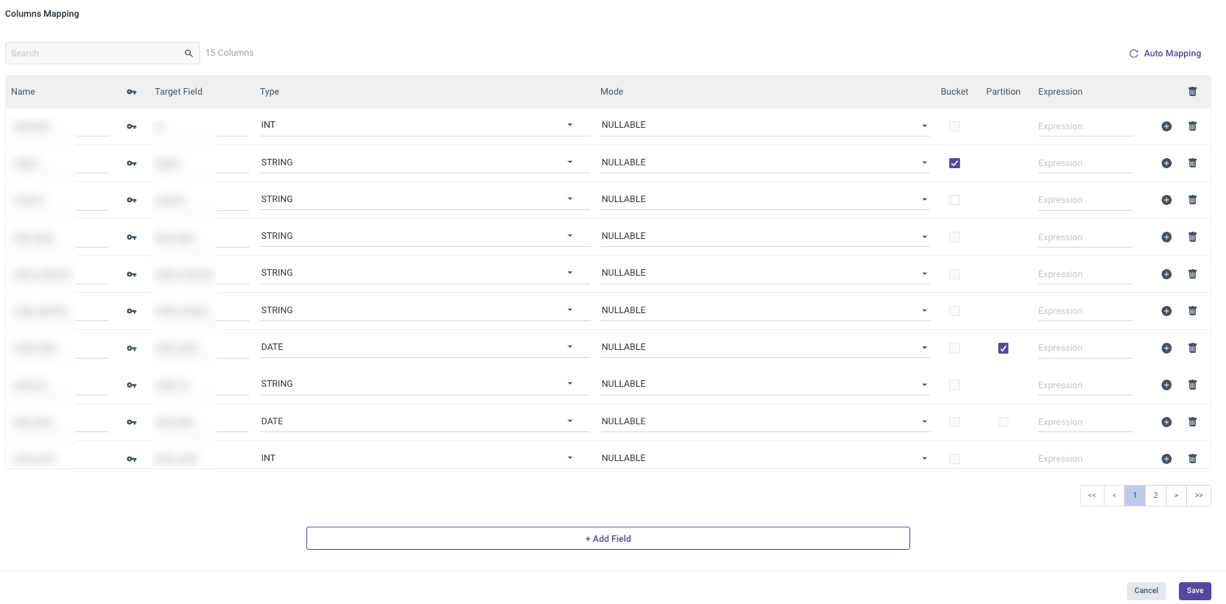
Note:
- To add a new field to your Target, select +Add Field.
- If a Bucket is selected next to a particular field, you would be able to specify the number of buckets to target that field by clicking Save and entering a Number of Buckets in a newly created section in the Target form.
The range of defined buckets is 2 to 100. - Only the Date and Timestamp fields can be partitioned, and the partition checkbox must be selected in order to do so.
- Click Save.
- You can now Select Run to run your River.
Type Mapping
We match Amazon Athena data types to Rivery data types while extracting your data. If a data type is not supported, we will map it as a String type.
The following table shows the mapping of Amazon Athena data types to Rivery-compatible types:
| Amazon Athena Type | Rivery Type |
|---|---|
| STRING | string |
| TIMESTAMP | timestamp |
| DATETIME | date |
| BOOLEAN | boolean |
| BIT | int |
| FLOAT | float |
| INTEGER | int |
| INT | int |
| BIGINT | bigint |
| SMALLINT | smallint |
| DATE | date |
| TIME | timestamp |
| RECORD | string |
| ARRAY | string |
| VARCHAR | string |
| TEXT | string |
| VARIANT | string |
| NVARCHAR(MAX) | string |
| NVARCHAR | string |
| TINYINT | tinyint |
| DATETIME2 | timestamp |
| DATETIMEOFFSET | timestamp |
| REAL | float |
| SMALLDATETIME | timestamp |
| UNIQUEIDENTIFIER | string |
| BINARY | binary |
| NUMERIC | float |
| CHAR | char |
| DECIMAL | decimal |
| NCHAR | string |
| VARBINARY | string |
Was this article helpful?