Amazon S3 as a Target
- 6 Minutes to read
- Print
- DarkLight
- PDF
Amazon S3 as a Target
- 6 Minutes to read
- Print
- DarkLight
- PDF
Article summary
Did you find this summary helpful?
Thank you for your feedback!
This tutorial will show you how to set up Amazon S3 as a Target.
Prerequisites
Create a Bucket
A bucket is an object container. To store data in Amazon S3, you must first create a bucket and specify a bucket name as well as an AWS Region. Then you upload your data as objects to that bucket in Amazon S3. Each object has a key (or key name) that serves as the object's unique identifier within the bucket.
Let's begin by logging into AWS and searching for Buckets:
Note:
This is a tour of the console. Please hover over the rippling dots and read the notes attached to follow through.
Add an IAM Policy
An IAM policy is a resource-based policy that can be attached to an IAM Role to grant permissions.
Let's create a policy to grant the necessary permissions.
Please Note:
Make sure to repleace < RiveryFileZoneBucket > with the name of your S3 bucket.
Here's the policy's code:
{
 "Version":"2012-10-17",
 "Statement":[
   {
    "Sid":"RiveryManageFZBucket",
    "Effect":"Allow",
    "Action":[
    "s3:GetBucketCORS",
    "s3:ListBucket",
    "s3:GetBucketLocation"
     ],
    "Resource":"arn:aws:s3:::<RiveryFileZoneBucket>"
   },
   {
    "Sid":"RiveryManageFZObjects",
    "Effect":"Allow",
    "Action":[
      "s3:ReplicateObject",
      "s3:PutObject",
      "s3:GetObjectAcl",
      "s3:GetObject",
      "s3:PutObjectVersionAcl",
      "s3:PutObjectAcl",
      "s3:ListMultipartUploadParts"],
    "Resource":"arn:aws:s3:::<RiveryFileZoneBucket>/*"
  },
  {
     "Sid":"RiveryHeadBucketsAndGetLists",
     "Effect":"Allow",
     "Action":"s3:ListAllMyBuckets",
     "Resource":"*"
  }
 ]
}
Create a Rivery User in AWS
Now, in order to connect to the Amazon S3 Source and Target (described in the following section) in Rivery console, you must first create an AWS Rivery user:
Establish a Connection
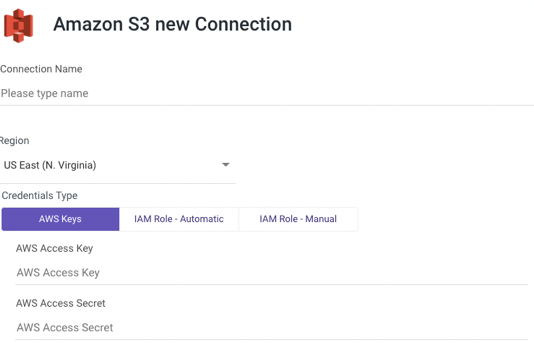
AWS Keys
- Type in the Connection Name.
- From the drop-down menu, choose your Region.
- Select AWS Keys credentials type.
- Enter Your AWS Access key id and Secret access key.
- Use the Test Connection function to see if your connection is up to the task.
If the connection succeeded, you can now use this connection in Rivery.
IAM Role - Automatic
- Type in the Connection Name.
- From the drop-down menu, choose your Region.
- Select IAM Role - Automatic credentials type.
- To initiate the AWS CloudFormation Stack, click the Launch Stack button.
- Replace the External ID in the Parameters section with the one you were given in the Rivery console.
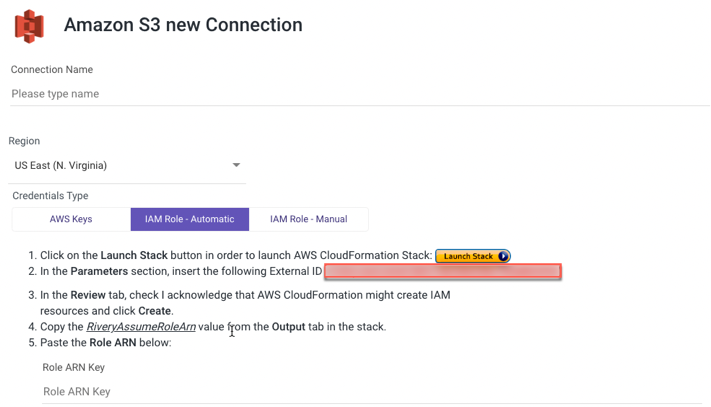
- Check 'I acknowledge that AWS CloudFormation may create IAM resources' in the Review tab, then click Create.
- Copy the value of 'RiveryAssumeRoleArn' from the Output tab in the stack.
- Paste the Role ARN Key.
- Use the Test Connection function to see if your connection is up to the task.
If the connection succeeded, you can now use this connection in Rivery.
IAM Role - Manual
Type in the Connection Name.
From the drop-down menu, choose your Region.
Select IAM Role - Automatic credentials type.
Initiate the AWS IAM console.
Click Policies on the side menu, and select Create Policy.
a. Navigate to the JSON tab.
b. Copy the following policy:
{
 "Version":"2012-10-17",
 "Statement":[
   {
    "Sid":"RiveryManageFZBucket",
    "Effect":"Allow",
    "Action":[
    "s3:GetBucketCORS",
    "s3:ListBucket",
    "s3:GetBucketAcl",
    "s3:GetBucketPolicy"
     ],
    "Resource":"arn:aws:s3:::<RiveryFileZoneBucket>"
   },
   {
    "Sid":"RiveryManageFZObjects",
    "Effect":"Allow",
    "Action":[
      "s3:ReplicateObject",
      "s3:PutObject",
      "s3:GetObjectAcl",
      "s3:GetObject",
      "s3:PutObjectVersionAcl",
      "s3:PutObjectAcl",
      "s3:ListMultipartUploadParts"],
    "Resource":"arn:aws:s3:::<RiveryFileZoneBucket>/*"
  },
  {
     "Sid":"RiveryHeadBucketsAndGetLists",
     "Effect":"Allow",
     "Action":"s3:ListAllMyBuckets",
     "Resource":"*"
  }
 ]
}
c. Paste the Policy it into the description box, then click Review Policy.
- Name the Policy - 'Rivery-S3-Policy' and click Create Policy.
- Click Roles on the side menu, and select Create Role.
- Select Another AWS Account and change the Account ID to the one you were given in the Rivery console.
- Check Require External ID, and set External ID to the one you were given in the Rivery console.
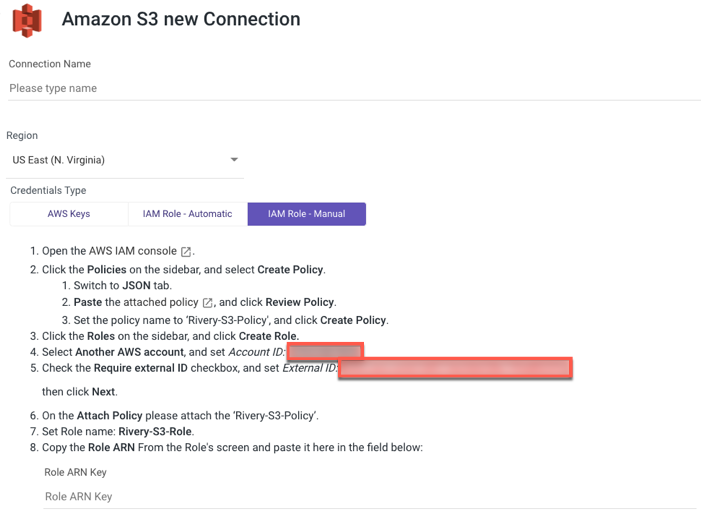
- Click Next.
- Attach the 'Rivery-S3-Policy' to the Attach Policy form.
- Set Rivery-S3-Role as the role name.
- Copy the Role ARN From the Role's window and paste it into the field below.
- Use the Test Connection function to see if your connection is up to the task.
If the connection succeeded, you can now use this connection in Rivery.
Setting up Amazon S3 as a Target Procedure
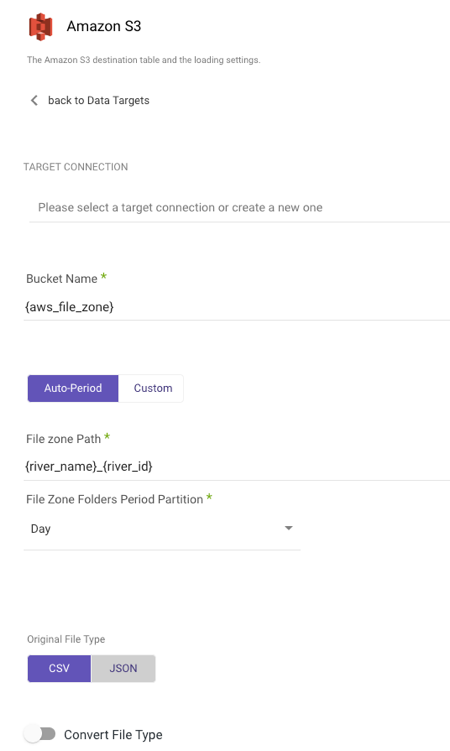
After you've established a connection, choose your Target Connection.
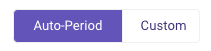
Select the type of partition granularity:
- Auto-Period
- Custom
By default, the Auto-Period option allows for data partitioning into periods as granular as minutes. However, if additional partitioning is required beyond the default granularity, users can select the Custom option.
Auto-Period Partition
a. Type in your Bucket Name.
b. Enter the FileZone path from your S3 storage. Here's an example:
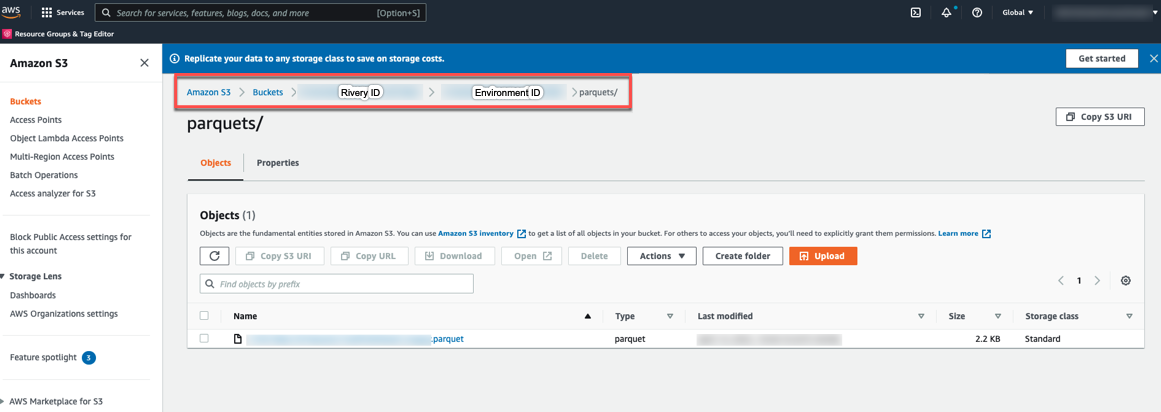
- Set the period partition timeframe for a FileZone folder.
Custom Partition
Custom partition granularity path allows you to specify the exact partitions that are used when loading data. This can help optimize the performance of your Rivers.
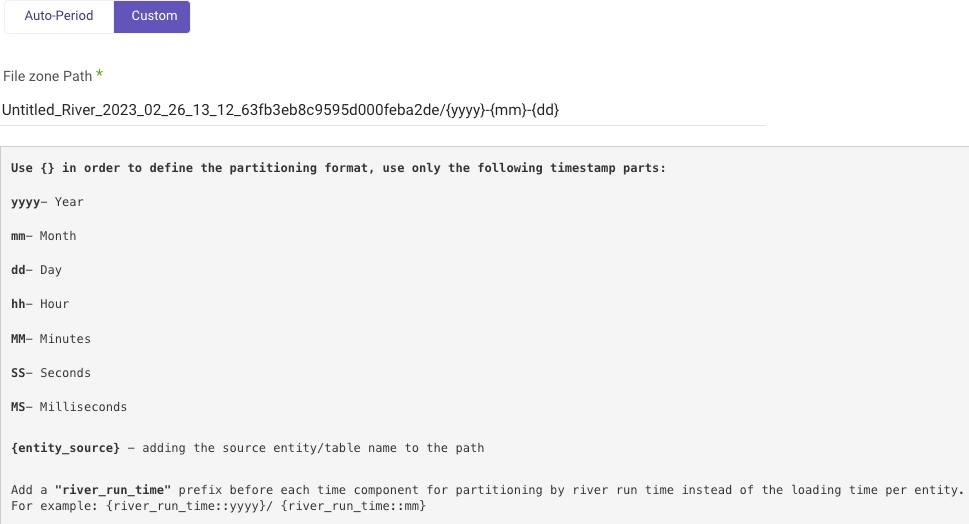
To configure custom partition granularity path:
a. Type in your Bucket Name.
b. Enter the Custom FileZone Path from your S3 storage.
Using the template:
{river_name}_{river_id}/{yyyy}{mm}{dd}_{hh}{MM}{SS}{MS}/{entity_source}.
c. Specify the granularity variables:
- yyyy - The numerical value representing a specific year (4 digits).
- mm - The month's numeric identifier within a calendar year (01, 03, 05, 12 ,etc).
- dd - The corresponding day on the 7 day week (1, 2, 7, etc).
- hh - The corresponding hour on the 24-hour clock (9, 10, 12, etc)
- SS - Seconds
- MS - Milliseconds
- entity_source - Using entity names for multi-tables Sources is beneficial as it allows for the creation of a separate folder for each table within the entity.
- entity_target - Including the name of the Target entity/table in the path.
- river_run_time - To partition by River run time rather than loading time per entity, use the "river_run_time" prefix before each time component. This means adding "river_run_time" before the year, month, day, or any other time component you want to use.
See example 3 below.
Please Note:
You are not required to input all variables, rather just input the ones that are most effective for your needs.
The option is only available for the sources listed below:
- Adobe Analytics
- Airtable
- App Store Connect - Sales
- Bing Ads
- Bluesnap
- Delta projects
- Display & Video 360
- DoubleClick Campaign Manager
- Facebook Ads
- Google Ad Manager
- Google Ads
- Google Analytics
- Google Cloud Storage
- Hasoffers
- Hubspot
- Linkedin Ads
- Mixpanel
- Moat Analytics
- MySQL
- Oracle
- Outbrain
- PostgreSQL
- Salesforce
- Sprinklr
- SQL Server
- Stripe
- Tiktok
- Twitter Ads
- Verta Media
- Snowflake Source
Here are some examples
1. Template input: {river_name}_{river_id}/{yyyy}-{mm}-{dd}_{hh} —>
s3://demo-bucket/mysql_to_S3_63b6a63a109fe00013417086/2023-01-05/items/d0e94c9a90d34b669309d36c5b1abc12_mysql_items_7615f00000PFqjiAAD_7525f00000Dfo2C.csv


2. Template input: {river_name}_{river_id}/{yyyy}-{mm}-{dd}_{hh}:{MM}:{SS}:{MS}/{entity_source} —>
s3://demo-bucket/google_ad_manager_to_S3_63b6a63a109fe00013417086/2023-01-05_20:30:12:13/line_items/c0e94c9a90c34b669309d36c5b1abc12_ad_manager_line_items_7515f00000PFqjiAAD_7525f111110Dao2C.csv


3. Template input: Salesforce/{river_run_time::yyyy}{river_run_time::mm}{river_run_time::dd}_{river_run_time::hh}{river_run_time::MM}{river_run_time::SS}{river_run_time::MS}/{entity_source}  —>
s3://demobucket/Salesforce/20230105_20301213/leads/d0e94c9a90d34b669309d36c5b1abc12_salesforce_Lead_7615f00000PFqjiAAD_7525f00000Dfo2C.csv
d. Rivery will automatically set your data into partitions of the specified varialbes when loading data.
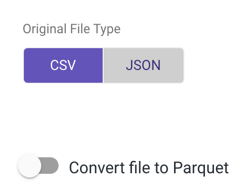
- Select the original file type, then toggle to true if you want to convert the file to a Parquet file type.
- Any Source to Target River can now send data to your S3 bucket.
Parquet File Type
Rivery allows you to convert CSV/JSON files to Parquet directories.
Parquet is an open source file format designed for flat columnar data storage. Parquet works well with large amounts of complex data.
Toggle to true to convert your original file type to a Parquet:
Please Note:
- Webhook and Storage Files (with the exception of Amazon S3 and Email) are not currently supported but will be in the near future.
- When PostgreSQL is used as a source, the Parquet file format is supported only for Standard Extraction and not for Change Data Capture.
CDC File Storage Structure for S3 Target
When loading Change Data Capture (CDC) files into Amazon S3 as the target, the data is organized using a hierarchical folder structure to optimize retrieval and management. The structure consists of the following components:
Top-Level Folder Structure
The primary folder path is defined using a prefix based on the account ID and River ID, followed by a source-side identifier. This identifier includes the MongoDB database name and the collection name, ensuring a structured and source-representative organization.
File Zone Partitioning
Within the top-level folder, data is partitioned into File Zone Folders, which are structured based on configurable time intervals. The partitioning options include:
- Daily partitions (
day=) - Hourly partitions within a day (
day-hour=) - Weekly partitions (
day-hour-week=)
The choice of partitioning depends on the system configuration and the volume of data ingested.
Incoming Data Timestamp Folder
Inside each time-based partition folder, an additional timestamp subfolder is created to group files by their ingestion time. This is labeled in the format:
Was this article helpful?