Setting up Google BigQuery as a Target
  • 6 Minutes to read
  • Dark
    Light
  • PDF

Setting up Google BigQuery as a Target

  • Dark
    Light
  • PDF

Article summary

Overview

Before you use this guide, please make sure you’ve signed up for the Google Cloud Platform and that you have a console admin user.

If you don’t have one of these prerequisites, click here.

With Rivery you can either choose to leverage the automatically created service account and bucket for your account or set your own.

This guide will walk through creating the following in order to create a connection to BigQuery within Rivery:

For Rivery default service account and bucket: 

  • Enable BigQuery API
  • Grant permissions to the service account on your project.
  • Create a BigQuery dataset

For custom service account and bucket:

  • Google Cloud Service Account
  • Enable Cloud Storage and BigQuery APIs
  • Google Cloud Storage Bucket
  • Create a BigQuery dataset

At the end of this guide, you will be able to quickly connect your BigQuery account to Rivery from inside the tool.

Working with Rivery Default File Zone (Default Service Account and Bucket)

Rivery automatically creates a dedicated service account and GCS bucket for your ease of use.
The service account only has access to the dedicated bucket created.

Enable BigQuery API

  1. Go to API's & Services on the Google Cloud Console menu pane -> Click on Library.
  2. Search for Google Cloud Storage JSON API and click on Enable.
    setting-up-google-bigquery-as-a-target_mceclip24.png
  3. Search for BigQuery API and click on Enable .
    setting-up-google-bigquery-as-a-target_mceclip33.png


Grant permission to the service account

Rivery uploads your source data into a dedicated Google Cloud Storage bucket. Your BigQuery project then pulls in data from this storage bucket. To access the BigQuery project, you will need to grant permission to the service account to the relevant BigQuery project.

Your service account is located in the BigQuery create connection screen: 

  1. Sign in to Google Cloud Platform Console. Make sure you are on the desired project.
  2. Go to IAM & Admin  -> IAM.
  3. Click on +add.
  4. In the new window add the service account created by Rivery.
    You can find the service account in the BigQuery connection screen
  5. Choose the BigQuery Admin role and click save.

Configure Your BigQuery in Rivery

For our last step we will configure a BigQuery connection within Rivery:

  1. Log into Rivery.
  2. Create a new connection for your BigQuery instance:
    • Go to Connections.
    • Select New Connection.
    • From the source list, choose Google BigQuery
  3. Next, enter the credentials information for your Google Platform Service Account:
    1. Connection Name
    2. Description (optional)
    3. Project Id (can be found on the Google Cloud Platform Home section)
    4. Project Number (optional - can be found on the Google Cloud Platform Home section)
    5. Region - Where your default bucket and dataset(if created VIA a river) will be created (default is USA)


Click 'Test Connection' at the bottom to test! Once a valid connection is made, save the connection.

If you cannot get a valid connection set up, contact helpme@rivery.io for support.

That's it, you now have a working connection to BigQuery you can use in RIvery.

If you'd like to create a dataset (optional) please see the create a BigQuery Dataset section below 

Working with Rivery Custom File Zone (Custom Service Account and Bucket)

Create a Service Account User for Rivery

Rivery uploads your source data into a Google Cloud Storage bucket. Your BigQuery project then pulls in data from this storage bucket. To access the relevant storage bucket and BigQuery project, you will need to first create a user in the Google Cloud Platform Console that has access to the relevant bucket and the relevant BigQuery project.


In order to create a new service account in Google Cloud Platform,
please make sure your user has a ServiceAccountAdmin role.

Now, let’s create a service account in the GCP Console:

  1. Sign into Google Cloud Platform Console .

  2. Go to IAM & Admin  -> Service account
    image.png

  3. Click on CREATE SERVICE ACCOUNT .
    setting-up-google-bigquery-as-a-target_mceclip1.png

  4. Set your Service Account name (i.e: RiveryUser)

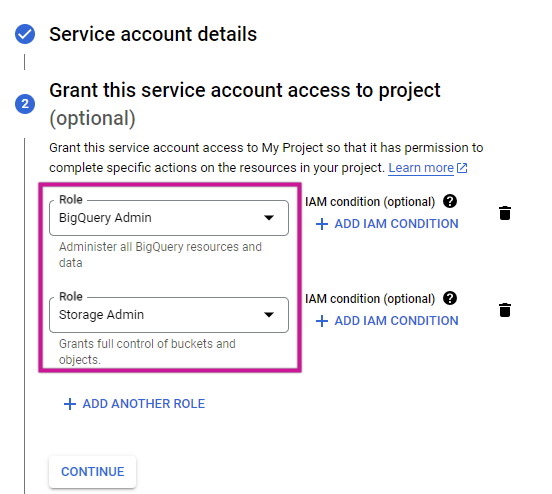
  5. Set Roles


    Storage Admin
    BigQuery Admin

  6. Copy your Account Service ID / Email from the service account list. You will enter this later in a Rivery connection.

  7. Mark the Checkbox - Furnish a new private key and in the key type options, choose JSON.

  8. Click on the CREATE button. Your JSON secret key will download. Keep track of this key file as you will need to import it in a forthcoming step.

Enable Cloud Storage and BigQuery API

  1. Go to API's & Services on the Google Cloud Console menu pane -> Click on Library.

  2. Search for Google Cloud Storage JSON API and click on Enable . setting-up-google-bigquery-as-a-target_mceclip24.png

  3. Search for BigQuery API and click on Enable . setting-up-google-bigquery-as-a-target_mceclip33.png

Create a Google Cloud Storage Bucket

Rivery needs a Google Cloud Storage bucket to operate as a file-zone before your data is uploaded to BigQuery.

  1. Sign into the Google Cloud Platform Console .

  2. In the menu pane on the left, go to Storage -> Browser.

image.png

  1. Click on the CREATE BUCKET button.
    setting-up-google-bigquery-as-a-target_mceclip46.png
  2. In the wizard:
    • Set Bucket Name (example:project_name_rivery_file_zone)
    • Set your Bucket to Region and choose your preferred location
    • Click the CREATE button

Create a BigQuery Dataset

You can leverage an existing dataset or have Rivery automatically create a dataset for you bymanually inserting the dataset name in yoursource to target river.
However, you may choose to manually create your data set by following these steps:

  1. Sign in to the Google Cloud Platform Console.

  2. On the menu pane to the left, go to BigQuery. The Google BigQuery editor will open.

image.png

  1. Go to the left sidebar -> Select your Project Name

  2. To the right of the page, in the bottom half of the editor, click on the CREATE DATASET button:setting-up-google-bigquery-as-a-target_mceclip53.png

  3. In the wizard:

    • Set the Dataset ID
    • Set the region, please make sure the region corresponds with the Google Cloud Storage bucket region you are going to use.
      More details here: https://cloud.google.com/storage/docs/locations
    • Click the Create dataset button.

Configure your BigQuery in Rivery

Next, we need to configure a connection to BigQuery within Rivery:

  1. Log into Rivery.
  2. Create a new connection for your BigQuery instance:
  3. Next, enter the credentials information for your Google Platform Service Account: 
    1. Connection Name
    2. Description (optional)
    3. Project Id (can be found on the Google Cloud Platform Home section)
    4. Project Number (optional - can be found on the Google Cloud Platform Home section)
    5. Region - select the region your bucket is located
      Your bucket and dataset region must be compatible! 
      In Rivery, there is a strict region definition; the region in the connection must match the region of the datasets.
      For more information: 

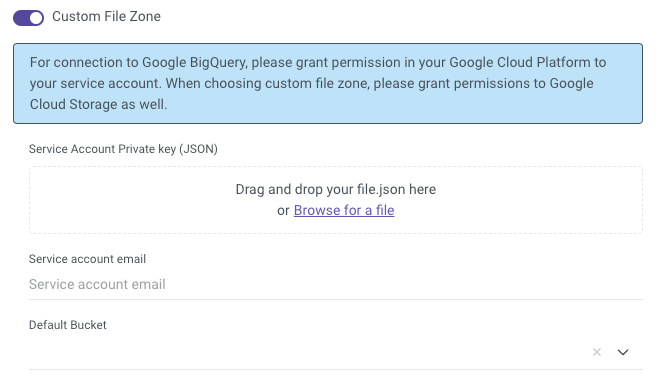
  4. Enable the custom file zone and enter the  credentials:

    1. Service Account email - the Service Account Id that you copied from the Service Account Wizard
    2. Choose file - upload the JSON file that was generated when you created a Service Account

    3. Default Bucket- click on the blue arrow button to pull all available buckets or insert one manually,


Click 'Test Connection' at the bottom to test! Once a valid connection is made, save the connection.

If you cannot get a valid connection set up, contact helpme@rivery.io for support.


Additional Options

Data Type Widening (Schema Shift)

When the data type of a column ischanged in the Source table, the corresponding Target column will be adjusted to accommodate the "wider" data type by default.

For instance, if the original field changes from an Integer to a String, the target data type will be modified to a String since it canencapsulate integer values. On the other hand, if the column has been changed from a String to a Date, it will retain its String data type in the target.

The toggle located in the Additional Options section guarantees that these changes will take effect as the default behavior. If you wish to disable this option and cause the River to fail in the case of a data type mismatch, you can set the toggle to false.

Please Note:

To receive notifications about these changes, it is advisable to set the "On Warning" toggle to the true in the settings tab.

Known Issues

  • Sometimes the "Storage Admin" type user role does not have a certain permission "storage.buckets.get" given to it by default.

In this case, you will have to edit your GCP user roles edit your GCP user roles by duplicating that "Storage Admin" role by clicking

image.png making sure the custom role you create has the storage.buckets.get permission, then assigning your service account this custom role instead of the "Storage Admin" (See the "Create a Service Account User for Rivery" section of this document).

  • Requirement for Consistent Locations for the Connection and Dataset ID in BigQuery:
    When using Bigquery as a Target, it's crucial to ensure that the connection and Dataset ID originate from the same location (region). Failure to do so will result in a loading error displayed by Bigquery: 
    Loading to BigQuery failed: BigQuery failed to load job. Error: Cannot read and write in different locations


Was this article helpful?