- 3 Minutes to read
- Print
- DarkLight
- PDF
Creating a Connection To Google BigQuery as a Target
- 3 Minutes to read
- Print
- DarkLight
- PDF
Introduction
This guide provides step-by-step instructions for setting up a connection between Rivery and Google BigQuery as a target. You will learn how to configure your Google Cloud Platform (GCP) account, set up the necessary resources, and create a connection in Rivery. The guide also covers options for managing service accounts and Google Cloud Storage buckets, whether you choose to use Rivery’s managed resources or configure your own via a Custom File Zone.
Additionally, you will find details on handling schema drifts and troubleshooting common issues.
By following this guide, you'll be able to successfully transfer data from Rivery to Google BigQuery.
Prerequisites
Before using this guide, ensure you have signed up for the Google Cloud Platform (GCP) and have a console admin user to manage the necessary resources.
To proceed, complete the following:
- Enable BigQuery API
- Enable Google Cloud Storage JSON API
- BigQuery Dataset: Ensure you have an available dataset or create a new one if needed.
- Google Cloud Storage Bucket: Required only if you opt for the Custom File Zone setup.
Step 1: Create a Google BigQuery Connection in Rivery
In the Rivery console, navigate to
Connections>New Connectionand select Google BigQuery (Target).Retrieve your Google Cloud Platform Project ID and Project Number from the GCP console home page.

Enter these values in the Rivery connection screen.
Select the region where your BigQuery dataset is located.
Step 2: Choose Service Account Management (File Zone Setup)
You can either use Rivery’s default service account and storage bucket or opt to manage your own via the "Custom File Zone" toggle:
- Default (Custom File Zone OFF): Rivery automatically provisions a service account and Google Cloud Storage bucket.
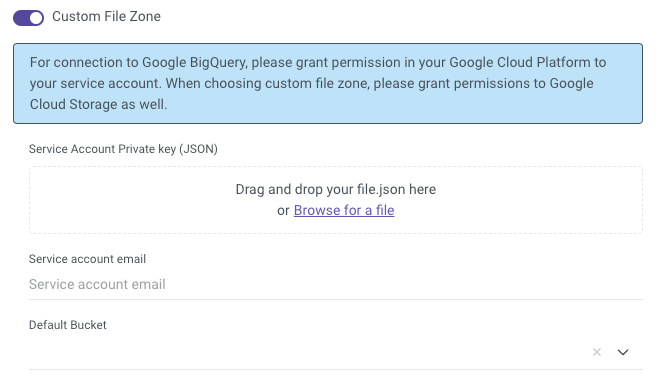
- Custom File Zone (Custom File Zone ON): If you toggle this ON, Rivery will use a Google Cloud Storage bucket you manage. This option stages data in your own Google Cloud bucket before inserting it into BigQuery.
2.1. Working with Rivery’s Default File Zone
Rivery automatically creates and manages a dedicated service account and Google Cloud Storage bucket. However, you need to grant access to Rivery’s service account.
Steps to Grant Permission:
- Sign in to Google Cloud Platform Console.
- Navigate to
IAM & Admin>IAM. - Click +GRANT ACCESS.
- Add the Rivery service account as the principal.
- Assign the BigQuery Admin role and click Save.
- Go to 'API & Services' > 'Library'.
- Look for BigQuery API and Cloud Storage JSON API, and enable each by clicking Enable.
2.2. Working with a Custom File Zone
When you use the "Custom File Zone" option, Rivery stages data in a Google Cloud Storage bucket that you manage within your GCP project.
Steps to Set Up:
Ensure your GCP user has the ServiceAccountAdmin role.
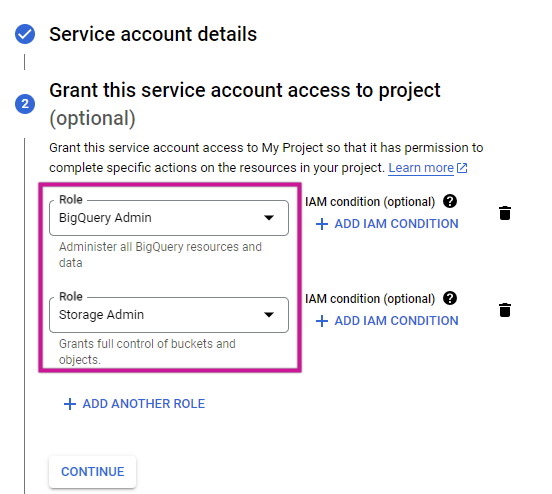
Create a new service account in the GCP Console:
- Go to
IAM & Admin>Service Accounts. - Click CREATE SERVICE ACCOUNT.
- Set the service account name (e.g., RiveryUser).
- Assign BigQuery Admin and Storage Admin roles.

- Go to
Copy the Service Account ID / Email.
Manage keys for the service account by selecting Manage Keys > ADD KEY > Create new key (JSON). This will download the key locally.
Upload the JSON key to the Rivery connection.
Enter your Google Cloud Storage bucket name in the Default Bucket field. If Rivery cannot detect the bucket list, manually enter the bucket name (see Known Issues section if permissions are incorrect).

Additional Configuration Options
Data Type Widening (Schema Drift)
When the data type of a column changes in the source table, Rivery automatically adjusts the target table to accommodate a "wider" data type. For example:
- If a column changes from an Integer to a String, the target data type will become a String to encapsulate the integer values.
- If a column changes from a String to a Date, it will remain a String in the target.
You can enable or disable this behavior using the toggle in the Additional Options section:
- If ON, the River will adjust data types automatically.
- If OFF, the River will fail when encountering data type mismatches.
Notifications:
To receive warnings about data type changes, set the On Warning toggle to True in the settings.

Known Issues
Storage Admin Permissions: The default "Storage Admin" role may lack the
storage.buckets.getpermission. If this occurs:- Duplicate the "Storage Admin" role and add the missing permission.
- Assign the custom role to your service account.
Location Consistency: When using BigQuery as a target, ensure that the connection and BigQuery Dataset ID are in the same location (region). Mismatched locations will result in errors such as:
Error: Cannot read and write in different locations.

