Amazon S3 as a Source Connection
- 3 Minutes to read
- Print
- DarkLight
- PDF
Amazon S3 as a Source Connection
- 3 Minutes to read
- Print
- DarkLight
- PDF
Article summary
Did you find this summary helpful?
Thank you for your feedback!
This is a step-by-step tutorial for creating an Amazon S3 connection.
Prerequisites
Create a Bucket
A bucket is an object container. To store data in Amazon S3, you must first create a bucket and specify a bucket name as well as an AWS Region. Then you upload your data as objects to that bucket in Amazon S3. Each object has a key (or key name) that serves as the object's unique identifier within the bucket.
Let's begin by logging into AWS and searching for Buckets:
Note:
This is a tour of the console. Please hover over the rippling dots and read the notes attached to follow through.
Add an IAM Policy
An IAM policy is a resource-based policy that can be attached to an IAM Role to grant permissions.
Let's create a policy to grant the necessary permissions.
Please Note:
Make sure to repleace < RiveryFileZoneBucket > with the name of your S3 bucket.
Here's the policy's code:
{
 "Version":"2012-10-17",
 "Statement":[
   {
    "Sid":"RiveryManageFZBucket",
    "Effect":"Allow",
    "Action":[
    "s3:GetBucketCORS",
    "s3:ListBucket",
    "s3:GetBucketLocation"
     ],
    "Resource":"arn:aws:s3:::<RiveryFileZoneBucket>"
   },
   {
    "Sid":"RiveryManageFZObjects",
    "Effect":"Allow",
    "Action":[
      "s3:ReplicateObject",
      "s3:PutObject",
      "s3:GetObjectAcl",
      "s3:GetObject",
      "s3:PutObjectVersionAcl",
      "s3:PutObjectAcl",
      "s3:ListMultipartUploadParts"],
    "Resource":"arn:aws:s3:::<RiveryFileZoneBucket>/*"
  },
  {
     "Sid":"RiveryHeadBucketsAndGetLists",
     "Effect":"Allow",
     "Action":"s3:ListAllMyBuckets",
     "Resource":"*"
  }
 ]
}
Create a Rivery User in AWS
Now, in order to connect to the Amazon S3 Source and Target (described in the following section) in Rivery console, you must first create an AWS Rivery user:
Connection Procedure
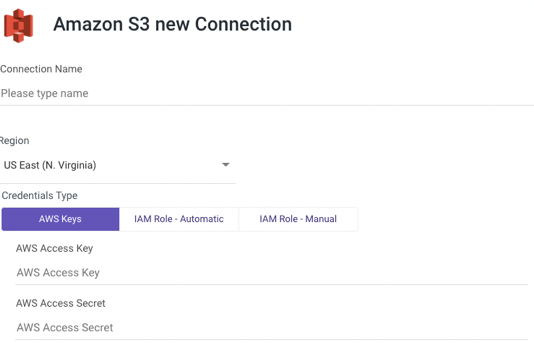
AWS Keys
- Type in the Connection Name.
- From the drop-down menu, choose your Region.
- Select AWS Keys credentials type.
- Enter Your AWS Access key id and Secret access key.
- Use the Test Connection function to see if your connection is up to the task.
If the connection succeeded, you can now use this connection in Rivery.
IAM Role - Automatic
- Type in the Connection Name.
- From the drop-down menu, choose your Region.
- Select IAM Role - Automatic credentials type.
- To initiate the AWS CloudFormation Stack, click the Launch Stack button.
- Replace the External ID in the Parameters section with the one you were given in the Rivery console.
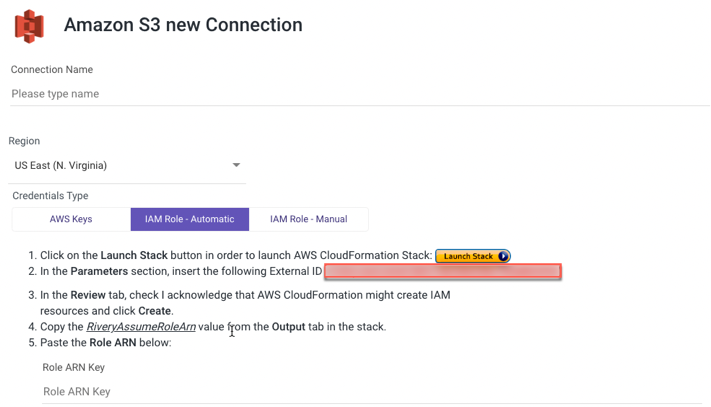
- Check 'I acknowledge that AWS CloudFormation may create IAM resources' in the Review tab, then click Create.
- Copy the value of 'RiveryAssumeRoleArn' from the Output tab in the stack.
- Paste the Role ARN Key.
- Use the Test Connection function to see if your connection is up to the task.
If the connection succeeded, you can now use this connection in Rivery.
IAM Role - Manual
Type in the Connection Name.
From the drop-down menu, choose your Region.
Select IAM Role - Automatic credentials type.
Initiate the AWS IAM console.
Click Policies on the side menu, and select Create Policy.
a. Navigate to the JSON tab.
b. Copy the following policy:
{
 "Version":"2012-10-17",
 "Statement":[
   {
    "Sid":"RiveryManageFZBucket",
    "Effect":"Allow",
    "Action":[
    "s3:GetBucketCORS",
    "s3:ListBucket",
    "s3:GetBucketAcl",
    "s3:GetBucketPolicy"
     ],
    "Resource":"arn:aws:s3:::<RiveryFileZoneBucket>"
   },
   {
    "Sid":"RiveryManageFZObjects",
    "Effect":"Allow",
    "Action":[
      "s3:ReplicateObject",
      "s3:PutObject",
      "s3:GetObjectAcl",
      "s3:GetObject",
      "s3:PutObjectVersionAcl",
      "s3:PutObjectAcl",
      "s3:ListMultipartUploadParts"],
    "Resource":"arn:aws:s3:::<RiveryFileZoneBucket>/*"
  },
  {
     "Sid":"RiveryHeadBucketsAndGetLists",
     "Effect":"Allow",
     "Action":"s3:ListAllMyBuckets",
     "Resource":"*"
  }
 ]
}
c. Paste the Policy it into the description box, then click Review Policy.
- Name the Policy - 'Rivery-S3-Policy' and click Create Policy.
- Click Roles on the side menu, and select Create Role.
- Select Another AWS Account and change the Account ID to the one you were given in the Rivery console.
- Check Require External ID, and set External ID to the one you were given in the Rivery console.
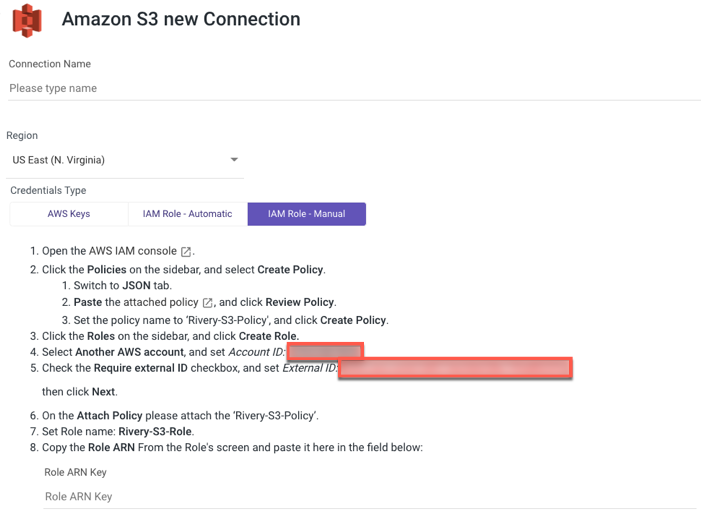
- Click Next.
- Attach the 'Rivery-S3-Policy' to the Attach Policy form.
- Set Rivery-S3-Role as the role name.
- Copy the Role ARN From the Role's window and paste it into the field below.
- Use the Test Connection function to see if your connection is up to the task.
If the connection succeeded, you can now use this connection in Rivery.
Was this article helpful?