AWS Private Link
- 6 Minutes to read
- Print
- DarkLight
- PDF
AWS Private Link
- 6 Minutes to read
- Print
- DarkLight
- PDF
Article summary
Did you find this summary helpful?
Thank you for your feedback!
AWS PrivateLink Introduction
PrivateLink is exclusively available to users on the Enterprise plan
What is PrivateLink
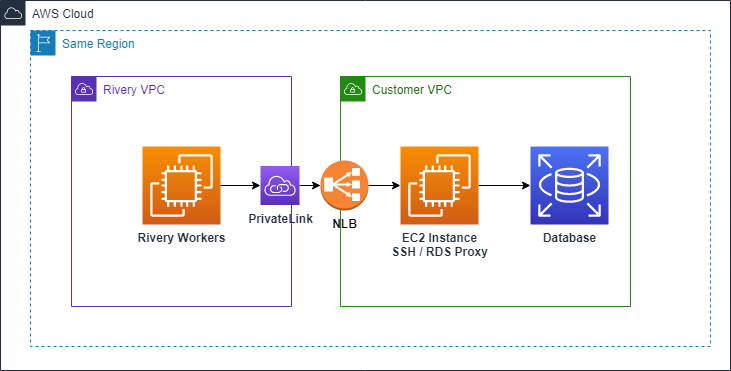
PrivateLink is a service AWS provides us. It allows a direct connection between VPCs, even if they reside in separate AWS accounts.
This service does not require a VPN Peering connection.
Here is a diagram illustrating the basic parts of this type of connection:
Basic terms
Here are some basic terms we need to understand before we set up a PrivateLink connection:
Provider (Client)
The service provider: An AWS account that a Consumer can connect to, and access the resources it exposes.
The provider must explicitly list which IAM Principals are allowed to find it, accept new connection requests, and handle routing within the source VPC.
Consumer (Rivery)
The service consumer: The AWS account that connects to the Provider and consumes the contents it wants.
Only Consumers can access Providers. It's a unidirectional link.
VPC Endpoint Service
The service that the Provider has to create in order to expose a specific load balancer.
This has to be an NLB (Network Load Balancer) within the VPC you want to expose.
Within the Endpoint Service, you need to whitelist the IAM Principals allowed to discover it.
Each Endpoint Service has a Service Name, which is used by Endpoint Interfaces to discover it.
VPC Endpoint / VPC Endpoint Interface
The endpoint (sometimes called endpoint interface) created on the consumer side's VPC to connect to the Endpoint Service in the Provider.
The interface creates an actual DNS Endpoint accessible to the source VPC (meaning only the Consumer)
AWS IAM Principal
The identifier of an AWS account: A standard AWS ARN format representing an IAM user.
This is the IAM Prinicipal for Rivery: arn:aws:iam::012922587834:root .
Creating a PrivateLink
General Process
If you want to use AWS PrivateLink to connect Rivery to your VPC, that's great!
In this case, Rivery is the Consumer (the initiator of the data transfer) and you are the Provider.
Please open a support ticket to initiate the process.
1. You'll need our IAM Principal (to whitelist it in your Endpoint Service) -arn:aws:iam::012922587834:root
2. Now you can start to create the PrivateLink,
once you are finished we'll then ask for the Service Name of your Endpoint Service (to create a connection request)
3. You'll then approve the request on your end.
4. Finally, we'll send you the hostname you should use when creating connections to your DB in Rivery.
And that's it, we're done! It's that simple.
Supported Regions
Canada (ca-central-1)
Frankfurt (eu-central-1)
Ireland (eu-west-1)
Israel (il-central-1)
London (eu-west-2)
Ohio (us-east-2)
Oregon (us-west-2)
Stockholm (eu-north-1)
Virginia (us-east-1)
Creating a proxy instance - Optional
In order to reach your private data sources using the private link you can use a proxy instance, that will redirect the network from Rivery connection via the PrivateLink into the client's database. This proxy can be used as one of the next purposes:
1. As a RDS proxy - If you are using RDS with MySQL/Postgresql you can use this option, please follow the Creating an RDS Proxy documentation.
2. Via SSH - This uses a SSH tunnel in order to connect to the DB, in this case, the PrivateLink (AWS Network Load Balancer) directs the network into the SSH instance, you will therefore need to configure the VPC Endpoint (PrivateLink) Hostname (which will be provided by Rivery in the end of the process)
in the SSH Tunnel part on the connection in Rivery, and the DNS of the data source in the host. In order to do so, you may use our docs about Creating an SSH Tunnel Instance.
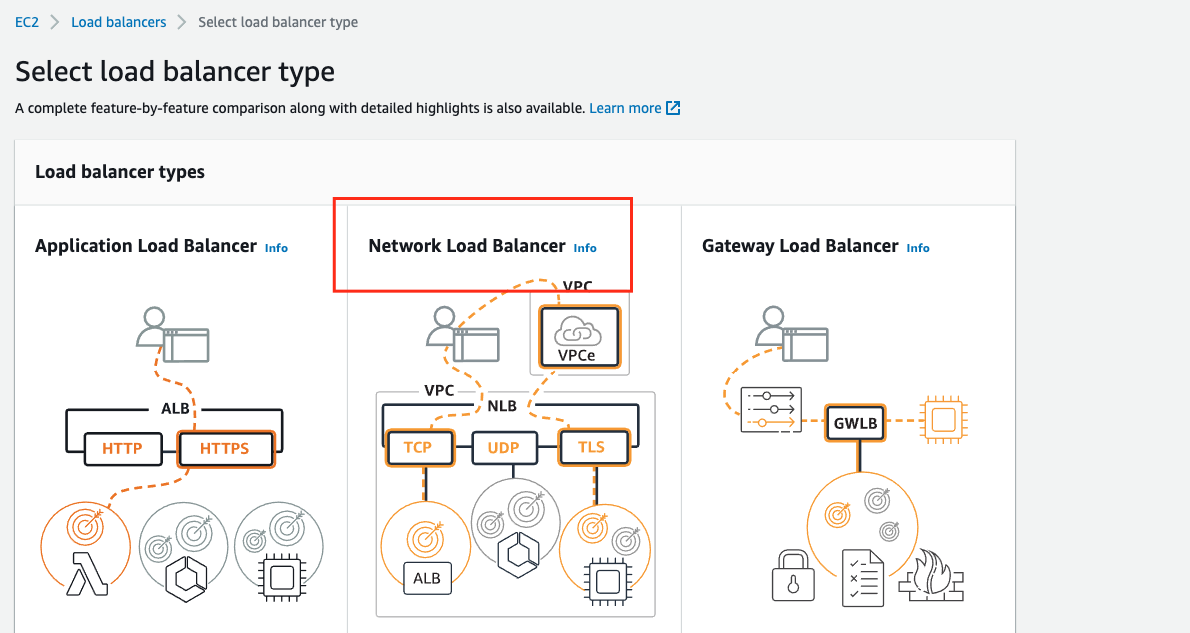
Creating an NLB
In order to expose your VPC to another account, all traffic has to go through a Network Load Balancer.
1. To create an NLB using the AWS Console, go to the EC2 Console, and in the navigation pane pick Load Balancers.
Click on Create Load Balancer, and then click Create under Network Load Balancer.

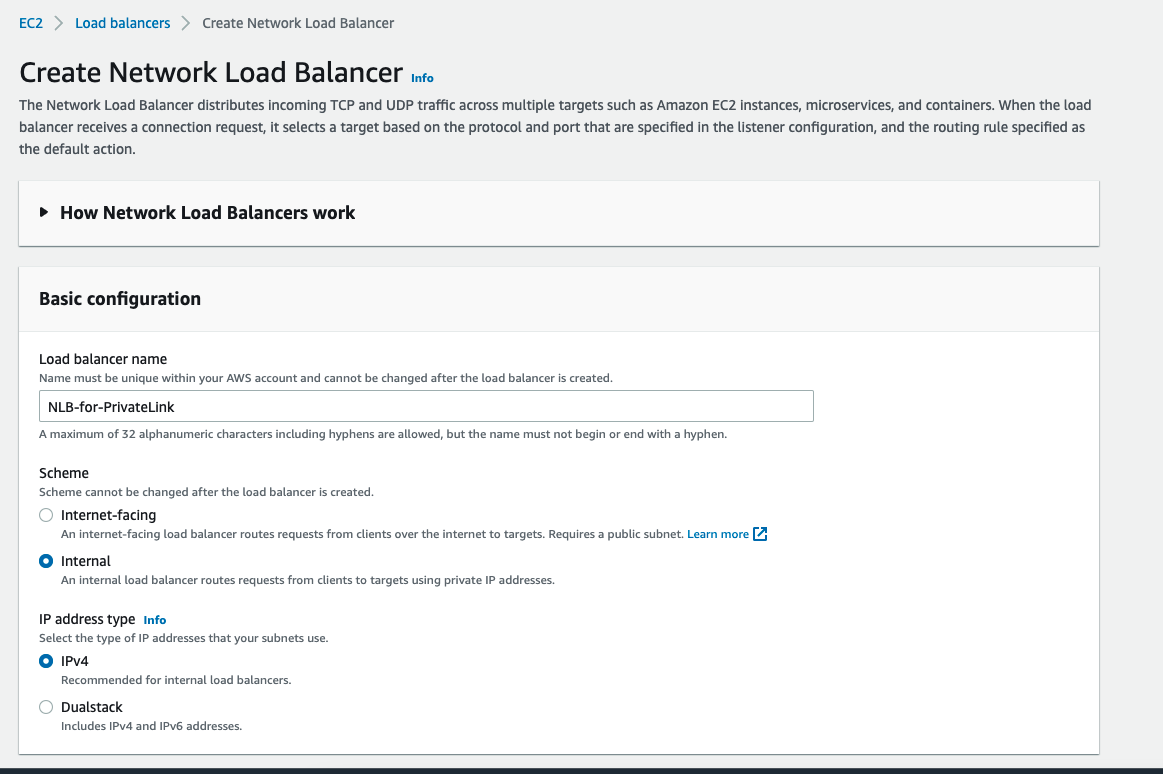
2. Make sure the Scheme is "Internal"
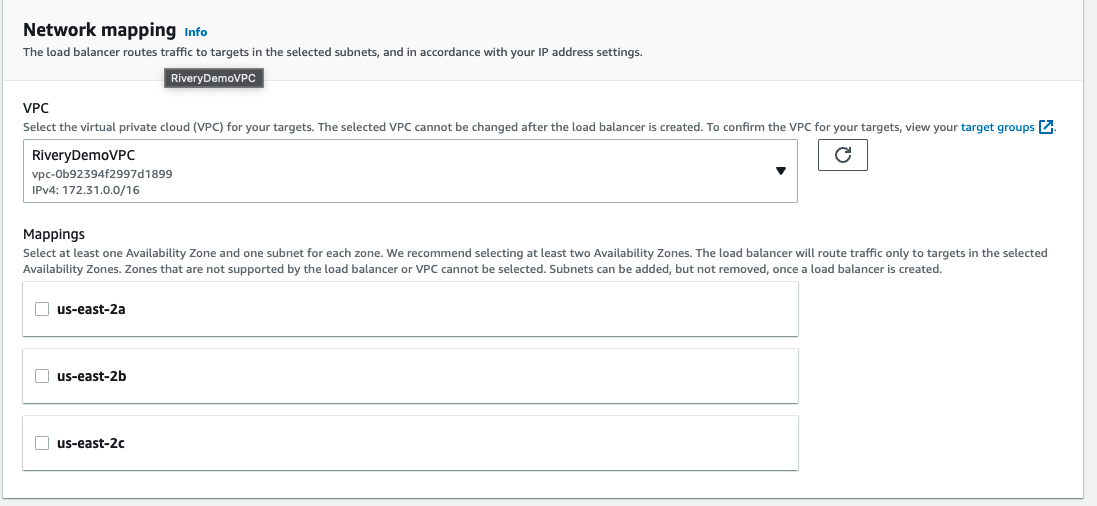
3. Network Mapping + Security Groups
3.1 Network mapping - Make sure the VPC you select is the same one that contains your data source (EC2/RDS etc..) and pick the relevant Availability Zones,
If you are not sure you can configure all available AZ's and set Cross-zone load balancing to true to make sure you can reach your data source.
3.2 Security Groups - Ensure no security groups are attached to the NLB. By default, AWS automatically attaches the NLB to your default security group. Please remove this attachment.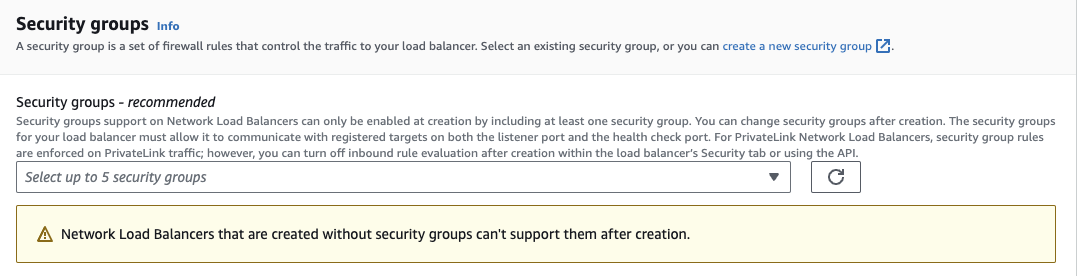
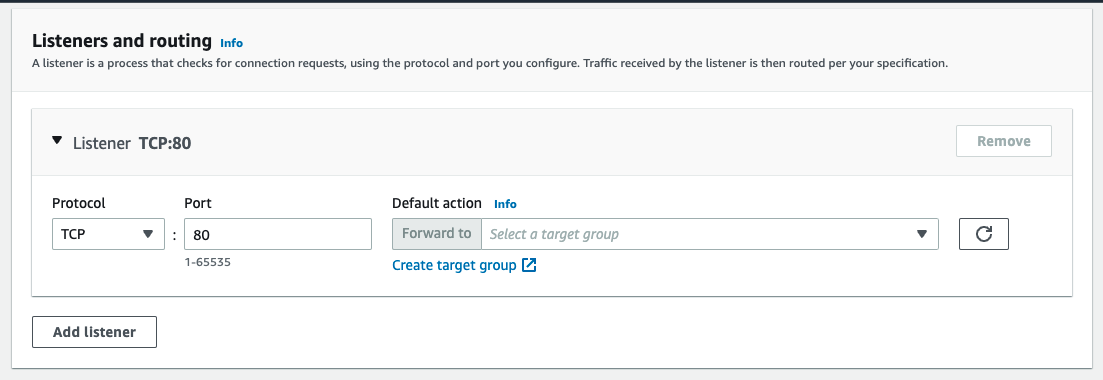
4.The listener depends on the target
4.1 If its an RDS, or RDS Proxy, create an empty target group and we will fill it using an AWS Lambda, you can follow this AWS guide to achieve that:
https://aws.amazon.com/blogs/networking-and-content-delivery/hostname-as-target-for-network-load-balancers/
4.2 if its a SSH Tunnel you will need to set a target group containing that EC2 instance,
Choose the port in which you want to reach the NLB and click Create target group
5. Create Target Group
5.1 To connect directly to a data source that is hosted on an EC2 instance, or to utilize an SSH Tunnel, pick Instances,
5.2 For RDS/RDS Proxy pick IP address and don't register any IP's, and use the mentioned guide to populate it with the destination IP's
https://aws.amazon.com/blogs/networking-and-content-delivery/hostname-as-target-for-network-load-balancers/
skip_name_resolve - 1

Move on to Register Targets, pick the relevant instances / IPs you wish to expose, and make sure to click Add to registered. Move on to the Review, make sure everything is configured to your liking, and then create. Make sure the Security Groups of the instances allow ingress traffic from the port you have chosen.
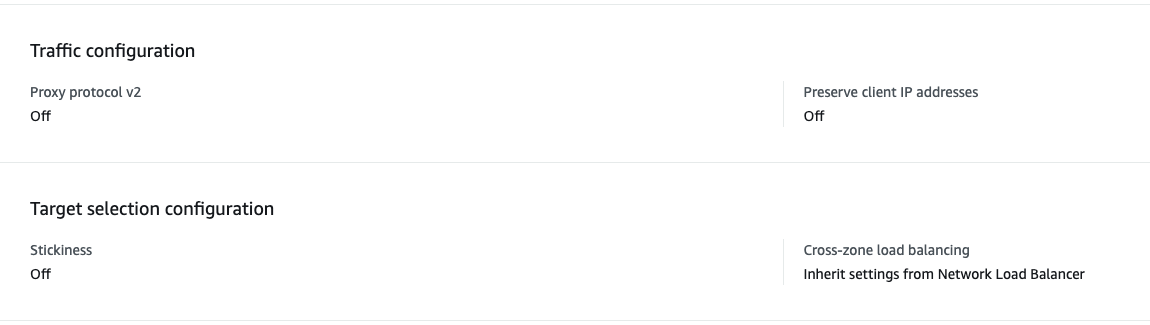
5.3 Target Group attributes - example follows
5.3.1 Please make sure Proxy protocol v2 and Preserve client IP addresses is switched off.
5.3.2 Stickiness should be Off by default, but if you think you require it please make sure by contacting support
5.3.3 Cross-Zone load balancing should be inherited from the NLB
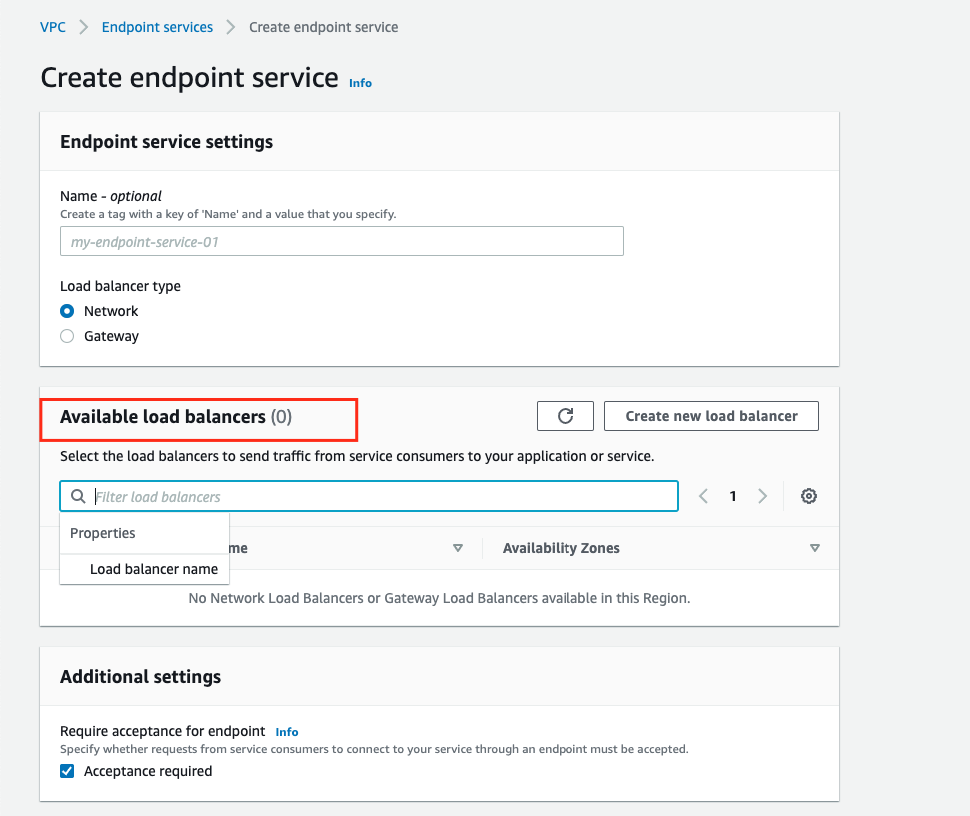
Creating an Endpoint Service
Now we have to expose the NLB we created in the last step using a VPC Endpoint Service.
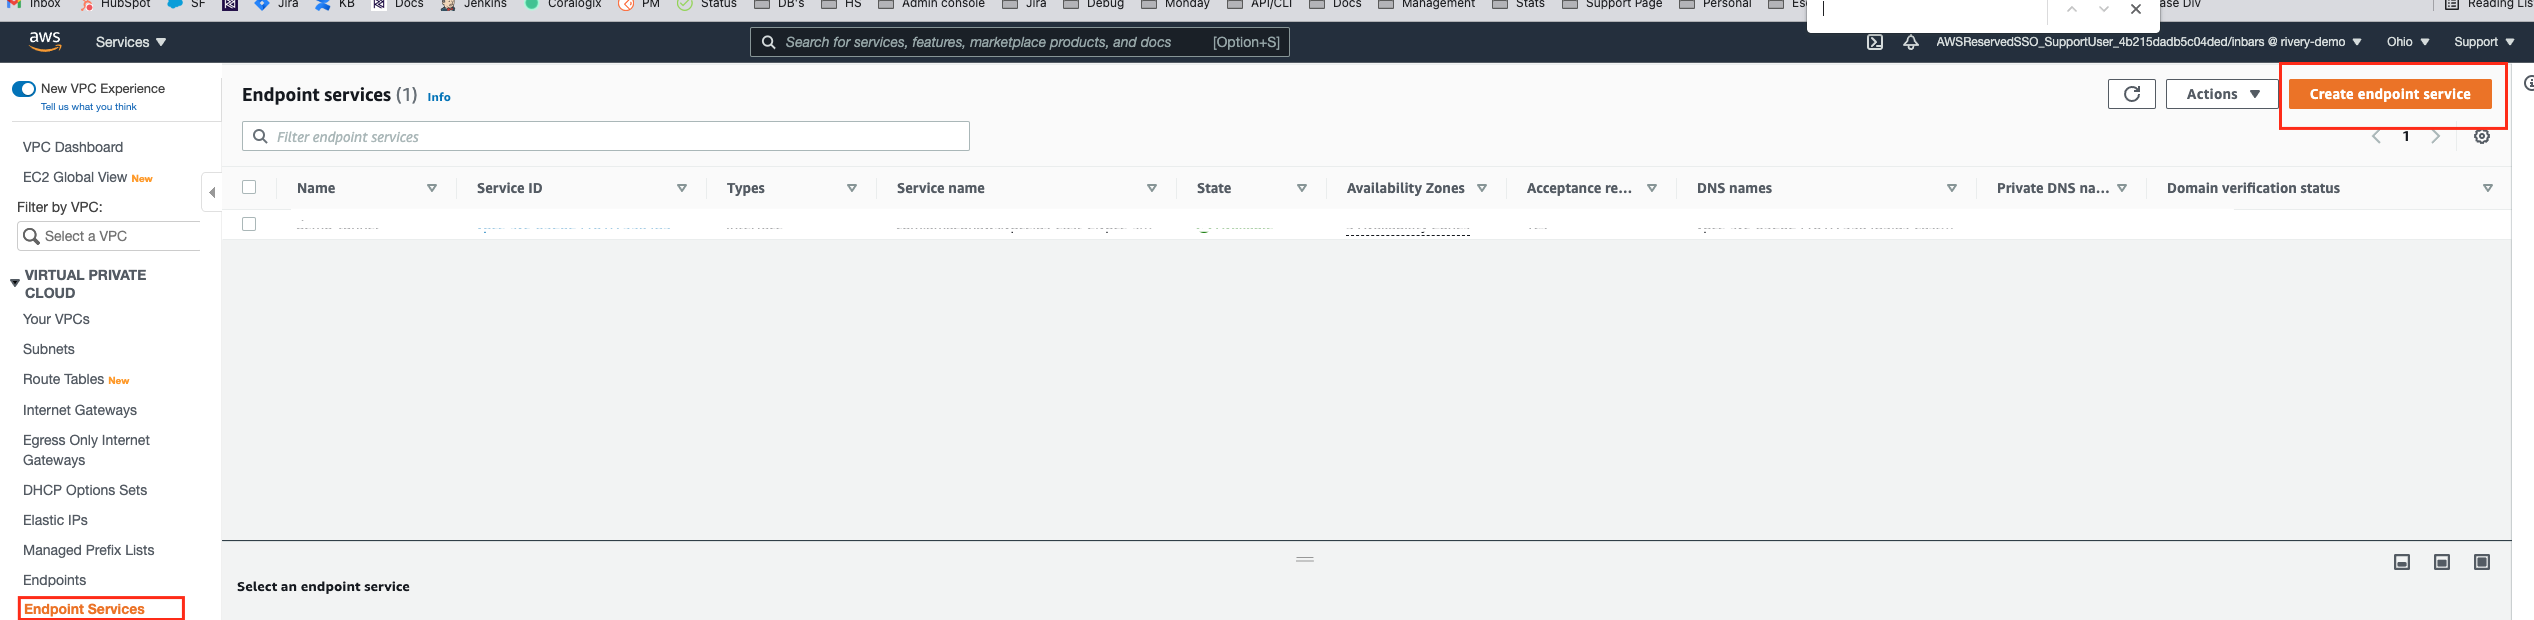
To create this service, go to the VPC Console, and in the navigation pane pick Endpoint Services.
1. Click on Create Endpoint Service, then pick the Network Load Balancer you created.
-=
2. Click on Create Service (at bottom of the page), and wait for it to finish initializing.
3. Pick your newly created Endpoint Service, and then under Actions choose Add principals to whitelist.
 4. Enter the ARN of the Rivery AWS account IAM Principal provided to you by our support.
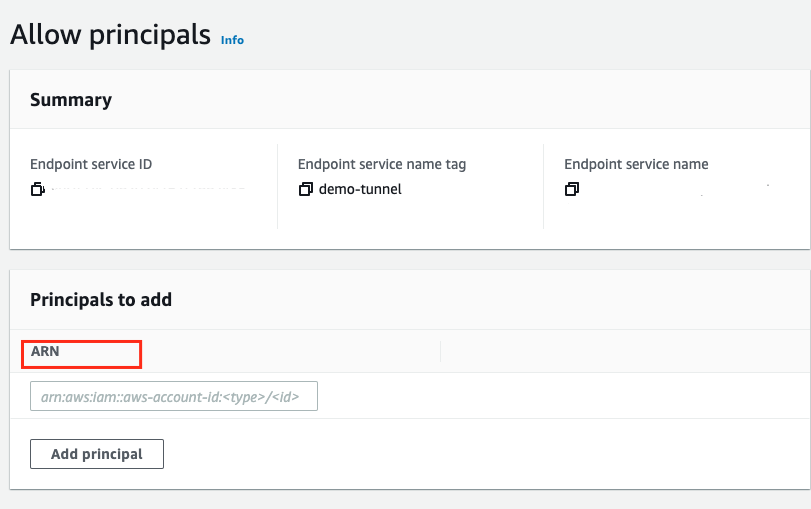
5. Click on Add to Whitelisted principals.
6. After doing so, go to the new service properties, and copy and send the Service Name to your contact at Rivery.
Accepting the connection on the client's VPC end
Now a connection request has been sent from Rivery to the client's endpoint.
Go to the Provider AWS account's VPC Console, and in the navigation pane pick Endpoint Services.
Choose your Endpoint Service, and on the bottom of the page, in the tabs section, pick Endpoint Connections.
You'll see there's a new pending connection request. Select the connection with the Consumer's AWS account ID under Owner, click on Actions, and pick Accept endpoint connection request.
What's next?
Using the Endpoint Interface on the Consumer end
We successfully connected our two VPC on different AWS accounts. Remember, only the Consumer can access the Provider, not the other way around.
To use this connection, go to the Consumer AWS account's VPC Console, and in the navigation pane pick Endpoints.
Find your newly created Endpoint Interface, and under Details you'll find your DNS names. You can make requests to these addresses (inside your VPC) in order to communicate with the Provider's Endpoint Service.
Connecting your AWS RDS to the exposed NLB
If you need to connect your RDS to the Load Balancer, please go here for an explanation on how to do so.
Was this article helpful?