Google Cloud PostgreSQL CDC Setup Guide
- 1 Minute to read
- Print
- DarkLight
- PDF
Google Cloud PostgreSQL CDC Setup Guide
- 1 Minute to read
- Print
- DarkLight
- PDF
Article summary
Did you find this summary helpful?
Thank you for your feedback!
Introduction
Google Cloud SQL is a fully managed database service that simplifies the process of setting up, maintaining, managing, and administering relational databases on the Google Cloud Platform (GCP). With the capability of Change Data Capture (CDC), Cloud SQL allows you to capture and replicate data changes in real-time from your database instances. This feature can be enabled by configuring logical decoding within your Cloud SQL instances.
In this article, you'll find step-by-step instructions on how to set up and configure logical decoding in Cloud SQL, empowering you to harness the full potential of real-time data replication.
Prerequisites
- Make sure you're running PostgreSQL 10 or higher.
- Server and Database permissions are required to change server configuration (depending on the PostgreSQL cloud/on-prem provider).
Step 1: Open Cloud SQL
To configure logical decoding in Cloud SQL, the first step is to log in to your GCP project and go to the Cloud SQL page.
Step 2: Choose the Cloud SQL Instances
Once you are on the Cloud SQL page, choose the Cloud SQL instances that you want to connect to CDC. Open the instance and click Edit.
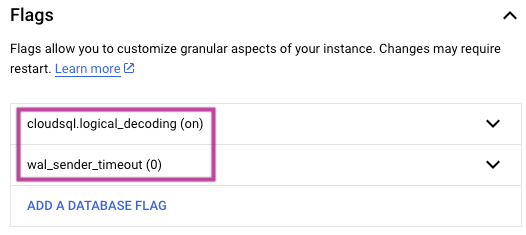
Step 3: Add Flag for Logical Decoding
Navigate to the Flags section, and select Add Flag. Set up the cloudsql.logical_decoding flag to enable seamless logical WAL level in the background. Also, make sure to set the wal_sender_timeout to a value of 0 to establish a dependable connector when routing our CDC to a Google Cloud SQL Postgres server.
Step 4: Restart the Cloud SQL Instance
After setting up the logical decoding flag, restart the Cloud SQL instance.
Step 5: Create SQL Replication User
To enable replication slots, the REPLICATION role must be granted permission to the Rivery user. If the server does not already have a REPLICATION role, create one with the following SQL command:
Please note that the <replication_role_name> must be substituted with a role name of your choice.
CREATE ROLE <replication_role_name> REPLICATION LOGIN;
Once the role has been created, execute the following SQL command to create a new login for Rivery's Log-Based extraction if it doesn't already exist:
CREATE USER rivery WITH <replication_role_name>;
In case the Rivery user already exists, use the following SQL command to assign the new role to the user:
ALTER USER rivery WITH <replication_role_name>;
Connect to Rivery
Follow the PostgreSQL Connection documentation to connect to the Rivery console.
Was this article helpful?