Snowflake as a Source Connection
- 9 Minutes to read
- Print
- DarkLight
- PDF
Snowflake as a Source Connection
- 9 Minutes to read
- Print
- DarkLight
- PDF
Article summary
Did you find this summary helpful?
Thank you for your feedback!
Introduction
Snowflake is a robust data warehouse solution that can serve as a Source in data integration workflows. With Rivery, you can seamlessly extract data from multiple Sources and load it into Snowflake for analysis and reporting.
This guide explains how to configure Snowflake as a Source.
Please Note:
A new connection must be created for using Snowflake as a Source. Connections configured for Snowflake as a Target cannot be used.
Prerequisites
Before proceeding, ensure you have an active Snowflake account.
If you don't have any valid Snowflake account, please create one. If you or your company already has a Snowflake account, you can connect/create a Rivery user.
Setting up your Snowflake Environment
Rivery's Snowflake environment can be configured in two ways, but only one method for granting access must be chosen:
The first method will grant an existing user the SYSADMIN role, which will allow rivery access to all object in the database and will be able to extract from, and ingest to, new and existing tables.
The second method will either create or use existing user, role, database and warehouse depending on the settings, and will either give Rivery the ability to ingest data to and/or extract data from (depending on the settings) said objects.
First Method - Global Permission With Sysadmin Role
Snowflake allows a single user to have multiple roles. Rivery will need to execute various commands on Snowflake, so you must assign a SYSADMIN role to the Rivery user you’ll be leveraging:
Access your Snowflake console. Utiliza a user that has access to the ACCOUNTADMIN role
Select the worksheet tab.
Run the following commands:
BEGIN;

 /* Set variables for script, select an existing user or create a new one, replace the value after var_user with
 the name of the user, do not forget to replace {password} with the password of your choice
 if you are creating a new user. */

   set var_user = 'RIVERY_USER';
   set var_password = '{password}';

 /* switch to ACCOUNTADMIN role: only an ACCOUNTADMIN can set or unset a user’s role */
    USE ROLE accountadmin;

    /* Create a user for Rivery or use an existing one */
   create user if not exists identifier($var_user)
   password = $var_password;

    GRANT ROLE SYSADMIN TO USER identifier($var_user);
    ALTER USER identifier($var_user) SET DEFAULT_ROLE = SYSADMIN;
COMMIT;
Second Method - Specific Permission With Custom Role
Copy the following script to your Snowflake console, make sure to change the variables to your desired variable and only run necessary steps, pay attention to the instructions on the script.
BEGIN;
 /* Set variables for script, You can choose to work with the default suggested values in the script or use your own.
   Do not forget to replace {password} with the password of your choice if you are creating a new user. */
   SET var_user = 'RIVERY_USER';
   SET var_password = '{password}';
   SET var_role = 'RIVERY_ROLE';
   SET var_database = 'RIVERY_DATABASE';
   SET var_warehouse = 'RIVERY_WAREHOUSE';
   SET var_schema = 'RIVERY_SCHEMA';  -- Add your schema here

  /* Switch to securityadmin role:
Role that can manage any object grant globally, as well as create, monitor, and manage users and roles */
   USE ROLE SECURITYADMIN;

   /* Create role for Rivery */
   CREATE ROLE IF NOT EXISTS IDENTIFIER($var_role);

   /* Create a user for Rivery */
   CREATE USER IF NOT EXISTS IDENTIFIER($var_user)
   PASSWORD = $var_password
   DEFAULT_ROLE = $var_role
   DEFAULT_WAREHOUSE = $var_warehouse;

   /* Grant role to the new user */
   GRANT ROLE IDENTIFIER($var_role) TO USER IDENTIFIER($var_user);

  /* switch to sysadmin role:
Role that has privileges to create warehouses and databases (and other objects) in an account. */
   USE ROLE SYSADMIN;

   /* Create warehouse for Rivery (optional) */
   CREATE WAREHOUSE IF NOT EXISTS IDENTIFIER($var_warehouse)
   WAREHOUSE_SIZE = XSMALL
   WAREHOUSE_TYPE = STANDARD
   AUTO_SUSPEND = 300
   AUTO_RESUME = TRUE
   INITIALLY_SUSPENDED = TRUE;

   /* Create database for Rivery (optional) */
   CREATE DATABASE IF NOT EXISTS IDENTIFIER($var_database);

   /* Create schema in the database (optional) */
   CREATE SCHEMA IF NOT EXISTS IDENTIFIER($var_database).IDENTIFIER($var_schema);

  /* Grant Rivery role access to the warehouse */
   GRANT USAGE
   ON WAREHOUSE IDENTIFIER($var_warehouse)
   TO ROLE IDENTIFIER($var_role);

   /* Grant Rivery role access to the database */
   GRANT USAGE
   ON DATABASE IDENTIFIER($var_database)
   TO ROLE IDENTIFIER($var_role);

   /* Grant Rivery role access to the schema */
   GRANT USAGE
   ON SCHEMA IDENTIFIER($var_database).IDENTIFIER($var_schema)
   TO ROLE IDENTIFIER($var_role);

   /* Grant minimum access to tables for COPY INTO operations */
   GRANT SELECT
   ON ALL TABLES IN SCHEMA IDENTIFIER($var_database).IDENTIFIER($var_schema)
   TO ROLE IDENTIFIER($var_role);

   /* Grant the Rivery role the ability to use the COPY INTO command */
   GRANT INSERT
   ON ALL TABLES IN SCHEMA IDENTIFIER($var_database).IDENTIFIER($var_schema)
   TO ROLE IDENTIFIER($var_role);

COMMIT;
Please Note:
If you wish to add Masking Policy permissions for this user, please refer to the 'Enforce Masking Policy' section.
Create Network Policy for Rivery IPs [Optional]
In some cases, your Snowflake account may be access restricted by IPs or domains. In such cases, you must add Rivery IPs to your Snowflake Network Policy in order to connect successfully.
Note: Open Rivery IPs in Snowflake Network Policies may block any other unspecified IPs in the network policy. Make sure you've whitelisted all of your IPs in Snowflake’s network policies before creating Rivery's. Read more about network policies here .
In order to create a Network Policy for Rivery IPs:
Log into your Snowflake account.
Make sure the user is set to a ACCOUNTADMIN or SYSADMIN role
In the worksheet, run the following command:
CREATE OR REPLACE NETWORK POLICY RiveryIPs ALLOWED_IP_LIST = (Copy our most recent whitelisted IPs here)
Supported Objects
When using Snowflake as a source, the following objects are fully supported:
- Tables
- Views
- Materialized Views (available exclusively for Enterprise accounts)
This compatibility ensures a seamless integration with Snowflake's data storage and processing capabilities. You can efficiently extract data from standard tables, which store raw data records, as well as from views, which may present aggregated or transformed data based on your business requirements.
Establishing a Connection
You can connect to Snowflake using one of 3 methods:
Basic Authentication
To connect to your Snowflake account using Basic Authentication, follow the steps below:
Go to the Connections menu in Rivery:
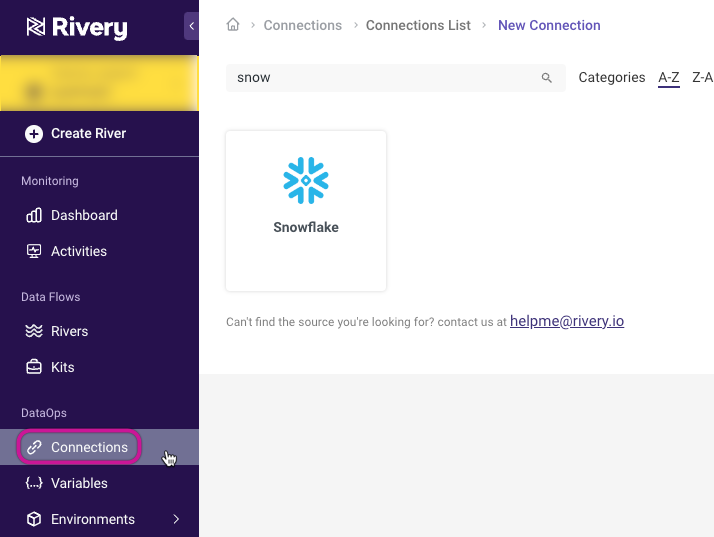
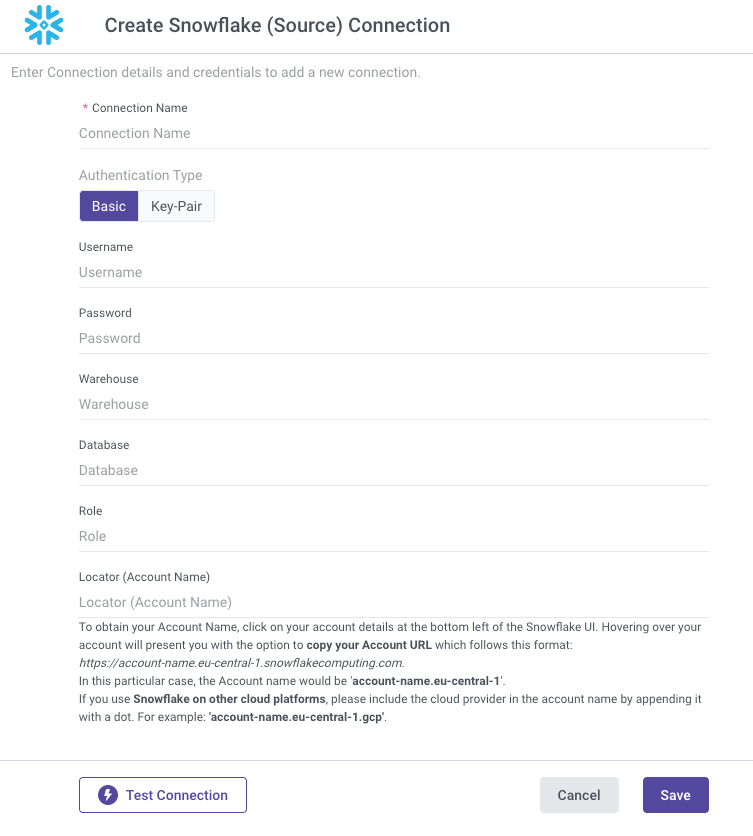
In Snowflake Connection form type in your Connection Name.
Select the Basic Authentication Type.
Enter your Username and Password.
Please note that Snowflake passwords are restricted from including special characters such as {, }, ", ?, /, #,*, and others.Enter the name of your Warehouse (mandatory).
Enter your Database name (mandatory).
Enter the name of your Role (optional).
Please Note:
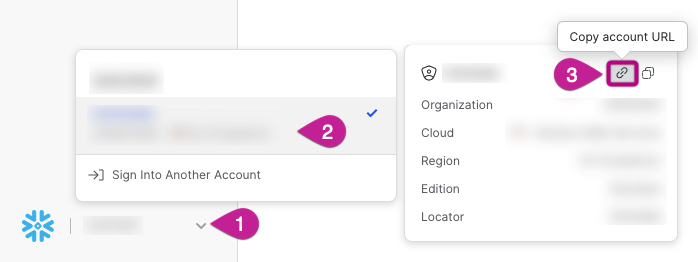
If you leave it blank, the account's default one will be used, and in that case, the default Role must have access to the selected Warehouse, or the connection will fail.Input your Account Name (mandatory).
Please Note:
To obtain your Account Name, click on your account details at the bottom left of the Snowflake UI. Hovering over your account will present you with the option to copy your Account URL which follows this format: https://account-name.eu-central-1.snowflakecomputing.com.
In this particular case, the Account Name would be “account-name.eu-central-1”.
If you use Snowflake on other cloud platforms, please include the cloud provider in the account name by appending it with a dot. For example: "account-name.eu-central-1.gcp".
- Use the Test Connection function to see if your connection is up to the task. If the connection succeeded, you can now use this connection in Rivery.
You can now pipe data to Snowflake by leveraging this connection in any River!
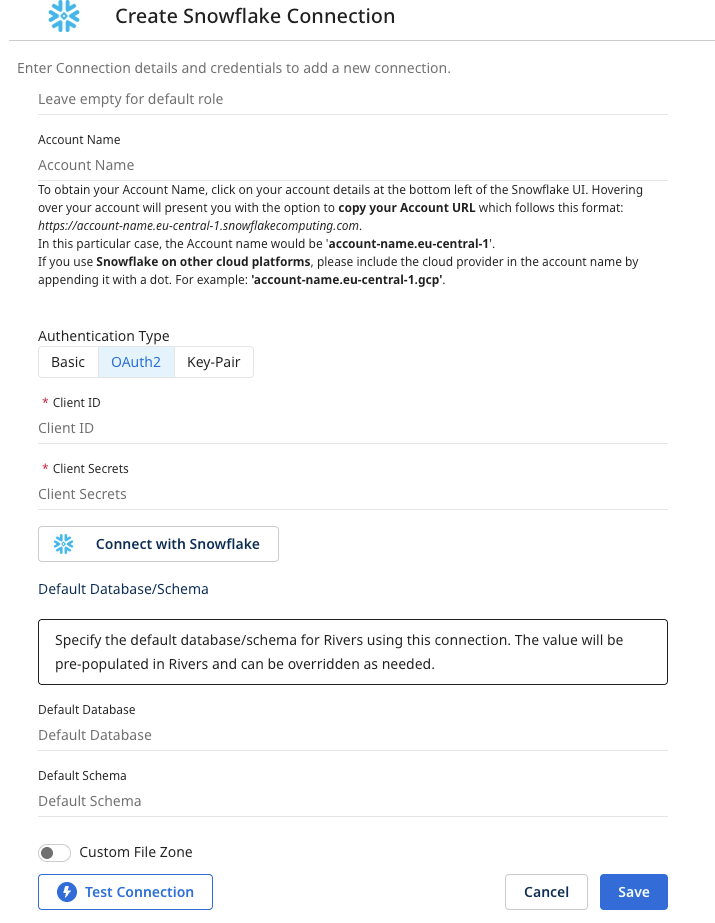
OAuth2 Authentication
Connect to Snowflake using OAuth2 authentication to securely extract data. This setup uses a read-only user only.
Prerequisites
Create a custom OAuth integration in Snowflake.
Ensure the integration:
- Has
OAUTH_CLIENT = CUSTOM - Issues refresh tokens
- Specifies
ALLOWED_ROLES(e.g.,READER) - Includes the correct
OAUTH_REDIRECT_URIfor your region
- Has
Grant usage of the integration to your read-only user:
GRANT USAGE ON INTEGRATION my_oauth_integration TO USER readonly_user;
Example: OAuth Integration with 90-Day Token
CREATE SECURITY INTEGRATION my_oauth_source
  TYPE = OAUTH
  ENABLED = TRUE
  OAUTH_CLIENT = CUSTOM
  OAUTH_CLIENT_TYPE = 'CONFIDENTIAL'
  OAUTH_REDIRECT_URI = 'https://console.rivery.io/api/oauthcallback/snowflake'
  OAUTH_ISSUE_REFRESH_TOKENS = TRUE
  OAUTH_ALLOW_NON_TLS_REDIRECT_URI = FALSE
  ALLOWED_ROLES = ('READER')
  OAUTH_REFRESH_TOKEN_VALIDITY = '90 days';
Redirect URIs by Region
| Region | Redirect URI |
|---|---|
| US | https://console.rivery.io/api/oauthcallback/snowflake |
| EU | https://eu-west-1.console.rivery.io/api/oauthcallback/snowflake |
| IL | https://il-central-1.console.rivery.io/api/oauthcallback/snowflake |
Required Fields
| Field | Description |
|---|---|
| Client ID | From the OAuth2 app registered in Snowflake |
| Client Secret | From the OAuth2 app |
| Account Name | e.g., xy12345.east-us-2.azure |
| Role | Must be a read-only role, e.g., READER |
| Username | Snowflake user assigned the read-only role |
Connecting Process
- Fill in all required fields.
- Click "Connect to Snowflake".
- Authenticate through the Snowflake login screen.
Upon successful authentication, the integration receives:
- Access token – used for running queries
- Refresh token – used for maintaining session continuity
All tokens are securely stored.
Please Note
- Client ID/Secret: Use the exact values from your Snowflake OAuth app.
- Account Name: Format as
<org>-<account>.<region>.<cloud>(do not include protocol or domain). - Role: Must be included in the
ALLOWED_ROLESof the integration. - Username: Case-sensitive and must be granted usage on the integration.
- Redirect URI: Must exactly match the URI specified in your Snowflake integration.
Key-Pair Authentication
To connect to your Snowflake account using Key-Pair Authentication, follow the steps below:
Please Note:
Windows is not supported.
- Enter the following command into your Terminal window to download the Key file to your Documents folder:
cd Documents
Please Note:
To confirm the command, click the Enter key.
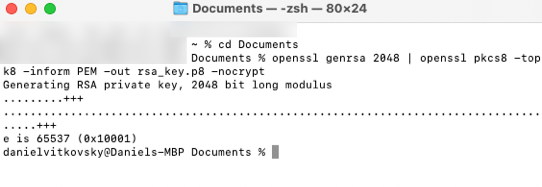
- Run the following command to generate a decrypted version of the Key:
openssl genrsa 2048 | openssl pkcs8 -topk8 -inform PEM -out rsa_key.p8 -nocrypt
Please Note:
Rivery does not support key-pair authentication with an encrypted private key.
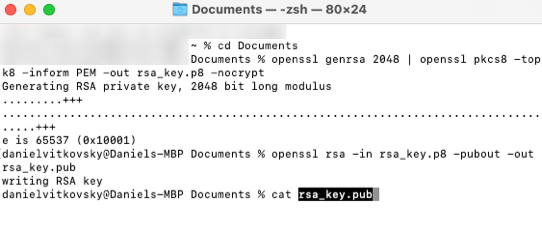
- Create the Public key by referencing the Private key.
Simply copy and run it:
openssl rsa -in rsa_key.p8 -pubout -out rsa_key.pub
- This will allow you to generate a private key in PEM (Privacy Enhanced Mail) format:
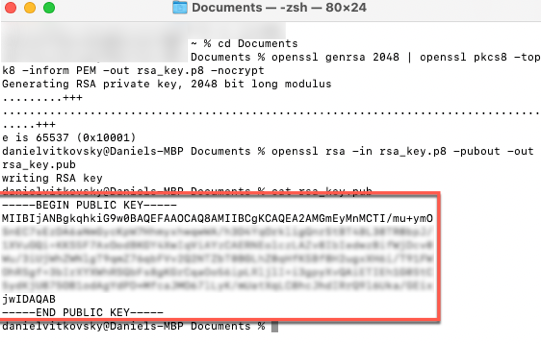
cat rsa_key.pub
This is the PEM format:
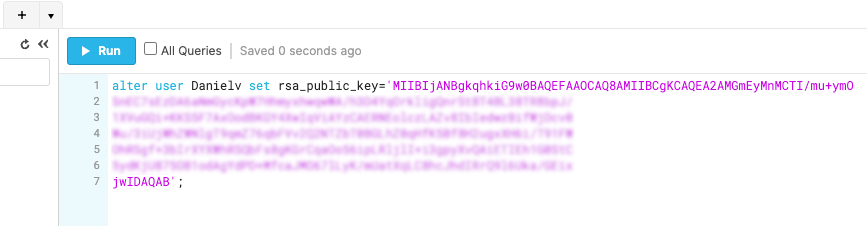
- To assign the public key to a Snowflake user, run the ALTER USER command in your Snowflake console:
Note:
Replace < Username > with your snowflake Username.
alter user < Username > set rsa_public_key='';
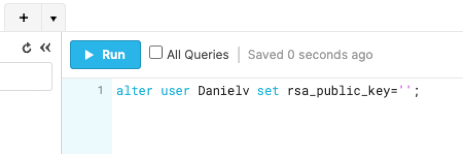
- Copy the PEM format from step 5 and paste it between the apostrophes in the Snowflake console code:
Go to the Connections menu in Rivery:
Fill out the Snowflake Connection form with the following information:
a. Type in Connection Name.
b. Select the Key-Pair Authentication Type.
c. Enter your Username.
d. Enter the name of your Warehouse (mandatory).
e. Enter your Database name (mandatory).
f. Enter the name of your Role (optional).
Please Note:
If you leave it blank, the account's default one will be used, and in that case, the default Role must have access to the selected Warehouse, or the connection will fail.
g. Input your Account Name (mandatory).
Please Note:
To obtain your Account Name, click on your account details at the bottom left of the Snowflake UI. Hovering over your account will present you with the option to copy your Account URL which follows this format: https://account-name.eu-central-1.snowflakecomputing.com.
In this particular case, the Account Name would be “account-name.eu-central-1”.
If you use Snowflake on other cloud platforms, please include the cloud provider in the account name by appending it with a dot. For example: "account-name.eu-central-1.gcp".
Drag the rsa_key.p8 file from your Documents folder to the label, or simply browse for it.
Use the Test Connection function to see if your connection is up to the task.
If the connection succeeded, you can now use this connection in Rivery.
Consult the Snowflake documentation to generate an encrypted Key or for more information on the Key-Pair configuration process.
Was this article helpful?