Custom File Zone
- 9 Minutes to read
- Print
- DarkLight
- PDF
Custom File Zone
- 9 Minutes to read
- Print
- DarkLight
- PDF
Article summary
Did you find this summary helpful?
Thank you for your feedback!
Introduction
Rivery offers flexible options for data management. You can securely store your data in your own Custom File Zone, giving you control over your designated storage. Alternatively, you can use Rivery's default Managed File Zone, which requires no setup. For organizations needing greater control over data storage and management, the Custom File Zone is available.
Furthermore, customers have the flexibility to set their own data retention policies for information stored in the Custom File Zone. In comparison, data stored in Rivery's default Managed File Zone is retained for a fixed period of 48 hours.
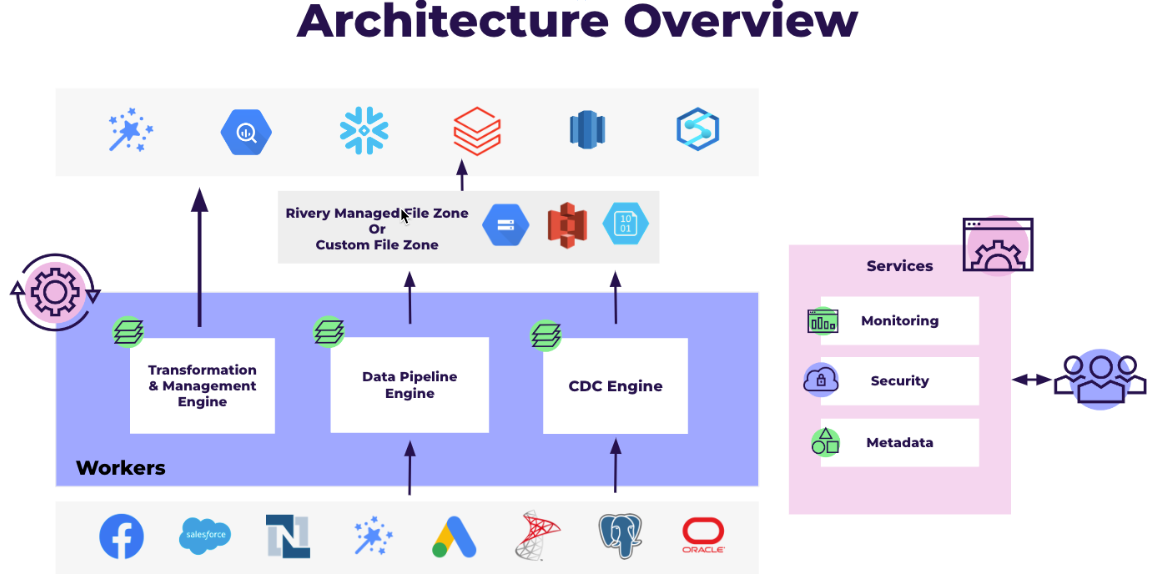
What is a Custom File Zone?
A Custom File Zone allows organizations to stage data in their own cloud environment (e.g., AWS S3, Google Cloud Storage, Azure Blob) before loading it into a data warehouse. Rather than using Rivery's default managed file zone, which is used if no additional configuration is made, a Custom File Zone keeps intermediary data within the organization’s control.
This setup enables the Custom File Zone to act as a data lake, storing raw data prior to its transfer to the data warehouse. Organizations can define their own data retention policies, which is especially beneficial for handling Personally Identifiable Information (PII), HIPAA-regulated data, and other sensitive datasets.
The Benefits of Using a Custom File Zone
The Custom File Zone in Rivery provides several advantages over the default Managed File Zone:
Data Storage Control: With the Custom File Zone, organizations can store their data in their own designated file zones rather than Rivery's Managed File Zone, offering greater control over data storage.
Custom Retention Policies: Organizations can set their own data retention policies for the Custom File Zone, unlike the Managed File Zone, which retains data for a fixed period of 48 hours.
Data Management: Files stored in a Custom File Zone are kept in the client’s specified AWS, Google Cloud Storage, or Azure buckets, managed by the client.
Please Note:
- Configuring a Custom File Zone requires some setup, while the Managed File Zone requires no additional setup.
- Rivery support will not have access to files stored in a Custom File Zone; the client must provide access or share necessary information.
Custom File Zone Support for Data Warehouses and Cloud Storage
| Data Warehouse | Amazon S3 | Azure Blob Storage | Google Cloud Storage Buckets |
|---|---|---|---|
| Amazon Redshift | Yes | No | No |
| BigQuery | No | No | Yes |
| Snowflake | Yes | Yes | No |
| Azure Synapse Analytics | No | Yes | No |
| Amazon RDS/Aurora for PostgreSQL | Yes | No | No |
| Databricks | Yes | Yes | No |
| Amazon Athena | Yes | No | No |
| Azure SQL | No | Yes | No |
Amazon S3 Bucket
If you're new to Amazon S3 Buckets, start with the S3 documentation.
Create a Bucket
A bucket is an object container. To store data in Amazon S3, you must first create a bucket and specify a bucket name as well as an AWS Region. Then you upload your data as objects to that bucket in Amazon S3. Each object has a key (or key name) that serves as the object's unique identifier within the bucket.
Let's begin by logging into AWS and searching for Buckets:
Note:
This is a tour of the console. Please hover over the rippling dots and read the notes attached to follow through.
Add a Policy
A bucket policy is a resource-based policy that allows you to grant access permissions to your bucket and the objects contained within it.
Now that you've created a bucket, let's create a policy to grant the necessary permissions.
Please Note:
Make sure to repleace < RiveryFileZoneBucket > with the name of your S3 bucket.
Here's the policy's code:
{
 "Version":"2012-10-17",
 "Statement":[
   {
    "Sid":"RiveryManageFZBucket",
    "Effect":"Allow",
    "Action":[
    "s3:GetBucketCORS",
    "s3:ListBucket",
    "s3:GetBucketLocation"
     ],
    "Resource":"arn:aws:s3:::<RiveryFileZoneBucket>"
   },
   {
    "Sid":"RiveryManageFZObjects",
    "Effect":"Allow",
    "Action":[
      "s3:ReplicateObject",
      "s3:PutObject",
      "s3:GetObjectAcl",
      "s3:GetObject",
      "s3:PutObjectVersionAcl",
      "s3:PutObjectAcl",
      "s3:ListMultipartUploadParts"],
    "Resource":"arn:aws:s3:::<RiveryFileZoneBucket>/*"
  },
  {
     "Sid":"RiveryHeadBucketsAndGetLists",
     "Effect":"Allow",
     "Action":"s3:ListAllMyBuckets",
     "Resource":"*"
  }
 ]
}
Create a Rivery User in AWS
Now, in order to connect to the Amazon S3 Source and Target (described in the following section) in Rivery console, you must first create an AWS Rivery user:
Connect to Amazon S3
To connect to Amazon S3, see our Amazon S3 Connection documentation.
Once you've finished creating the bucket and connecting to Amazon S3 in Rivery, continue to 'Configure Custom FileZone in Rivery' down below.
Azure Blob Storage Container
If you're new to Azure Blob Storage, start with the Microsoft documentation.
Follow the Microsoft documentation to create a Standard Azure Account.
Please Note: Only Standard Azure accounts can use Azure Blob Storage Containers (Custom Filezones) with Rivery, Make sure to choose Standard in the Performance section.
Make sure all of the settings are correct before clicking Create. The creation of a Blob account may take a few minutes.
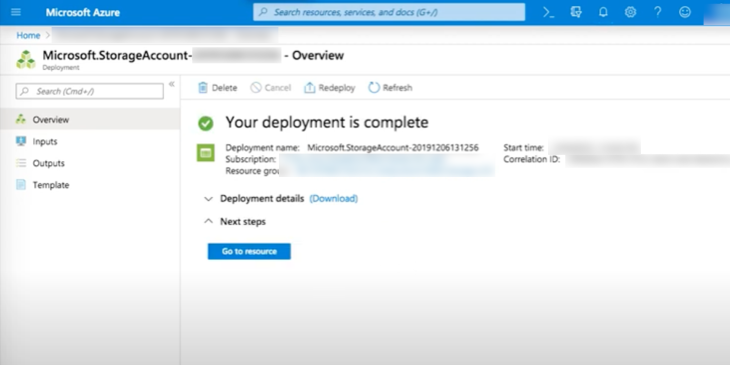
- Click on Go to resource.
- Choose Containers (Alternatively, scroll down the main menu to Blob Service and select Containers).
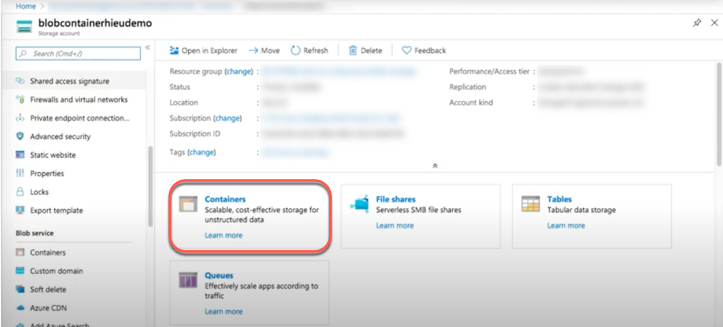
- In the upper left corner, click on +Containers.
- Give the container a Name.
- From the Public access level drop-down menu, select Container.

Click Ok.
Go to Access Keys in the storage account menu.
Copy and save your keys.
When connecting to Azure Blob Storage in Rivery, this will be used.
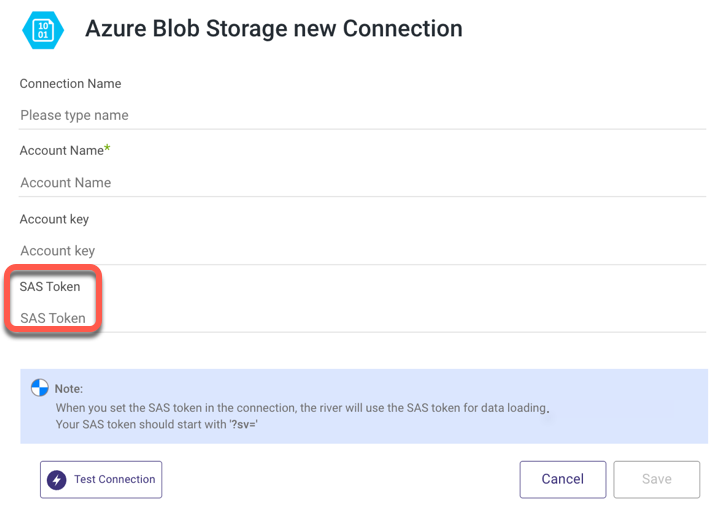
Connect to Azure Blob Storage
- Type in your Connection Name.
- Fill out the Account Name and Account Key.
- Enter your SAS Token
Note: This is mandatory for using a Blob Storage as a Custom FileZone (it is optional only for Blob Storage as a source).
To create a SAS Token, consult the Microsoft documentation. - Use the Test Connection function to see if your connection is up to the task.
If the connection succeeded, you can now use this connection in Rivery.
Once you've finished creating the container and connecting to Azure Blob storage in Rivery, continue to 'Configure Custom FileZone in Rivery' down below.
Google Cloud Storage Buckets
If you're new to Google Cloud Storage Buckets, start with the Google documentation.
- Enable Necessary APIs:
Navigate to the Google Cloud Console and access the "APIs & Services" section.
Click on "Library."
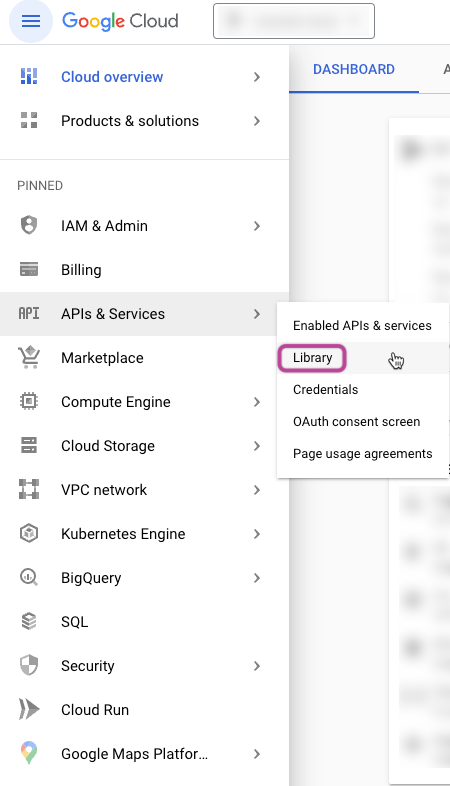
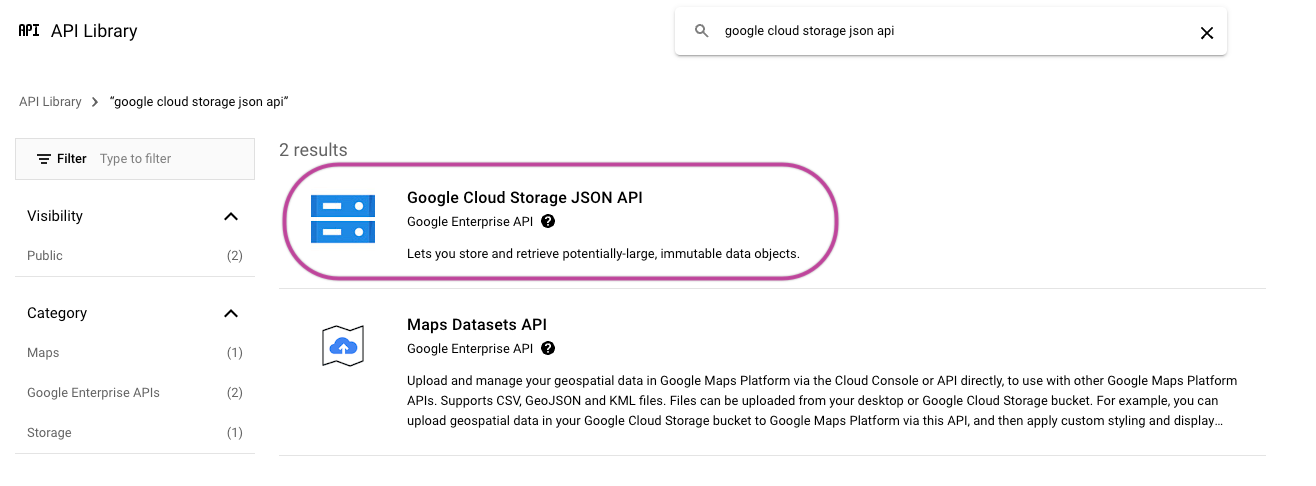
Look up "Google Cloud Storage JSON API" and enable it.
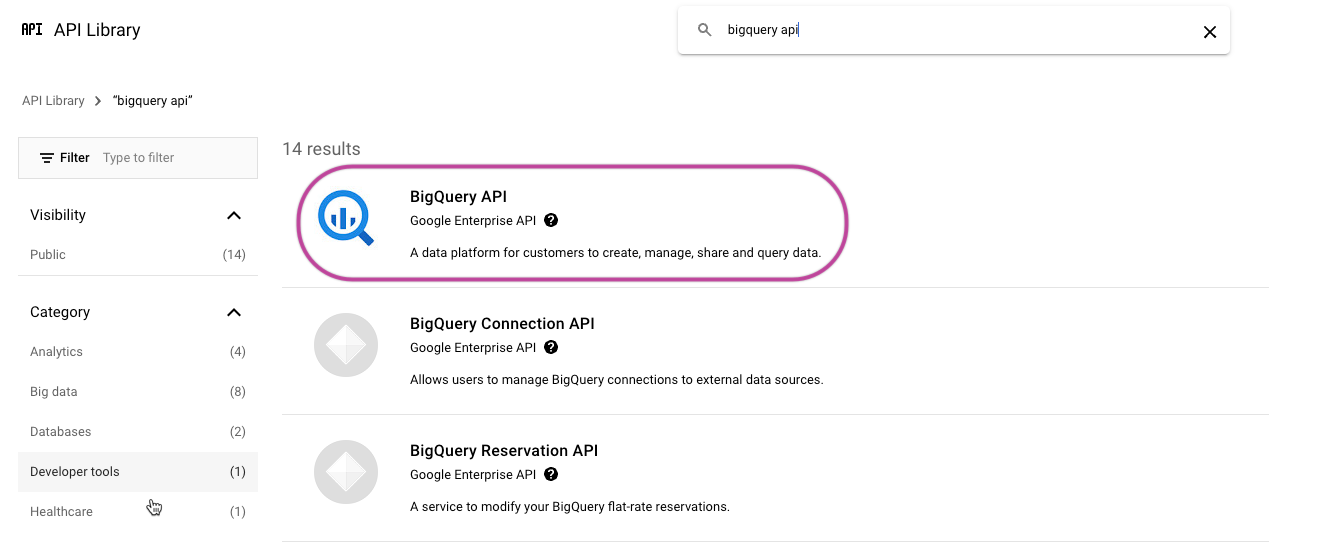
Find the "BigQuery API" and enable it.
Grant Permissions:
Rivery automatically generates a dedicated service account and Google Cloud Storage (GCS) account folder. This service account only has access to the created folder.
To grant permissions, sign in to the Google Cloud Platform Console and ensure you are in the desired project.
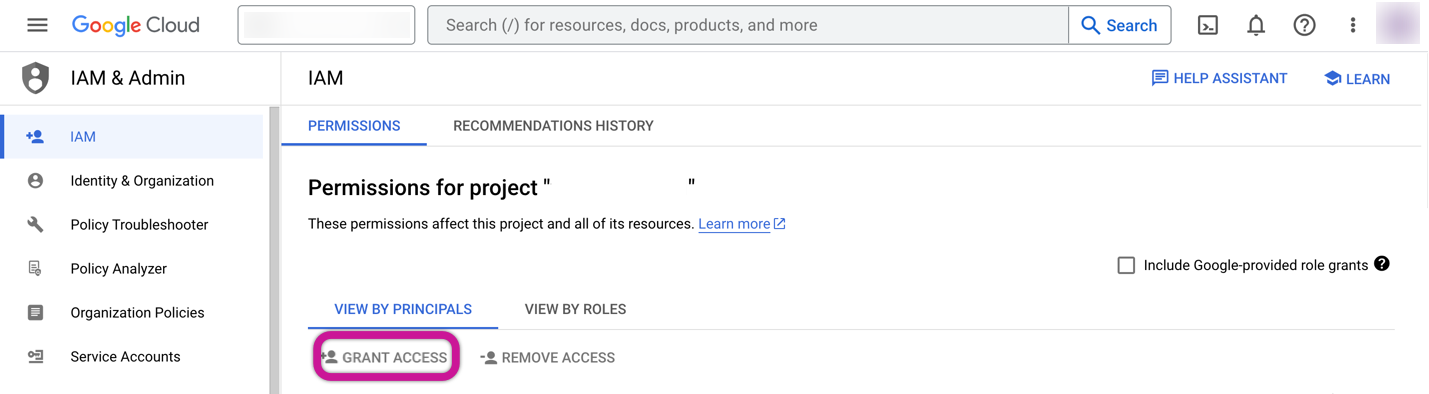
Go to "IAM & Admin" and then click "IAM".
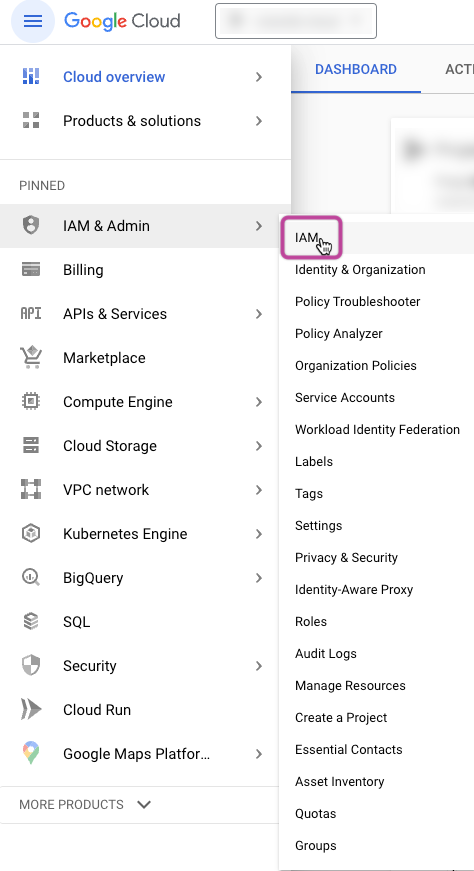
Click on "+GRANT ACCESS" under the "VIEW BY PRINCIPALS" section.
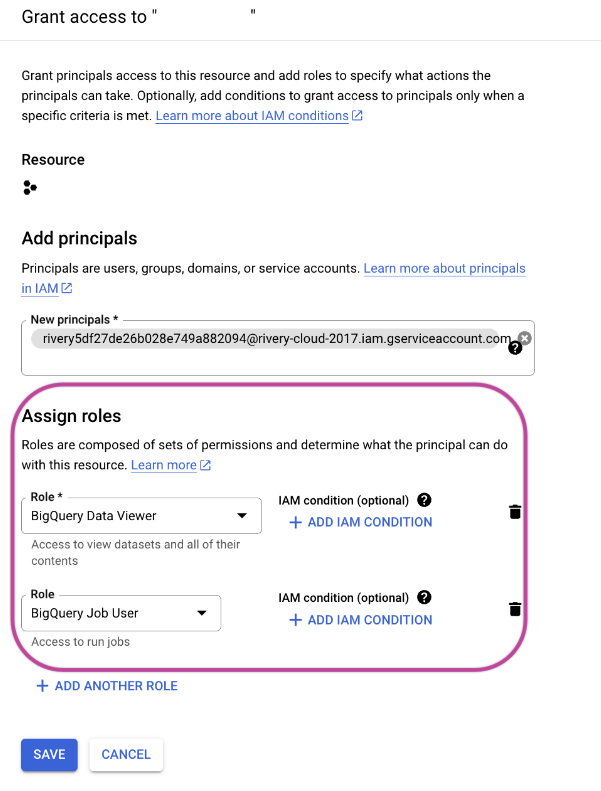
Add the Rivery service account under the "New Principals" section.
Assign the "BigQuery Data Viewer" and "BigQuery Job User" roles and save the settings.
- Create a Google Cloud Service Account:
Please Note:
The Custom Service account has the option to utilize either an already established service account or one that is freshly created. If you wish to create a new service account within the Google Cloud Platform, it's important to confirm that your user possesses the "ServiceAccountAdmin" role. Then, proceed by adhering to these instructions:
Sign in to the Google Cloud Platform Console.
Go to "IAM & Admin" and then "Service accounts" and click "+CREATE SERVICE ACCOUNT".
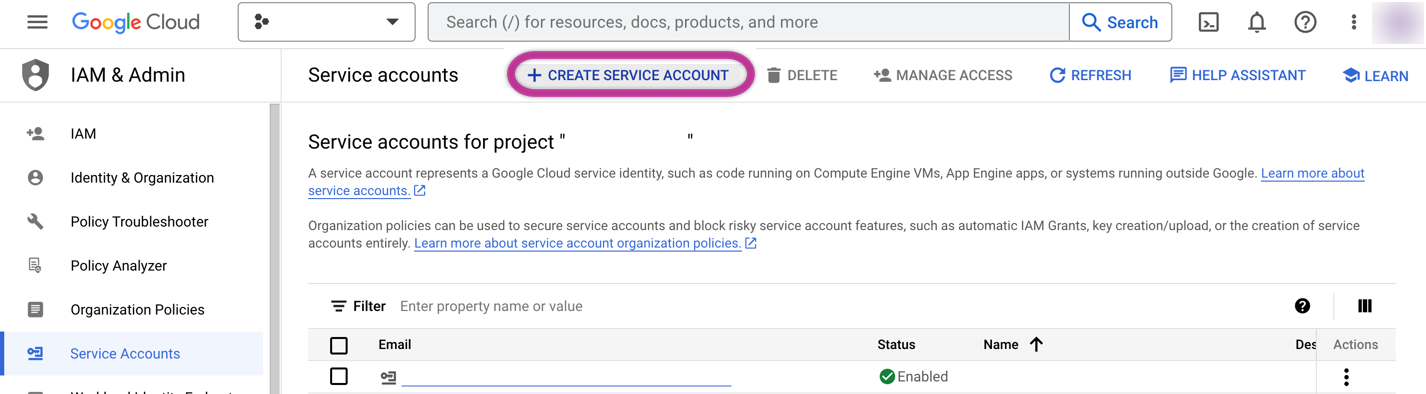
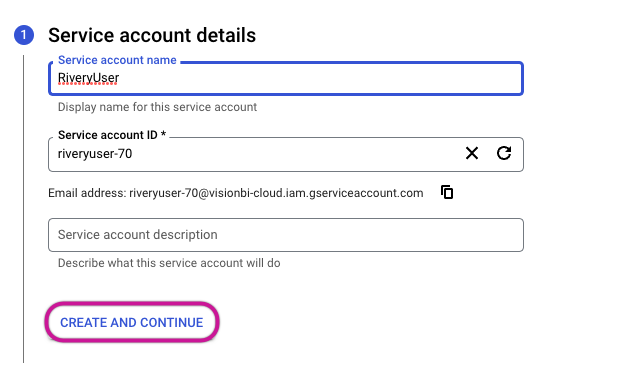
In the Service Account Creation Wizard:
- Specify the Service Account name (e.g., RiveryUser).
- Click "CREATE AND CONTINUE".
- Provide the service account with project access by selecting the BigQuery Data Viewer and BigQuery Job User roles. Afterward, proceed by clicking on CONTINUE.
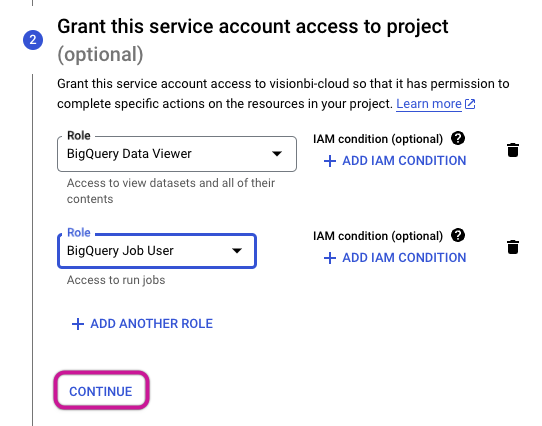
- You have the option to grant users access to this service account. To finalize the process, simply click the DONE button.
- Upon completion of the creation process, the service account will be displayed within the Google Cloud console.

Provide Access for the Service Account:
Grant the 'storage.buckets.list' Permission at the project level by associating it with a Role that includes this specific permission and assigning it to the service account.
Please Note:
This permission is essential for retrieving Service account buckets and adding them to the connection list.Create a Google Cloud Storage Bucket:
Sign in to the Google Cloud Platform Console.
Go to "Cloud Storage" and then "Buckets" and click "+CREATE".
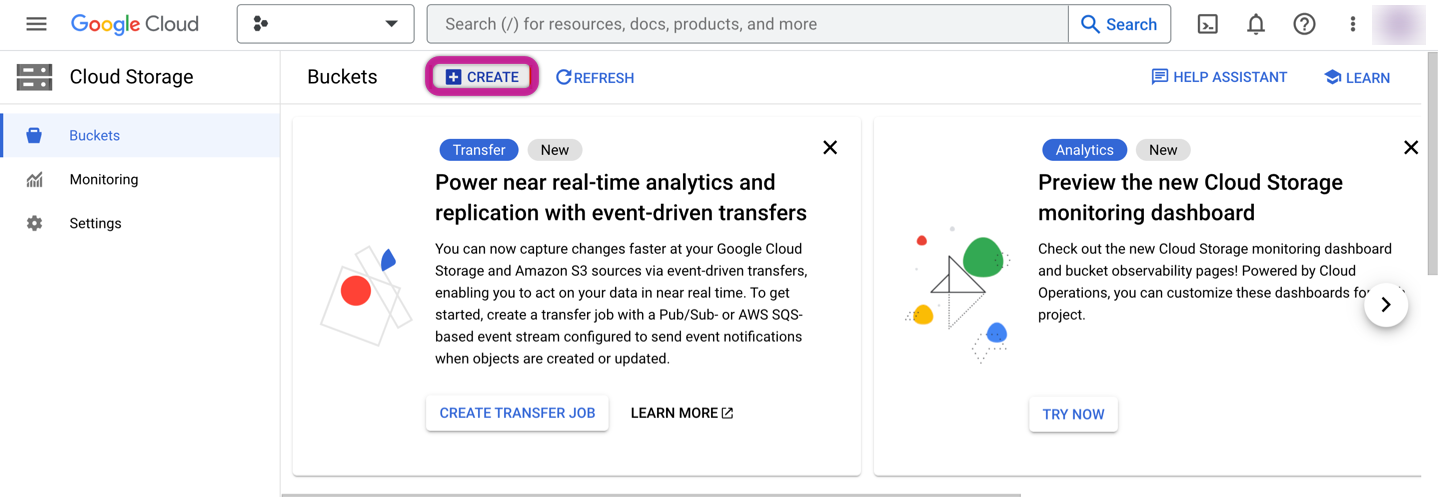
In the Bucket Creation Wizard:
- Set Bucket Name (e.g., project_name_rivery_file_zone).
- Choose a Region for the bucket.
- Select a storage class.
- Configure the object access for your Bucket as Uniform, and make sure to select the option "Enforce public access prevention on this bucket."
- Click "CREATE".
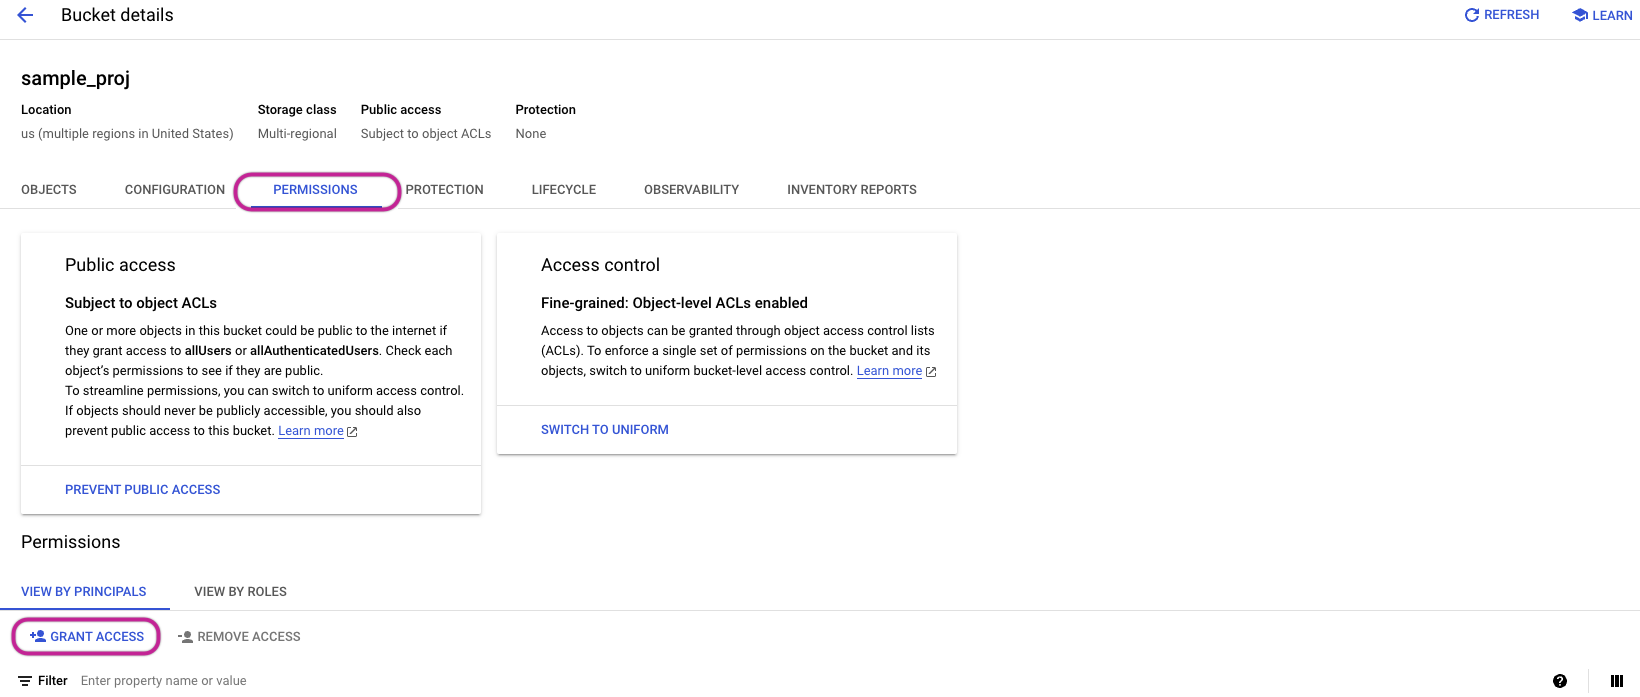
- Provide Access to the Dedicated Bucket for the Service Account:
Navigate to "Cloud Storage" and click "Buckets".
Select the intended bucket (designated for Custom File Zone).
Within the "Permissions" section, click on the "+GRANT ACCESS" option.
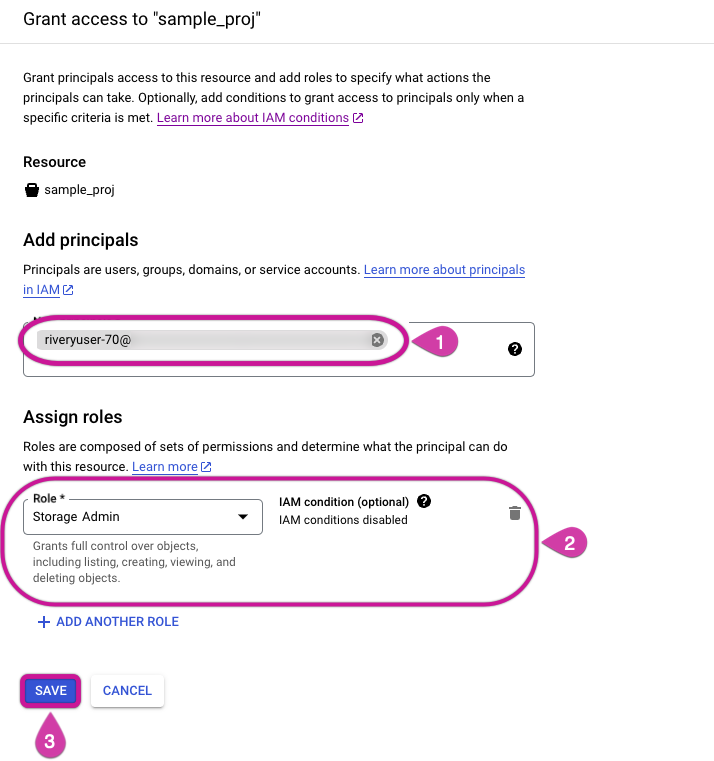
In the "Add Principals" area, include your service account.
For role assignment, designate the Storage Admin role for the specified Custom File Zone
Complete the process by clicking the SAVE button.
- Configure BigQuery Source Custom Connection in Rivery:
Follow the same steps as described under step 3 in "Default Service Account and Bucket Configuration."
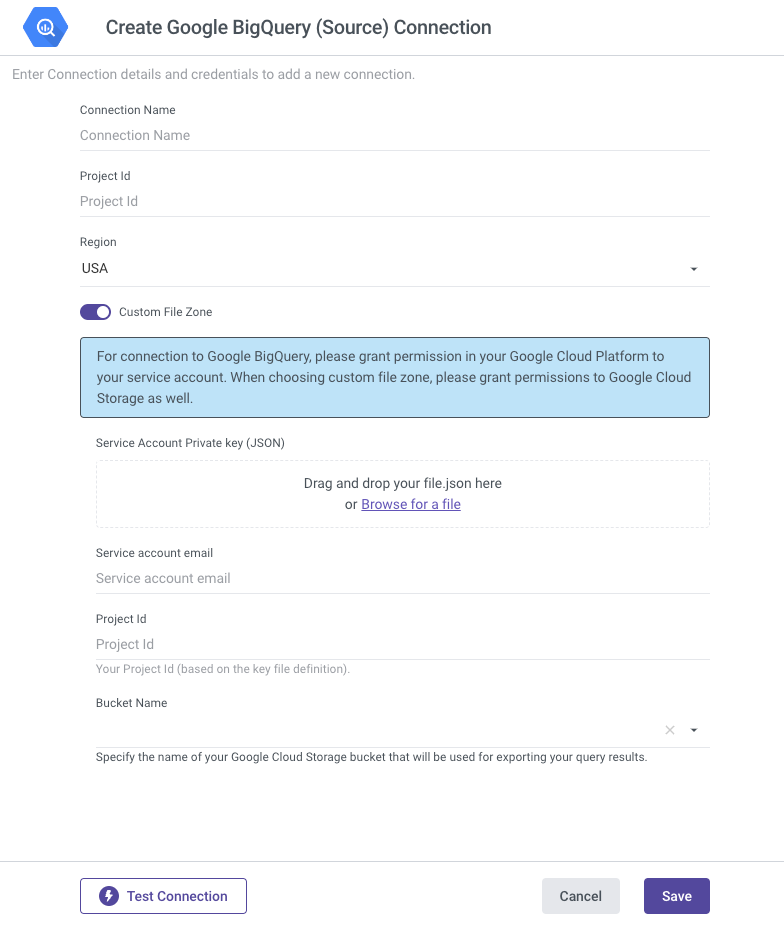
Now, you have the option to enable the "Custom File Zone" toggle, which is where the Custom Service Account and Bucket Configuration come into action.
Provide the Service Account email.
Submit your Service Account Private Key (JSON) file. To create your JSON file for the Service Account, adhere to these instructions:
Log in to the Google Cloud Platform Console.
Navigate to "IAM & Admin" and click "Service accounts".
Select the relevant service account from the menu and access the "Manage Keys" option.

Click on the dropdown for adding a key, then choose to 'Create New Key".
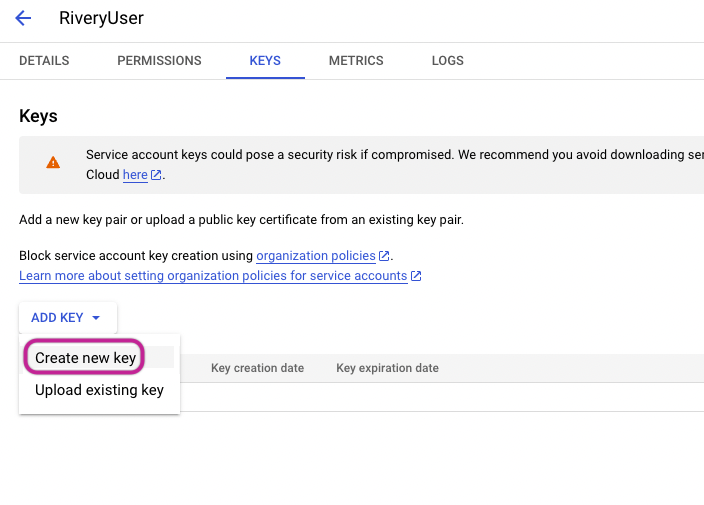
Opt for a JSON key format and proceed by clicking the "Create" option.
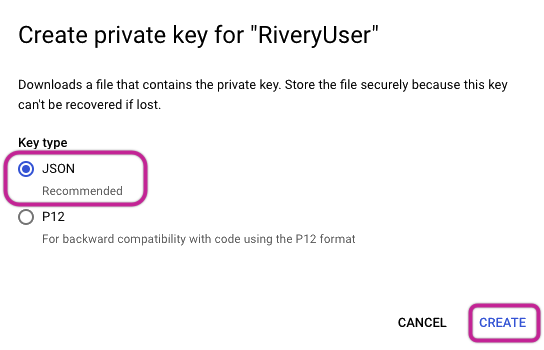
- This action will result in the generation of a JSON file, which will then be downloaded to your local device.
Set the Service Account Private Key (JSON), and this action will lead to the automatic population of the Service Account Email and Project ID fields.
Set the Default Bucket to the one created earlier, ensuring Region consistency.
Test the connection and save the settings.
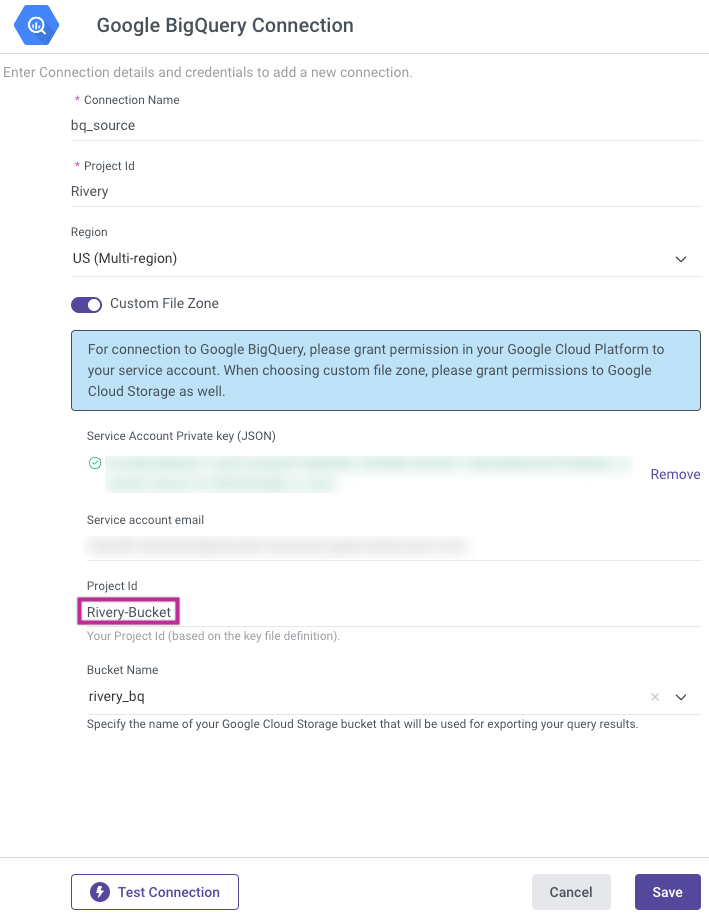
Project ID and Custom File Zone Association
The project ID specified in the attached Service Account Private key (JSON) file determines the Custom File Zone.
For instance, in the case of "Rivery-Bucket," this Project ID is extracted from the Service Account Private key (JSON), and this specific Project ID dictates the buckets available for use as the Custom File Zone.
Configure Custom File Zone in Rivery
Go to Connections -> +New Connection and search for your Target warehouse.
Type in your Connection Details and Credentials.
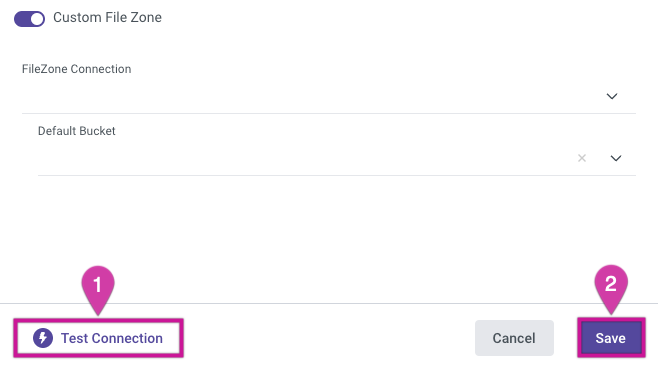
Toggle the Custom File Zone to true.
By clicking on File Zone Connection, you can select the previously configured File Zone Connection.
Choose a Default Bucket (Container) from the drop-down list.
Use the Test Connection function to see if your connection is up to the task.
If the connection was successful, click Save.
Please Note:
When dealing with Databricks, it is necessary to include specific statements to enable Azure blob storage to function as a customized file zone. Please incorporate the subsequent configuration into the SQL Warehouse within Databricks:
spark.hadoop.fs.azure.account.auth.type.rivery.dfs.core.windows.net SAS
spark.hadoop.fs.azure.sas.token.provider.type.rivery.dfs.core.windows.net
org.apache.hadoop.fs.azurebfs.sas.FixedSASTokenProvider
Was this article helpful?