Source to Target River - General Overview
- 11 Minutes to read
- Print
- DarkLight
- PDF
Source to Target River - General Overview
- 11 Minutes to read
- Print
- DarkLight
- PDF
Article summary
Did you find this summary helpful?
Thank you for your feedback!
Introduction
Source to Target Rivers are used to build simple data pipelines that take data from a Source and push it to a Target destination.
Rivery streamlines the process by automatically identifying the structure of the incoming data and generating the necessary target tables and columns.
With Rivery, there are more than 180 supported Sources as targets, such as Facebook Ads, Google Analytics, and Oracle, in addition to all the leading data warehouses.
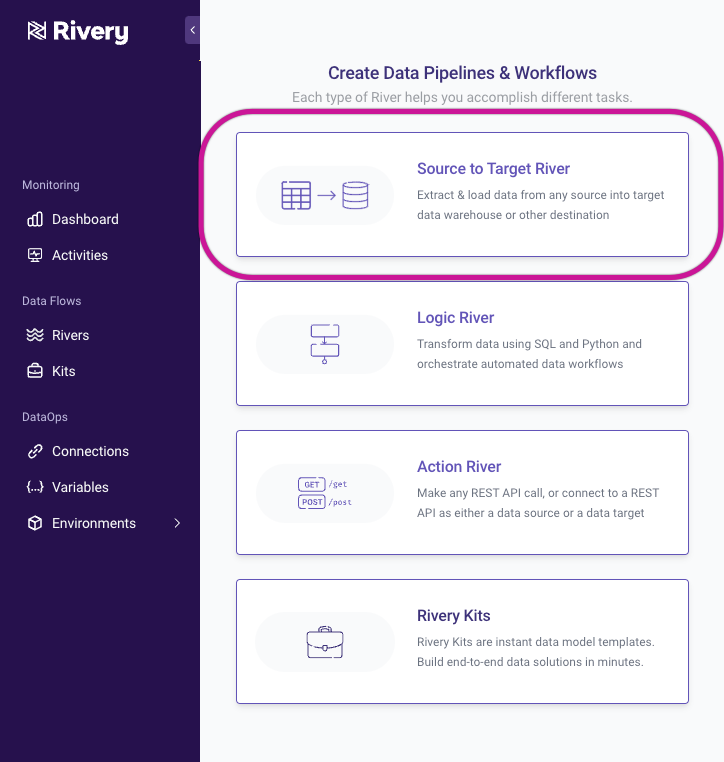
To create a Source to Target River, click Create River and then select Source to Target River.
Source
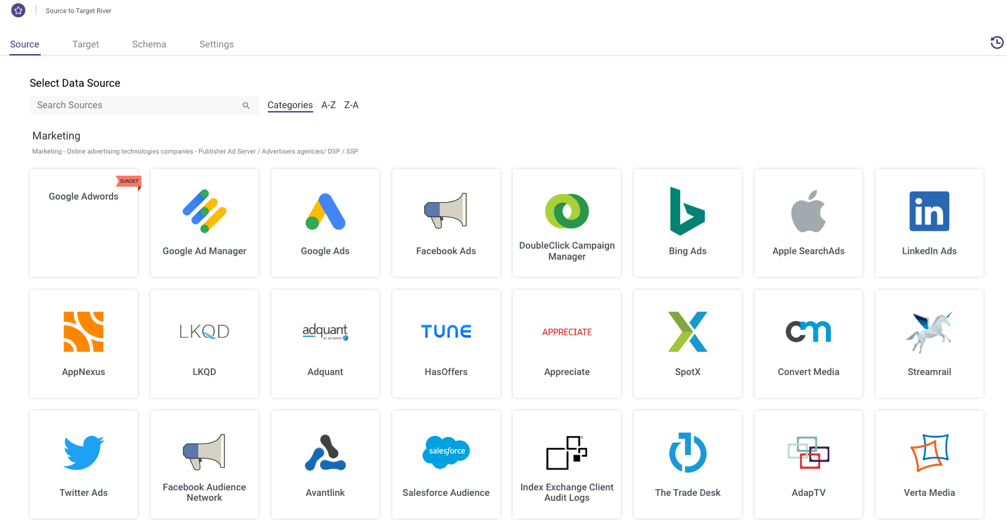
The Source step is where you select the data source you would like to ingest data from and fill out respective parameters to further customize this ingestion.
You are first given a list of supported Rivery connectors to choose from as your source.
Regardless of which data source you choose, you'll first have to choose or define your connection. If you've already made a connection to the source in the 'Connections' tab, you should see this connection available in the dropdown. If you haven't yet made a connection, you can create one on the fly by selecting 'New Connection.'

Predefined Reports
Depending on which data source you choose, the Source tab will provide different options for customizing and shaping the data to be pulled into your target.
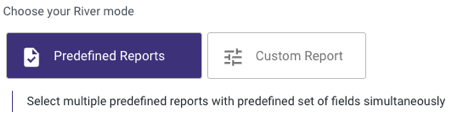
Using Predefined Reports option, you can select multiple predefined reports with predefined set of fields simultaneously. Those predefined reports provide a simple and easy configuration of your source data structure with a few clicks of a button.
For example, when connecing to Hubspot, you'll be able to choose your Schema from a list of predefined reports which were built with best practices.
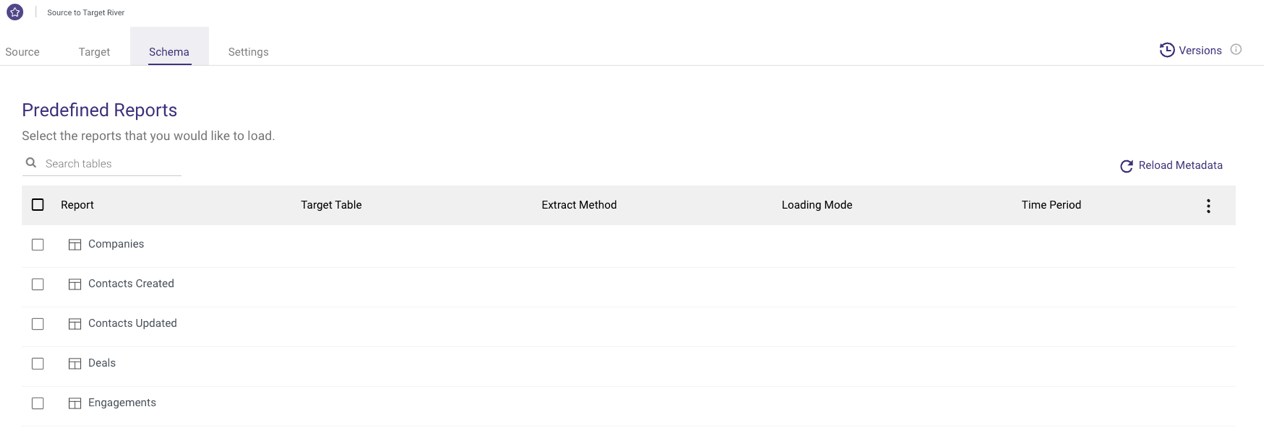
Per each data source, you can view the documentation of the predefined reports describing all reports, fields and schema definitions. For example, HubSpot Predefined Reports.
While if you are looking for custom reports and advanced configuration you can use the Custom Report option to create a custom single report by selecting report type and fields.
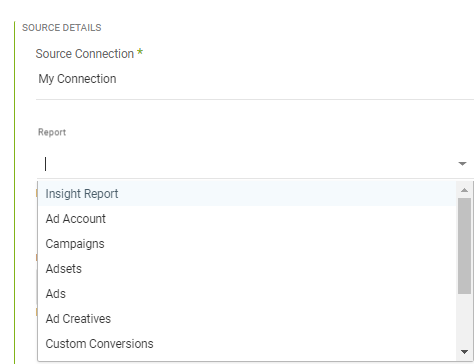
For example, when connecting to an API connector such as Facebook Ads, you'll be presented with parameters and options that reflect what the API offers. For example, in Facebook Ads, you are first given the option to select which Facebook Ad report you would like to pull into your target.
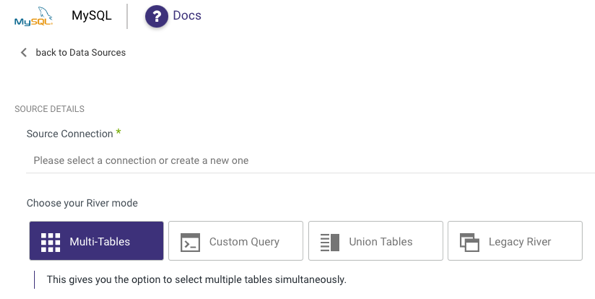
For connecting to a Database Source , the Source tab will look a bit different. Instead of pulling predefined reports and selecting accounts, campaigns, date ranges, etc. we are prompted to select how we would like to pull data from our source database.
Incremental Loading
In our RDBMS sources (MySQL, SQL Server, Oracle, PostgreSQL), as well as some others (Salesforce, Netsuite, to name a couple) there is an option to set the Extract Method to load the data incrementally.
What this means is that instead of extracting all of the data in a given table or report, you can identify a field that will serve as your increment. Most commonly this is a timestamp or ID field of some sort. For example, if I set my river to load incrementally based on a field in my table called DATE_LAST_MODIFIED, then each time the river runs, Rivery will check to see what the largest DATE_LAST_MODIFIED value was from the previous run, and then only take records with a greater DATE_LAST_MODIFIED to be sent to the target data warehouse.
It is important to note that the "Start Date" for the incremental field is inclusive, while a set "End Date" defaults to exclusive, meaning that for the following scenario:
Start Date = 2020/01/10 00:00:00,
End Date = 2020/01/11 03:00:00,
The query in the backend would have the following range:
start_date >= 2020/01/10 00:00:00
end_date < 2020/01/11 03:00:00
There is an option to specify that the end value should be included in these increments:
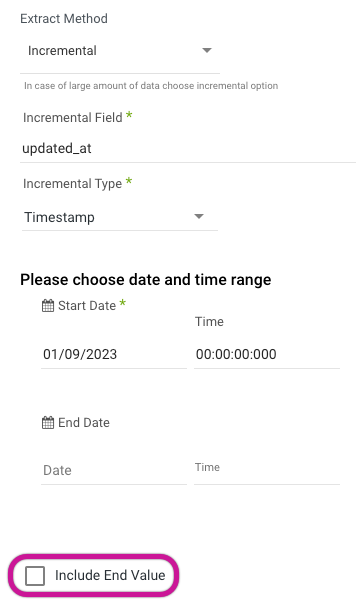
which would then change the above query range to look like:
start_date >= 2020/01/10 00:00:00
end_date <= 2020/01/11 03:00:00
The incremental loading method can save time and RPUs as since it is only processed the delta between runs, the data volume will be presumably lower than extracting all data every run.
Selecting Time Periods
In most API connections, you will find the ability to specify a time period for data extraction. The available options for the data retrieval period may vary depending on the type of Source connector you are utilizing:
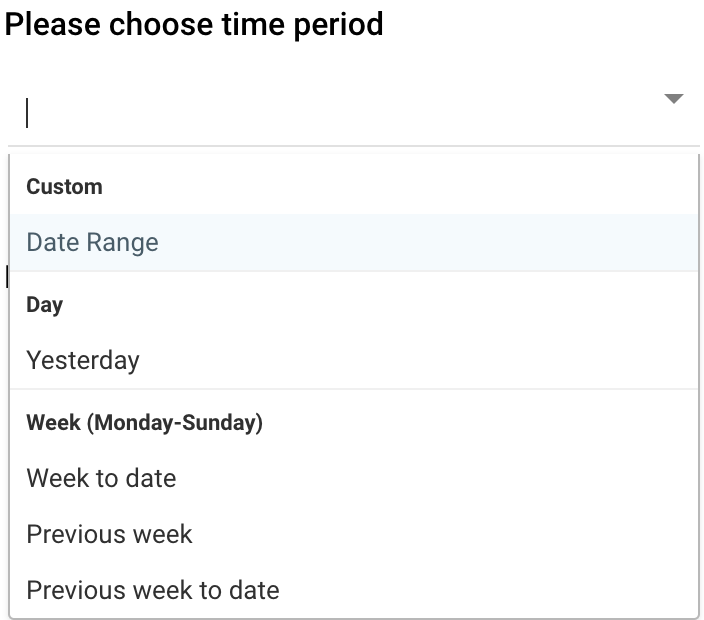
Custom - Data Range:
Set a custom date range for retrieving data.Day - Yesterday:
It sets the start date from yesterday to today (up to the current moment, considering microseconds) by initializing a starting date based on the current date and subtracting one day, then adding one day and the specified microseconds to get the ending date.Week (Monday - Sunday)
- Week to Date: It sets the start date to the beginning of the current week and the end date to the current date. Essentially, 'Week to date' includes all days from the start of the current week up to and including the current day.
- Previous Week: It sets the start date to the beginning of the previous work week and the end date to the start date plus one week and the specified microseconds.
- Previous Week to Date: It sets the start date to the beginning of the previous week and the end date to the current date. Therefore, 'Previous week to date' includes all days from the start of the previous week up to and including the current day.
Month
- Month to Date: It sets the start date to the beginning of the current month and the end date to the current date. Therefore, 'Month to date' includes all days from the start of the current month up to and including the current day.
- Previous Month: It sets the start date to the beginning of the previous month and the end date to the start date plus one month and the specified microseconds.
- Previous Month to Date: It sets the start date to the beginning of the previous month and the end date to the current date. Therefore, 'Previous month to date' includes all days from the start of the previous month up to and including the current day.
Year to Date: It sets the start date to the beginning of the current year, and the end date to the current date. Therefore, 'Year to date' includes all days from the start of the current year up to and including the current day.
Please Note:
- The functionality of these options may differ based on the Source connector type you are using and the limitations of its API.
- Upon the first run with a Custom Date Range, the River will retrieve data from the indicated Start Date to the indicated End Date (if the End Date is unspecified, it will fetch data from the Start Date until the current time). Subsequent runs of the River will update the Start Date to match the date and time of the latest run, while the End Date will be left empty. This ensures that the River load resumes from where it previously left off during the last run.
'Last Days Back' option

In some source connections, there is a 'Last Days Back' option. This feature allows Rivery to include an additional number of retroactive days in the data pull, beyond the specified time period.
For instance, if the time period is set to 'Yesterday' and 'Last Days Back' is set to 1, Rivery will retrieve data for both yesterday, the previous day, and the current date.
Once you have configured the Source tab to your requirements, move on to the Target tab.
Target
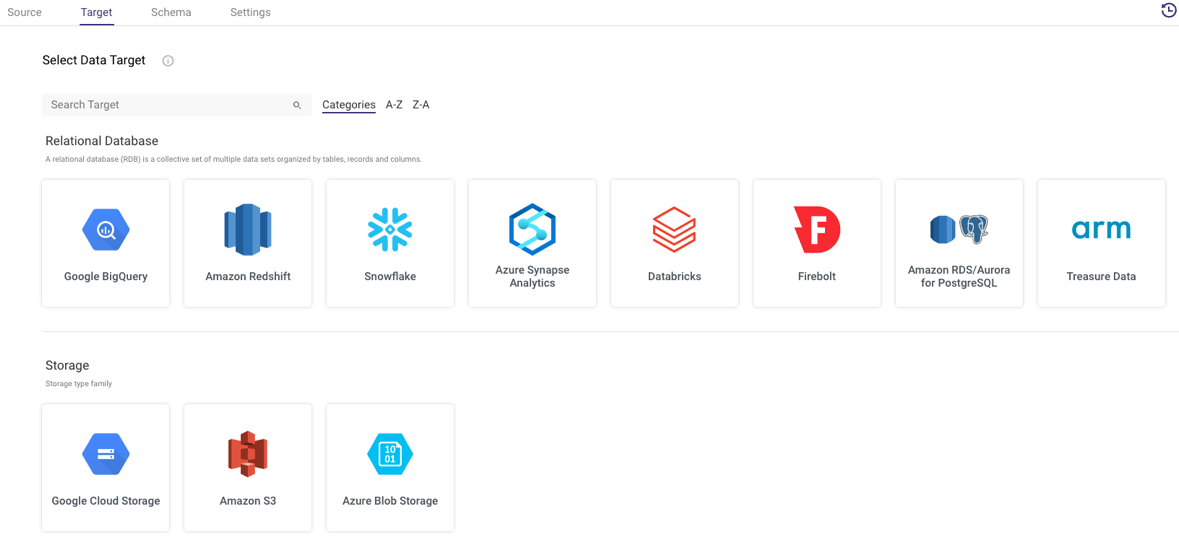
In the Target tab, you will first be prompted to select your cloud target. This is where the data coming from the source will land.
Currently, Rivery supports the following cloud data warehouses and cloud file storage as targets:
Regardless of what target you choose, you will need to set the connection. Again, you can either choose an existing connection or create one on the fly.
If your target is a cloud data warehouse, the Target tab will look something like this:
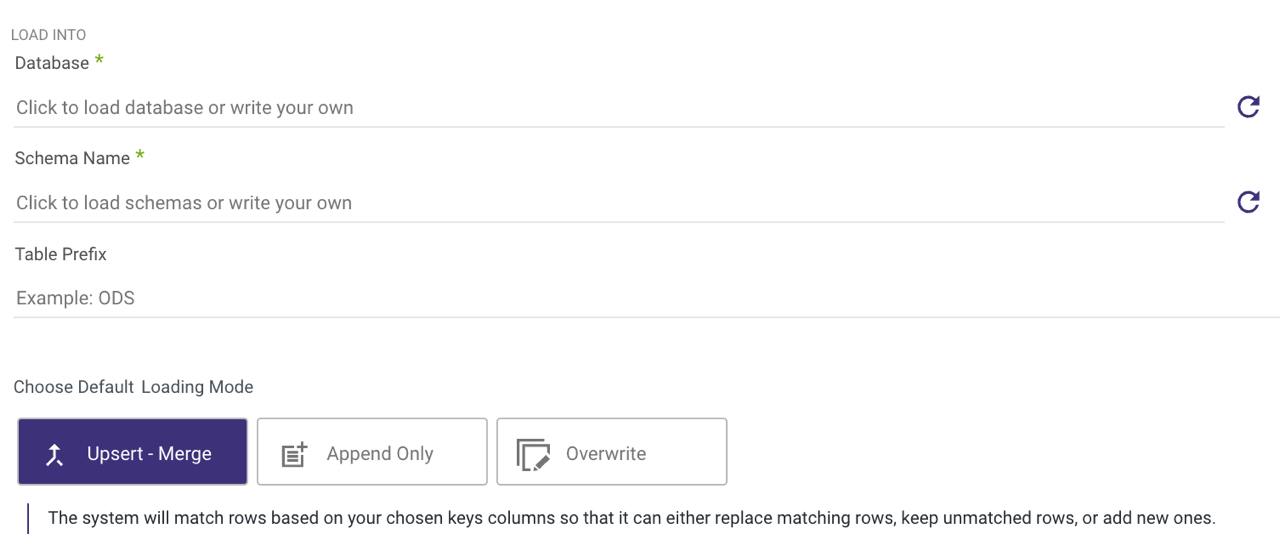
You'll have to define a database, schema, and target table. This is where the data pulled from your selected source will land. Rivery will automatically detect available databases and schemas for you to choose.
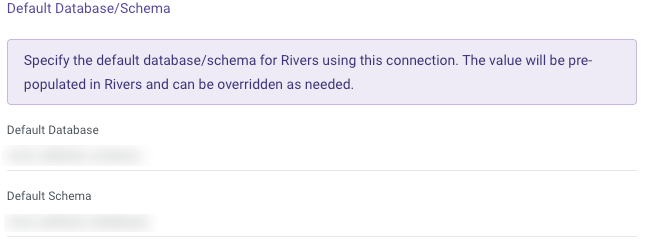
Please Note:
In Snowflake, the connection form includes a "Default Database/Schema" section. This allows you to specify the database and schema you want to work with, and the connection will automatically remember and use these as the default.
This simplifies the setup process for the target, saving time and effort.
Next, choose the loading mode you require:
- Overwrite: Replace the data in the target table entirely with the data from this run. If the target table does not already exist, it will be created automatically.
Please Note:
Each Target has its own unique behavior. To ensure how your desired Target Overwrites, please consult the Target's documentation. - Upsert-Merge: Only add new or changed records to the target table based on a defined key in the Column Mapping.
- Append Only: Union the data from this load onto the existing target table.
If you choose to use Upsert-Merge functionality, you can define your merge key by clicking in the Column Mapping (the next tab).
Upsert-Merge also has the ability to Filter on Logical Keys. This allows for deduplication within the Source records (Existing Target records will not be deduplicated). This can be done by adding an expression (in Target Database syntax) to the 'Filter Order Expression' field. This acts an ORDER BY function in SQL with the River only pulling the first record.
If your target is cloud storage, the parameters will look like this:

You'll need to identify the desired bucket and file path for the data to land. The default is the bucket used to set up the connection.
Schema
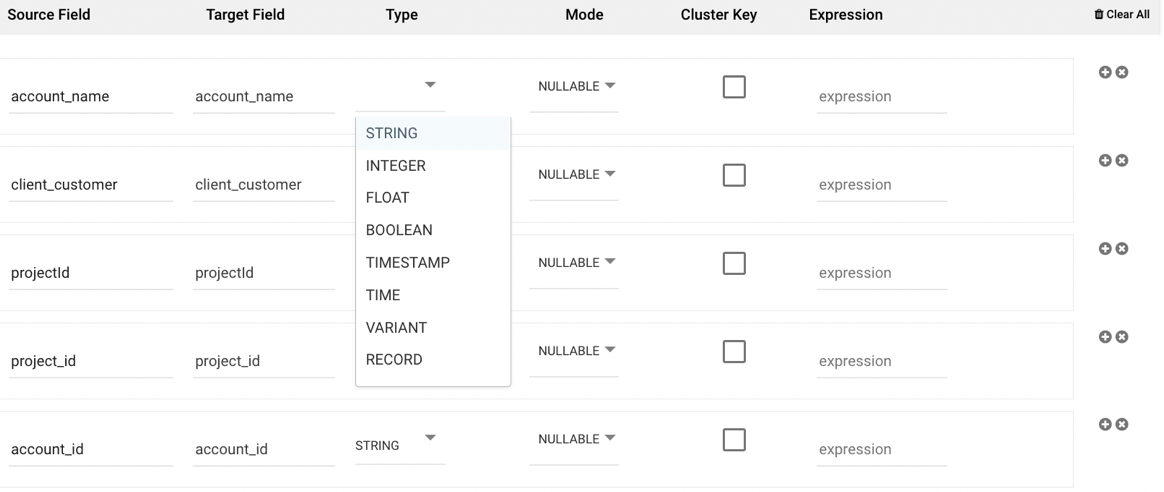
Columns Mapping
The auto-detection of a table schema can be found under the Schema tab, allowing for extra customization and updates to the metadata of the target table before the data is loaded.
To auto-detect the schema outlined from the Source tab you configured, select 'Auto-Mapping.' The corresponding fields and their data types will populate.

If Upsert-Merge was selected as your loading mode in the Target tab, you can define the primary key to use to define a match for when data from the source should be merged. You can do this by clicking the key symbol next to the desired key field so that it is colored yellow. If you click more than one field to be the key, then this will act as a combination key, meaning that the combination of the two field values will act as the primary key in the upsert-merge.
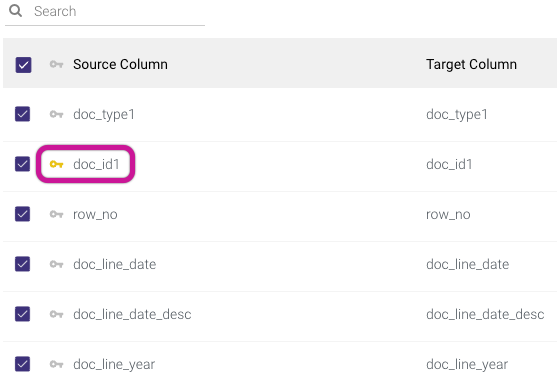
In addition to setting a primary key, you can edit the target field name, data type, and mode of any field. This enables renaming fields and casting data types during the load process itself.
Please Note:
Rivery excludes column descriptions from the metadata. Ensure you document these descriptions separately if required.
Rivery does not currently support the use of dots (.) in column names.
Attempting to use dots in column names may lead to errors or unexpected behavior when processing data.
Please remove or replace any dots in column names to ensure compatibility with Rivery.
The 'Mode' option is used to specify the behavior and constraints of a column in a database schema. It defines how the column handles values, particularly in terms of nullability and multiplicity:
Nullable: This option allows the column to accept null values, meaning it is not mandatory to store a value for every row in the dataset. A row can either have a defined value or no value (null) for this column.
Required: This option enforces that the column must always contain a value. Every row in the dataset must have a value for this column; null values are not allowed.
Repeated: The repeated mode is typically used for columns that need to hold multiple values of the same type, functioning similarly to an array or list. This is especially useful for defining nested or complex data structures. For example, in Google BigQuery, a column with the Repeated mode can store an array of values, where each row may contain zero, one, or more values for that column. This contrasts with Required, where exactly one value is expected, and Nullable, where a single value or a null value is permitted.
The 'Cluster Key' option can be used to define a partition field.
The 'Expression' option allows for SQL syntax to be used to either define a new field or alter the definition of an existing field. The SQL syntax to be used is that of the target data warehouse you have selected.
Settings
Schedule & Notifications
After setting up the Column Mapping step for your River, you have the option to either run it instantly (by clicking the Run button located at the screen's bottom) or schedule it for later execution. For guidance on scheduling, please refer to the "Settings tab" documentation.
Activities
Once the River is running, navigate to the Activities tab located in the right-side menu to observe the ongoing progress. Rivery offers organized logs, providing an insightful view into the operations occurring within each of your connections. Activities empower you to conveniently monitor, access, and analyze these logs.
Important Note
There is a limit of up to 500 tables per River.
Was this article helpful?