Database River Modes
- 9 Minutes to read
- Print
- DarkLight
- PDF
Database River Modes
- 9 Minutes to read
- Print
- DarkLight
- PDF
Article summary
Did you find this summary helpful?
Thank you for your feedback!
Introduction
Rivery offers multiple database River modes to meet the needs of different use cases. Each River mode has its own advantages, and the choice of a River mode depends on the nature of the source data and the requirements of the target database.
This document will outline the different database River modes available in Rivery and explain the use cases for each mode.
River Modes
Multi-Tables
Standard Extraction
This mode allows for mapping and transforming the data from multiple tables into a unified schema, before loading the data into the destination. The process involves defining the relationships between the tables, so that data can be linked and loaded in a consistent manner. Multi-Tables River mode in Rivery typically uses SQL-based queries to perform the data transformations, and can be configured to run on a schedule or triggered manually.
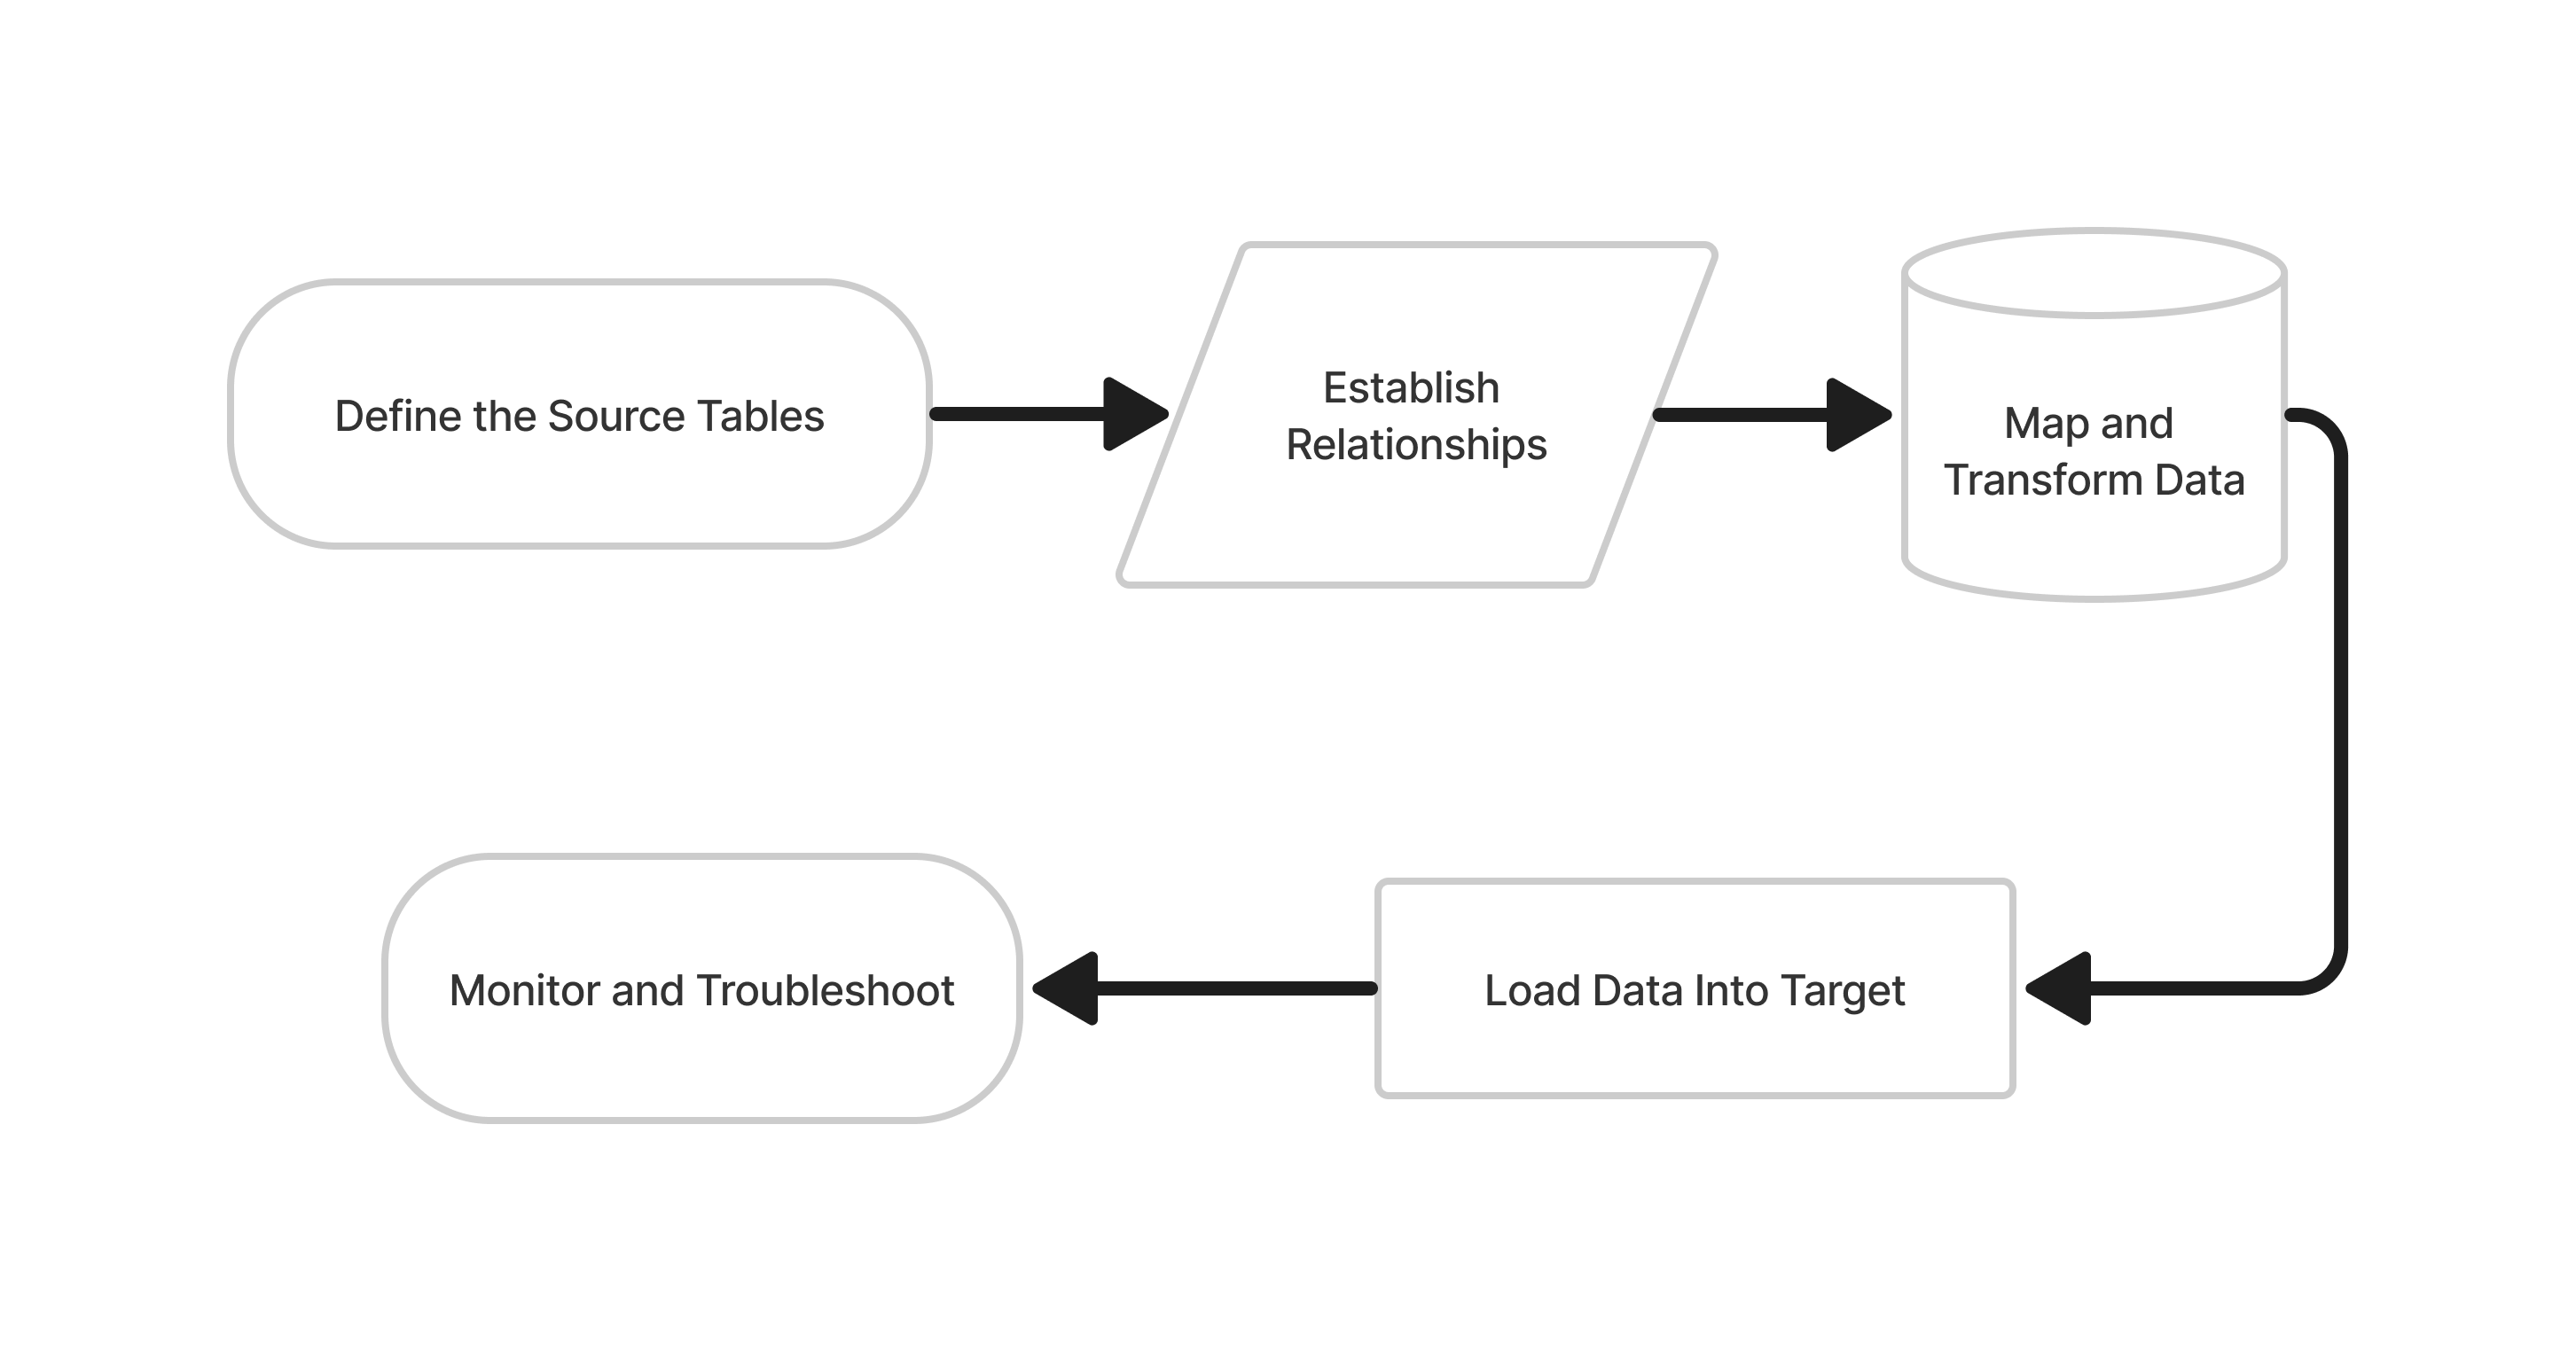
Standard Extraction Mode Flowchart
The Steps
Define the source tables: Identify the tables you want to load into the destination and set them up as sources in Rivery.
Establish relationships: Define the relationships between the source tables. For example, you may have a main table and several related tables that provide additional information about each record in the main table.
Map and transform data: Use SQL-based queries to map and transform the data from the source tables into a unified schema that is compatible with the destination. This may include operations such as merging columns from different tables, splitting columns into multiple fields, or aggregating data.
Load data into Target: Use Rivery to load the transformed data into the destination. This may involve creating a new database or table, or updating existing data in an existing database or table.
Monitor and troubleshoot: Monitor the process to ensure that the data is loaded correctly, and troubleshoot any issues that may arise. For example, you may need to fix data that has been rejected due to data type mismatches or other errors.
This is a console tour for pulling data into a Target with Multi-Tables Standard Extraction mode using MySQL. Please hover over the rippling dots and read the notes attached to follow through.
Here are a few additional notes:
Even though there is a default Loading Mode defined in the Target tab, any individual table's loading mode can be changed by selecting the Schema tab and then 'Edit' button on the far right:
After you've chosen your tables, they'll be displayed with further editing possibilities.
You can change the following on the 'Columns' tab:
Check or uncheck the boxes next to the columns you want to include or exclude from the Target.
In 'Target column,' rename the field by clicking the name and typing a new one.
Double-click the current data type under 'Type' to change the field to a new data type.
Change the field's mode under 'Mode'.
By checking the 'Cluster Key' box, you can make a field a Cluster Key, which is used for partitioning.
To make a field the key for Upsert-Merge, highlight it with the key to the left of the field name.
On the 'Table Settings' tab you are able to edit the following:
You can extract data in two ways:
All (Default)
Incremental
If you choose 'Incremental,' you can specify which field will be used to define the increment.
Please Note:- Start Date is mandatory.
- Data can be retrieved for the date range specified between the Start and End dates.
- If you leave the end date blank, the data will be pulled at the current time of the River's run.
- Dates timezone: UTC time.
Select 'Edit' to change the Target Table Name.
Change the Upsert-Merge mode to any other Loading Mode.
Filter logical key duplication between files - This option removes duplications from the current source pull.
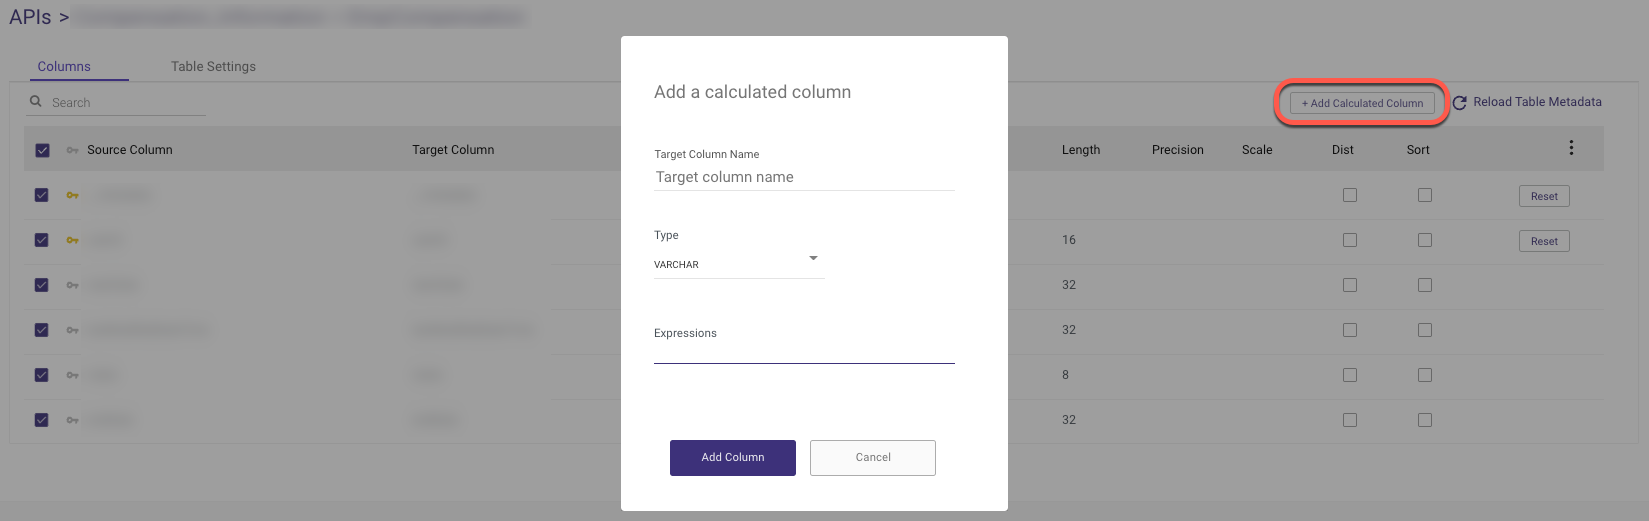
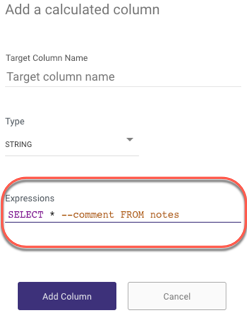
A custom expression can be added to any target column by clicking '+ Add Calculated Column'.
When adding a comment to an Expressions query, use /* "comment" */ rather than two hyphens (--) to prevent commands from being mistakenly interpreted as comments, as the query is converted to a single line.
Change Data Capture (CDC)
Rivery's Change Data Capture (CDC) extraction mode works by constantly monitoring the logs or records generated by the source database and then capturing changes made to the source data. This change data is then collected, transformed, and loaded into the target database, ensuring the target is always in sync with the source. CDC extraction provides real-time data replication and ensures minimal data loss by providing low latency data transfer.
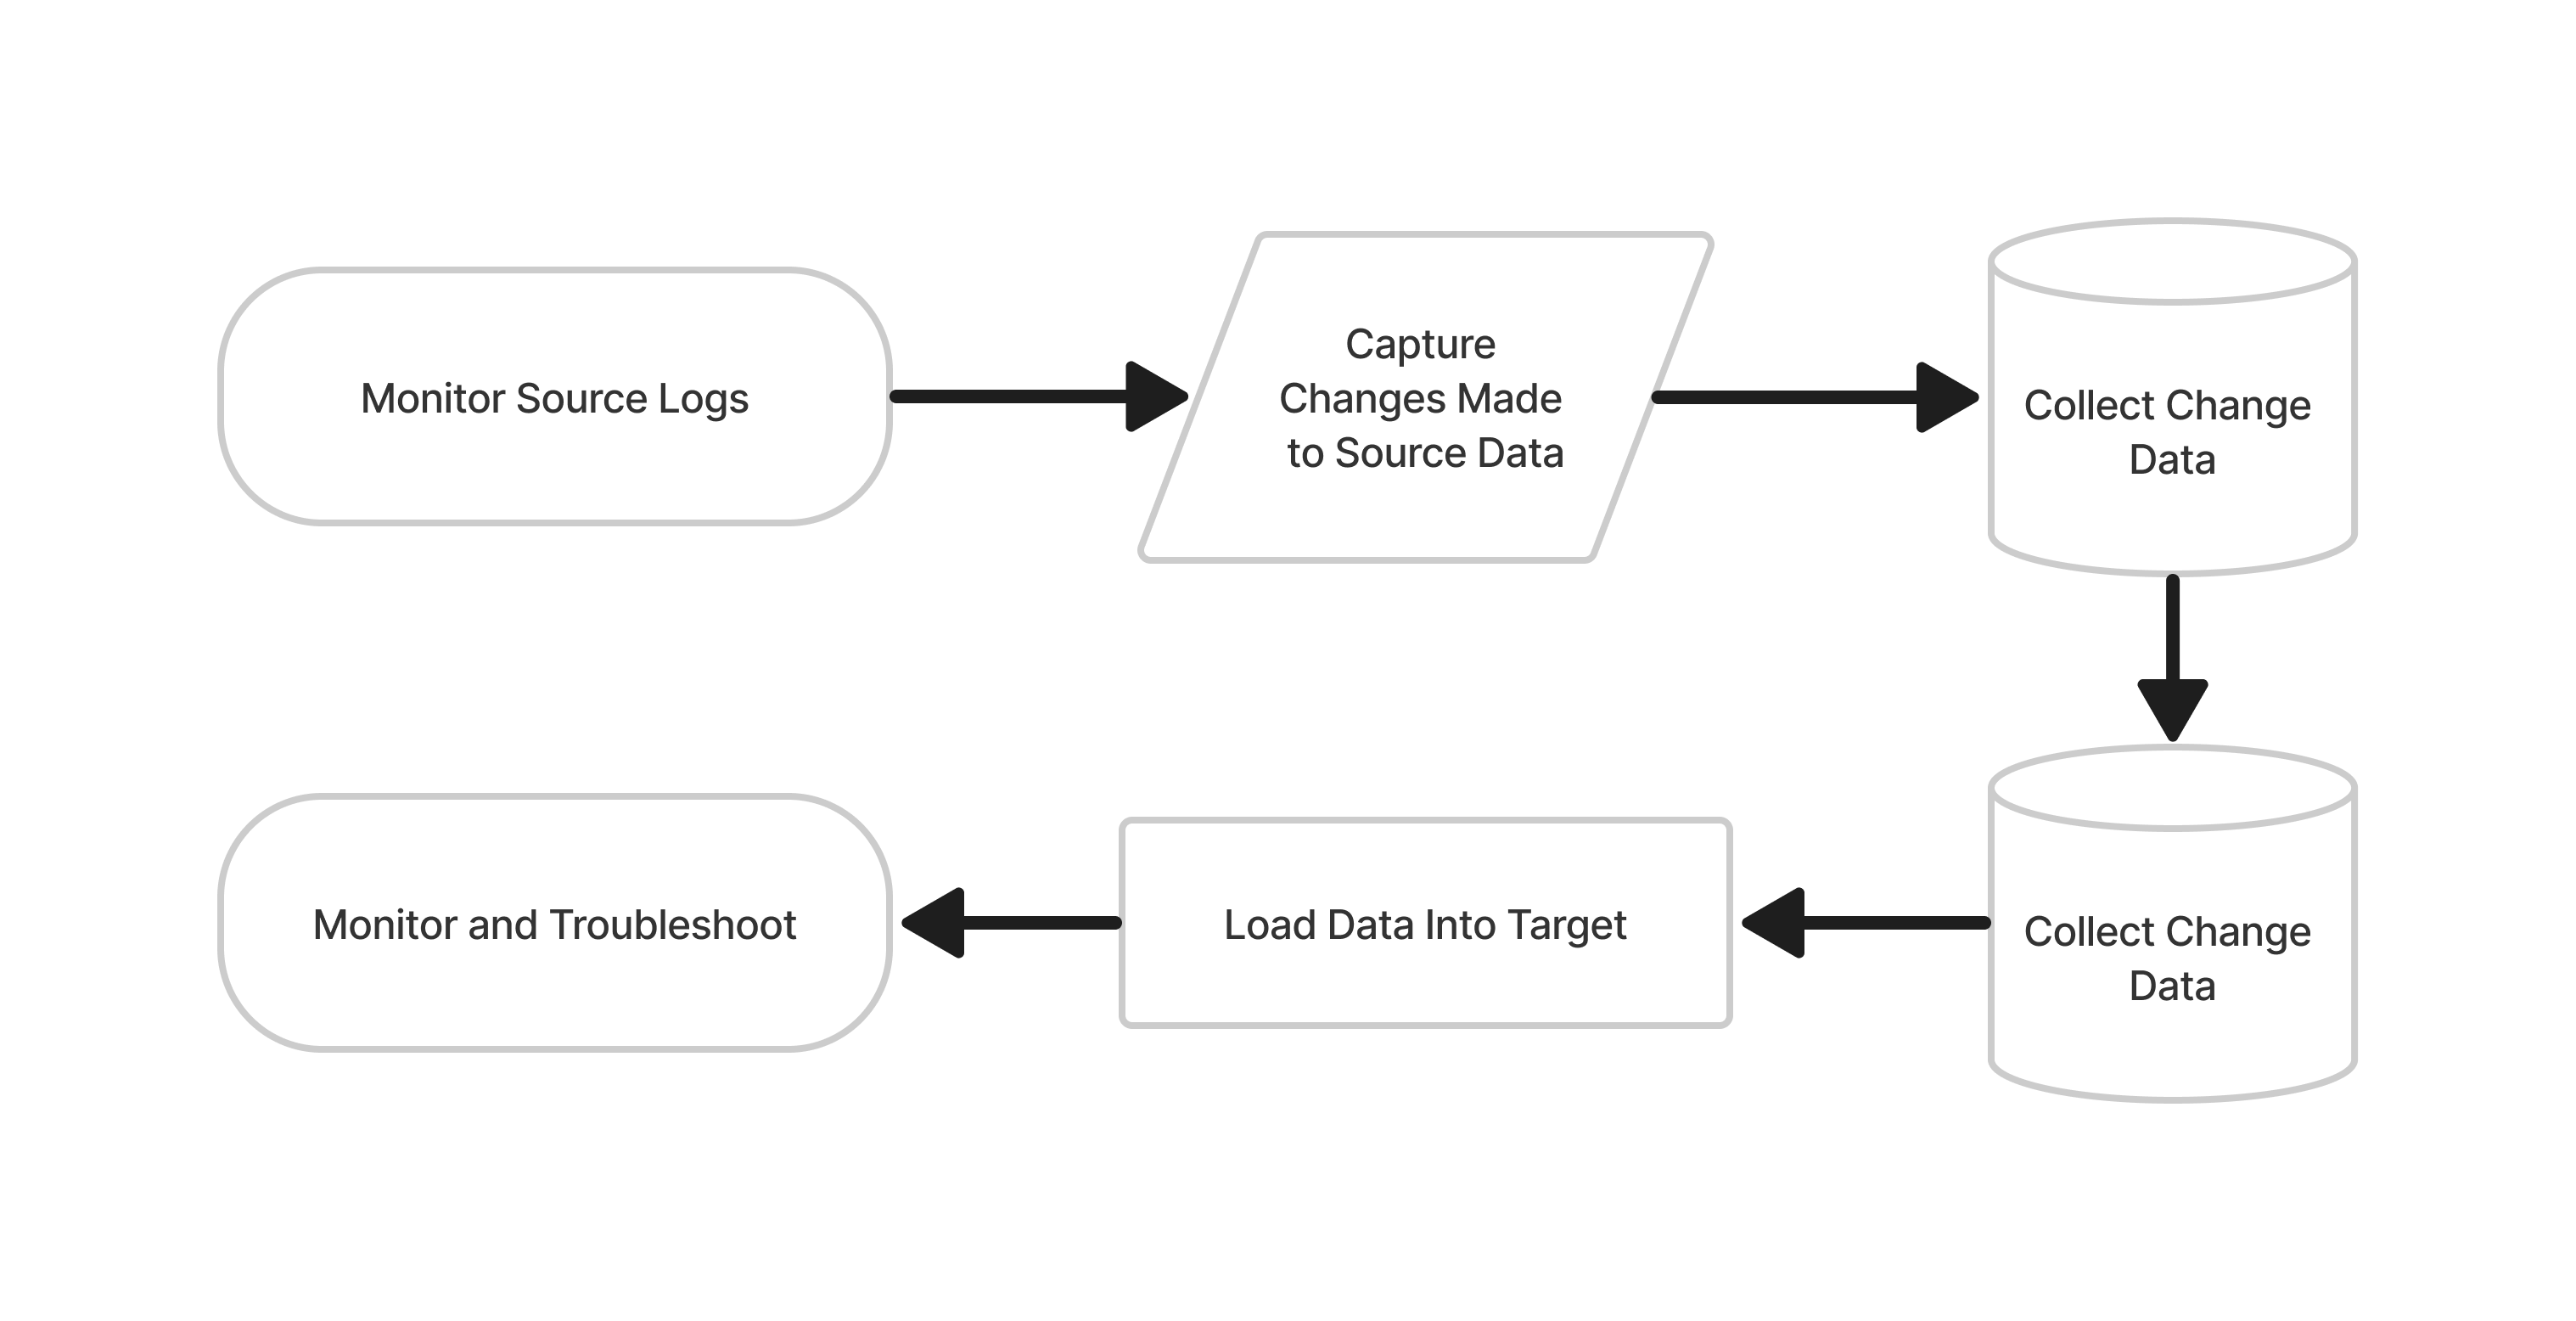
CDC Mode Flowchart
The Steps
Monitor Source logs: Rivery monitors the logs generated by the source database to keep track of changes made to the data.
Capture changes made to Source data: Rivery captures changes made to the source data, such as updates, inserts, and deletes, as they occur.
Collect change data: Rivery collects the captured change data into a batch or stream for processing.
Transform change data: The change data is transformed to match the structure of the target database and to meet any other specific requirements.
Load transformed data into Target: The transformed change data is loaded into the target database, ensuring that it is always up-to-date with the source database.
Ensure Target is always in sync with Source: Rivery continually monitors the source database logs and replicates changes to the target database, ensuring that it remains in sync with the source.
This is a console tour for pulling data into a Target with Multi-Tables Log Based mode using SQL Server Log-based extraction mode. Please hover over the rippling dots and read the notes attached to follow through.
Please Note:
The CDC extraction mode can be used with the following Databases:
Custom Query
The Custom Query River mode in Rivery allows users to load data into the platform using their own SQL queries. This mode provides a high degree of flexibility and control over the data being loaded, as users can define the exact data to be loaded and the specific transformations to be applied. The queries can be written in SQL, and data can be loaded from databases and data warehouses. Once the custom query is defined, the data can be automatically loaded into Rivery on a regular schedule, or on-demand, providing real-time access to the data.
Note:
Rivery does not support multi-statements or SQL Script in the custom query field.
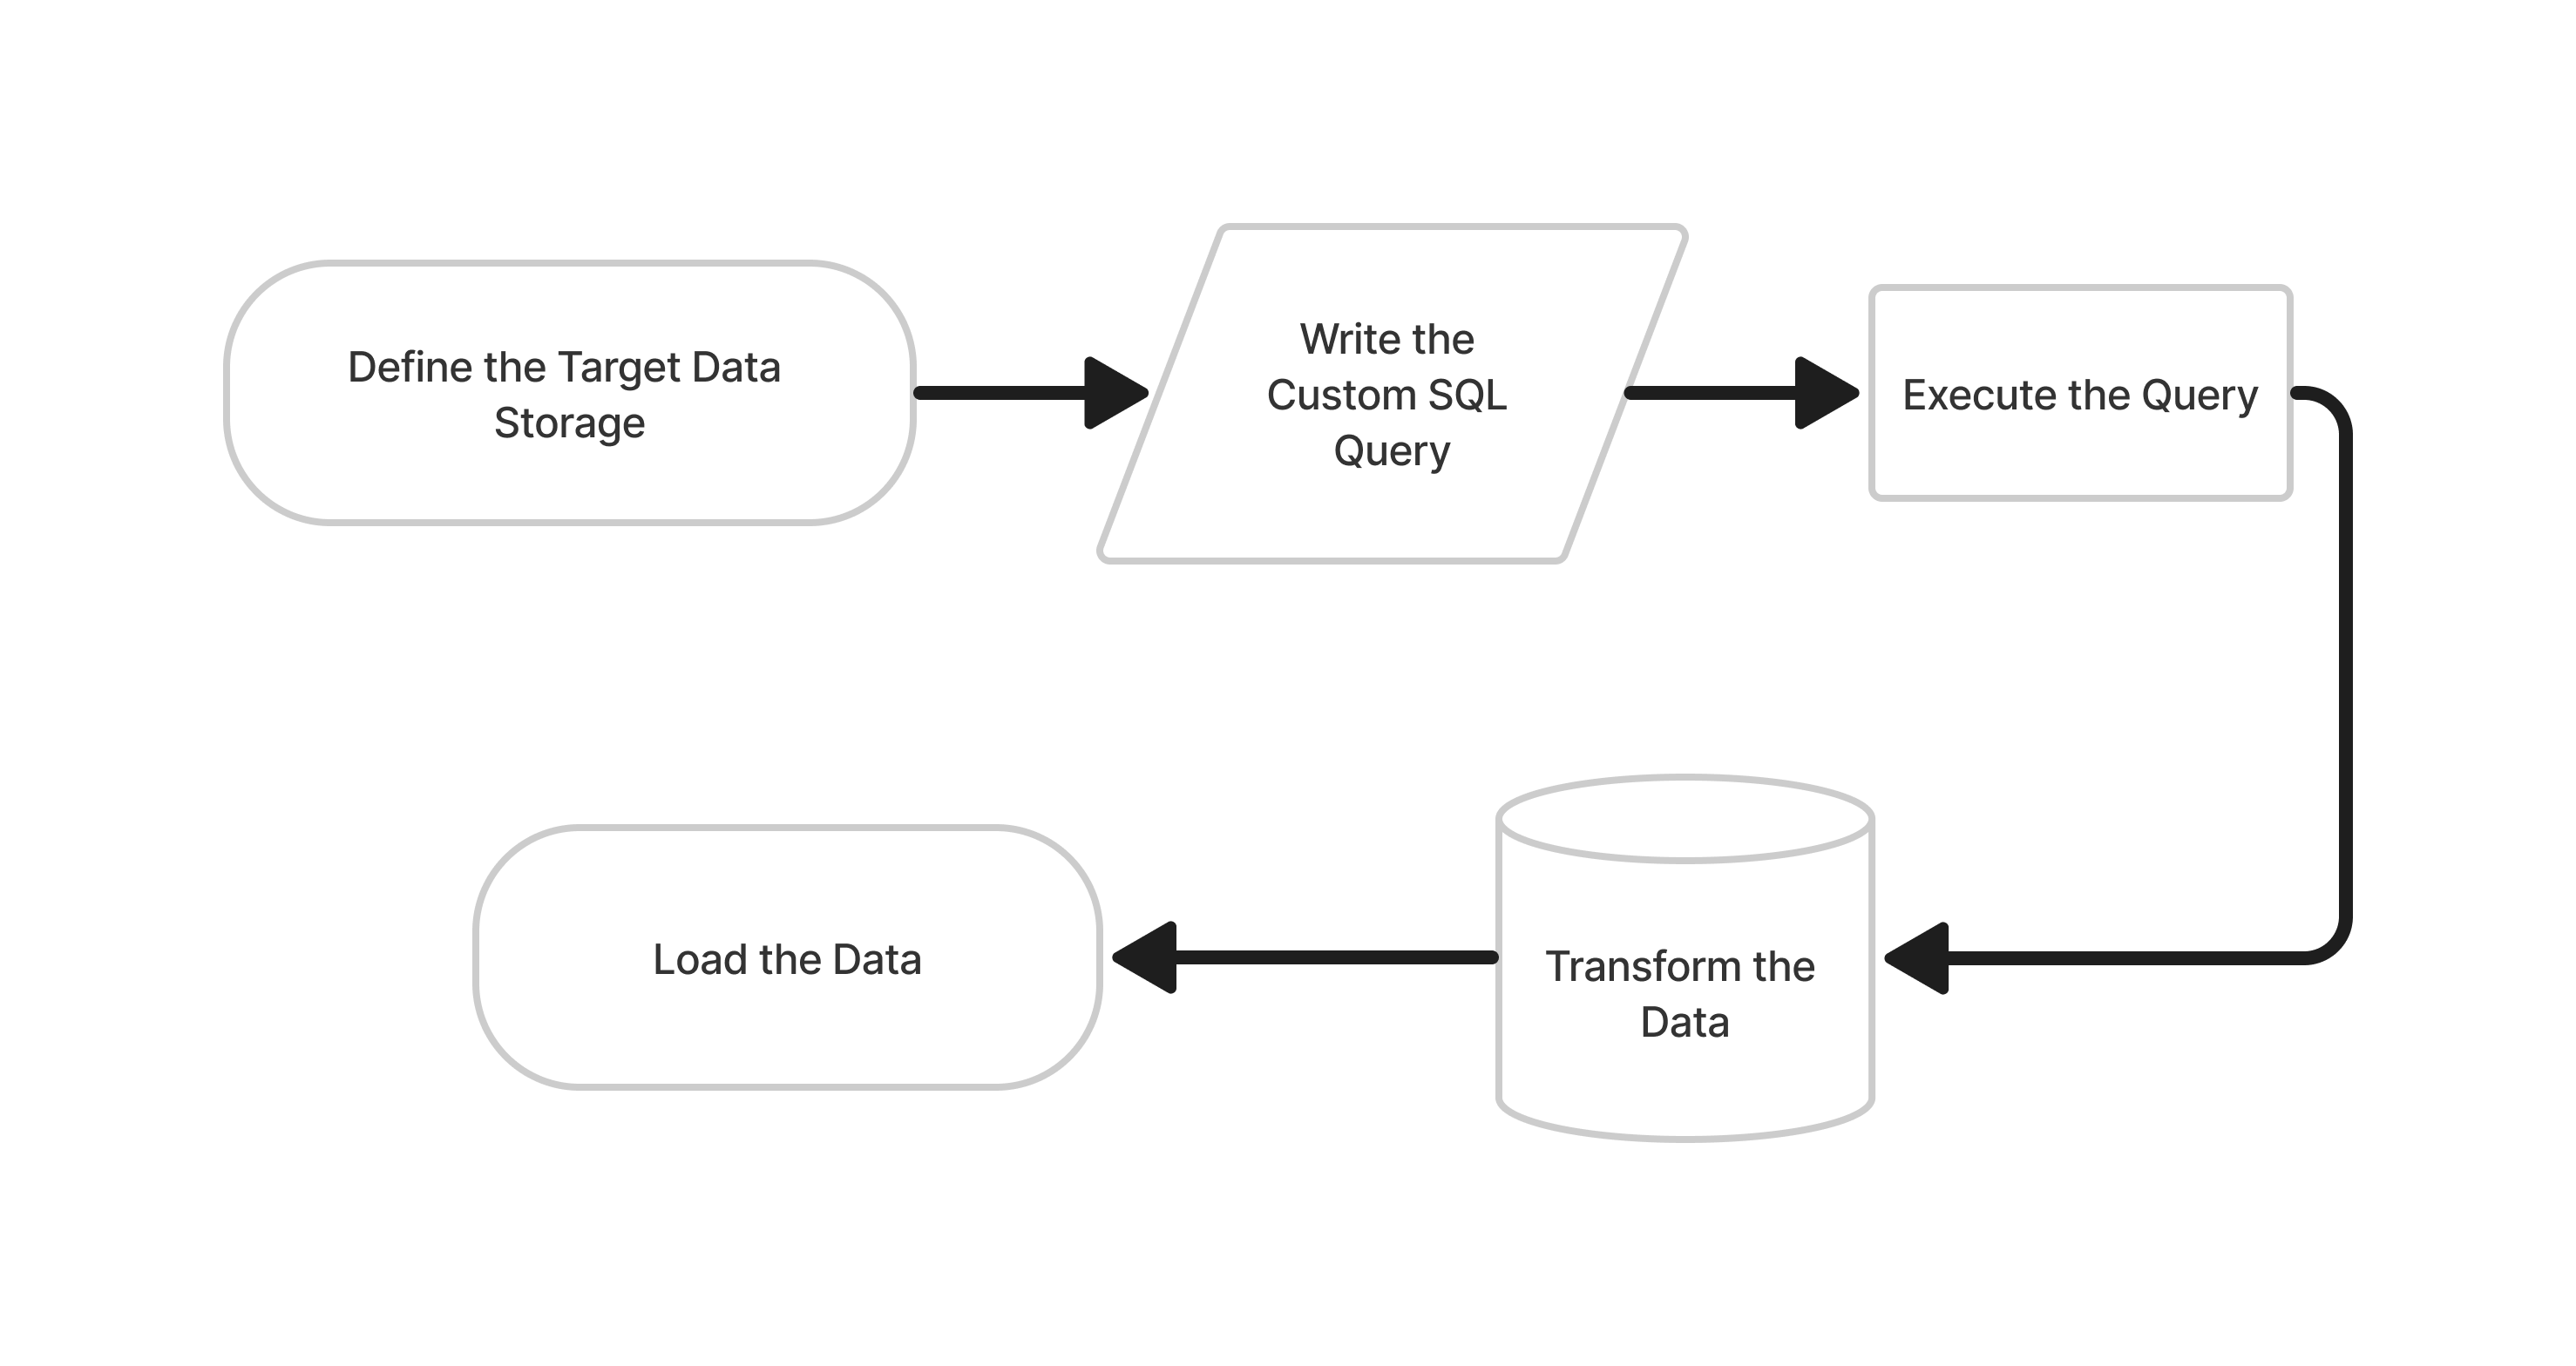
Custom Query Mode Flowchart
The Steps
Define the target data storage: The user needs to specify the target storage where they want to load the data. This could be a database, data warehouse, or any other data storage system supported by Rivery.
Write the custom SQL query: The user writes a custom SQL query to select the data they want to load. The query should return the desired data in the expected format.
Execute the query: Rivery executes the custom SQL query and retrieves the data.
Transform the data: Rivery allows users to perform transformations on the data if necessary. This could include operations like renaming columns, transforming data types, and more.
Load the data: Finally, Rivery loads the transformed data into the target storage. The data is loaded in the desired format and structure.
This is a console tour for pulling data into a Target with a Custom Query using MySQL. Please hover over the rippling dots and read the notes attached to follow through.
The following River mode is soon to be deprecated:
Legacy River
Legacy River River mode in Rivery supports loading data from a single source table into a single target table. It's designed for basic data loading scenarios where you want to periodically bring in new or updated data from your source into Rivery for processing and loading into your target system.
Extract Methods
Two methods are available for extracting data:
- All
- Incremental
All
This mode loads all data from a Source into the Target database, replacing all existing data in the Target database. It is useful when the Source data is complete and up-to-date, and you want to create a fresh copy of the source data in the target database.
Incremental
This mode loads only new or updated data from a source into the target database. It is useful when the Source data is frequently updated and you want to keep the Target database in sync with the Source data.
Incremental Behavior
Rivery works in millisecond increments, but users can store data in more granular microsecond or nanosecond increments.
When operating incremental runs based on timestamp, it may appear that the most recent record is missing.
Rivery reads three numbers after the dot when there are six, so '2022-08-14 10:26:52.895132' becomes '2022-08-14 10:26:52.895' and the last record is missing from the current run when fetching the data.
Please be aware that the following run will retrieve this record with updated information.
Please Note:
The extraction methods can be selected in all River modes. In Multi-Tables mode, you can locate the options by navigating to the Schema tab and selecting a table. From there, access the 'Table settings' option.
Incremental Load Strategy with WITH (NOLOCK)
In Boomi Data Integration, queries use the WITH (NOLOCK) clause to avoid locking source tables during data extraction. This improves performance and minimizes disruption to production systems, especially during write-heavy operations.
Note: This method introduces the risk of dirty reads, where:
Data is read before transactions are committed Uncommitted changes may be extracted Recently committed rows may be missed
Inconsistent data may appear between consecutive loads
This is particularly common when reading from "hot" tables frequently updated data with late changes or long-running transactions.
Recommended Strategy for Stability
To improve data accuracy when using WITH (NOLOCK), follow this two-step incremental load approach:
1. Initial Historical Backload
Use a wide date range to capture delayed or retroactive updates.
Example: start_date = 23 June 2025, last_days_back = 380
2. Ongoing Incremental Loads
Include a small overlap window on each run to catch late updates.
Example: Pull data from the last 5 days (adjust as needed based on data volatility).
Tip
Overlapping windows help recover missed or uncommitted data and improve consistency in frequently updated ("hot") tables.
Additional notes on the Incremental Extraction Method:
Start Date/Value is mandatory.
Data can be retrieved for the date range specified between the Start and End dates.
If you leave the end date blank, the data will be pulled at the current time of the River's run.
Should we check the End value box?
This question refers to whether the end value in a sequence should be included or not. The difference between including or excluding the last value is shown in 3 cases:Case #1: If the start date/value is 01/01/2023 and the end date/value is also 01/01/2023:
If the "Include End Value" toggle is checked, all data from 01/01/2023 will be pulled to the target table.
If the "Include End Value" toggle is unchecked, no data will be pulled to the target table and a warning will be issued.
Case #2: If the start date/value is 01/01/2023 and the end date/value is 02/01/2023:
- If the "Include End Value" toggle is checked, all data between 01/01/2023 and 02/01/2023 will be pulled to the target table, and the start date will be updated to 02/01/2023 after the run.
- If the "Include End Value" toggle is unchecked, only the data from 01/01/2021 will be pulled to the target table.
Case #3: If the start date/value is 01/01/2023 and the end date/value is blank:
- If the "Include End Value" toggle is checked, all data between 01/01/2023 and the current UTC time will be pulled to the target table, and the start date will be updated to current UTC time after the run.
- If the "Include End Value" toggle is unchecked, only the data from 01/01/2021 will be pulled to the target table.
Dates timezone: UTC time.
Start/End Date format: DD/MM/YYYY (Day/Month/Year with leading zeros).
Was this article helpful?