- 1 Minute to read
- Print
- DarkLight
- PDF
Oracle Connection
- 1 Minute to read
- Print
- DarkLight
- PDF
This is a step-by-step tutorial for creating an Oracle connection.
Prerequisite
To connect to Oracle, you must whitelist our IPs.
Singletenant vs. Multitenant Database Architecture in Oracle
In Oracle, the architectural approach can significantly impact the efficiency, scalability, and resource utilization of the system. One key decision in this regard is choosing between a Singletenant and Multitenant architecture. This section explores the fundamental differences between these 2 topoligies within the Oracle.
Singletenant Architecture
A Singletenant architecture, also known as a traditional or non-CDB (Container Database) architecture, involves the creation of standalone Oracle databases for each application or business unit. Each database operates independently, with its dedicated set of memory, processes, and data files. In this topologie, there is no shared infrastructure or resources between databases.
Multitenant Architecture
A Multitenant architecture, is built on the concept of a CDB (Container Database) that can host multiple Pluggable Databases (PDBs) within a shared infrastructure. The CDB contains common resources, while each PDB represents a distinct, isolated database within the shared container.
Establishing a Connection
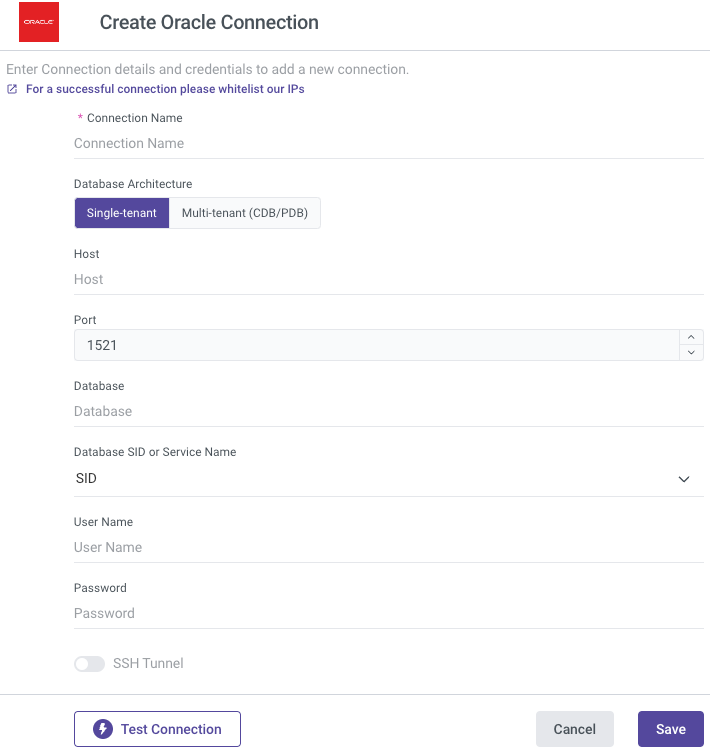
- Type in the Connection Name.
- Choose your Database Architecture.
- Single-Tenant
- Multi-Tenant (CDB/PDB).
- Enter your Host name.
- Fill in the Port (typically 1521 is the most common).
- Input the name of your Database.
- Select whether to connect using the System Identifier (SID) or Service Name.
Please be aware of the following details regarding each option:
- System Identifier (SID) - Ensure that you enter the distinct name that uniquely identifies your instance or database in the Database field.
- Service Name - Ensure that you input the TNS alias name used for remote connection to your database in the Database field.
- Enter your Username and Password.
- Use the Test Connection function to see if your connection is up to the task. If the connection succeeded, you can now use this connection in Rivery.

SSH (Optional)
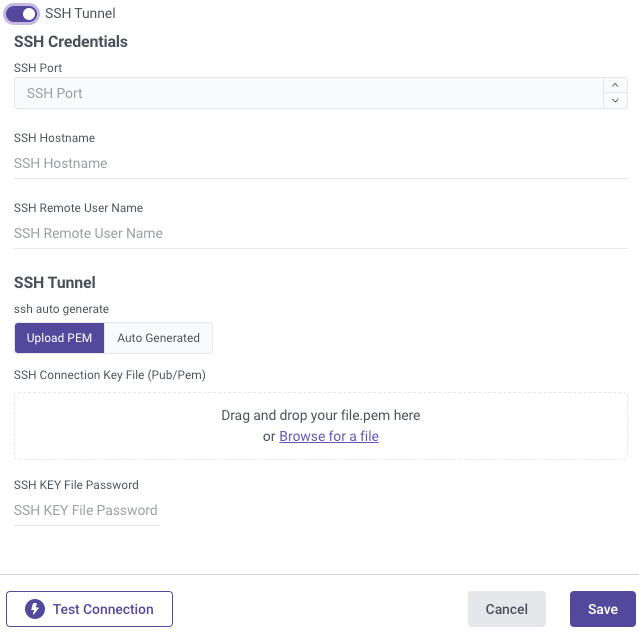
Secure Shell Protocol (SSH) is used to provide secure and encrypted access to internal databases from Rivery servers in order to retrieve data.
Configure your SSH Tunnel server in your network to use SSH Tunneling via Rivery. This server will be able to connect to your database server via the internal IP or address, and will accept SSH connections from Rivery IPs. Rivery uses a key file to connect to the SSH server.


