Reverse ETL - Example Use Case
- 5 Minutes to read
- Print
- DarkLight
- PDF
Reverse ETL - Example Use Case
- 5 Minutes to read
- Print
- DarkLight
- PDF
Article summary
Did you find this summary helpful?
Thank you for your feedback!
Overview
Rivery by nature is an E-L-T platform as opposed to E-T-L. Our source connectors load raw data into destination data lakes or data warehouses, and our Logic rivers enable full ELT orchestration and pushdown transformations in said destinations.
But what about pushing data from your data warehouse to other systems? In theory, this is using the data warehouse as a source, and an API endpoint as the target. Instead of ‘ELT’, think of it as ‘TEL’, where we first utilize data warehouse functionality to transform data into the format needed to send data to our desired ‘destination’ API, and then extract and load the data to that endpoint.
Rivery requirements
In order to perform Reverse ETL in Rivery, you’ll need the following:
- A data warehouse target (not supported for data storage targets)
- The data destination is a REST API endpoint
It’s important to note that a general understanding of the destination API structure and behavior is recommended, as we will leverage Rivery’s Action River functionality to pass data from a data warehouse table through corresponding inputs of a REST API endpoint.
Example use case
In this example, we’ll walk through the process of updating custom Hubspot deal properties when certain events take place in our data warehouse (in this example, Snowflake).
At Rivery, we want to track our free trial account usage. To enable our Salespeople to understand trial account usage, we want to send 3 custom properties about product usage to Hubspot:
- Number of Rivers
- Number of runs
- Number of distinct Sources
Let’s assume we already have this data loaded to our data warehouse, in a table in Snowflake called RIVER_EXECUTIONS.
1. Define your dataset to PUSH (the T of “T-E-L”)
We first need to create a logical step that will only return the data we want to push back to Hubspot. In this example, we want to calculate the measures listed above, but only for active trial accounts in our system.
When any new trial account is created, Hubspot deal is auto-generated and includes the Rivery account ID as a custom property by default (this is how we can connect our product usage data to our sales pipeline).
Thus, let’s imagine the query to get our desired results looks something like this:
select
deals.deal_id,
runs.rivery_account_id,
runs.rivery_num_of_rivers,
runs.rivery_executions,
runs.rivery_data_sources
from "INTERNAL"."ODS"."HUBSPOT_DEALS" deals
inner join (
select
rivery_account_id,
count(distinct river_id) as rivery_num_of_rivers,
count(distinct run_id) as rivery_executions,
count(distinct datasource_type) as rivery_data_sources
from INTERNAL.ODS.RIVER_EXECUTIONS
Where account_type = ‘trial’
group by rivery_account_id
) runs
on deals.rivery_account_id = runs.rivery_account_id
where deals.isdeleted = FALSE;
To summarize, we are 1) creating 3 different metrics grouped at the account level for trial accounts and 2) joining this to our existing deal pipeline.
Now, for the Rivery part! Create a new Logic River and use the ‘SQL/Script’ type of Logic Step. Choose your target type, your connection, and input your source query (i.e. what we have above).
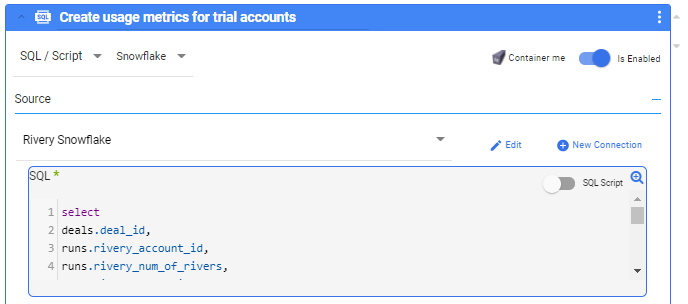
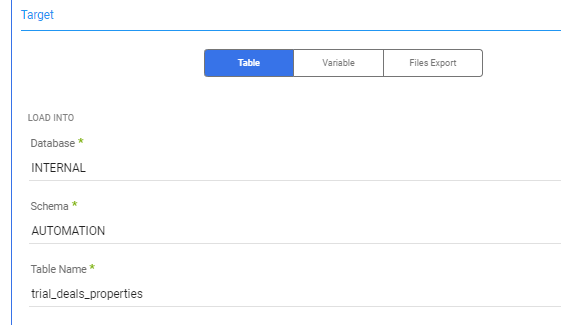
For the Target, define a table in your data warehouse to store these results. This table will be used in the next step. In our example, let’s call this ‘TRIAL_DEALS_PROPERTIES’.
2. Match your data format to the expectations of your destination API (more ‘T’)
In this case, we’ll leverage the Hubspot endpoint for updating a deal. Thus, in each call to this API endpoint, we’ll need a dealid parameter, and a request body populated with properties object listing the properties to update in the deal.
An example request body would look something like this:
{
"rivery_data_sources": 3,
"rivery_executions": 591,
"rivery_num_of_rivers": 39
}
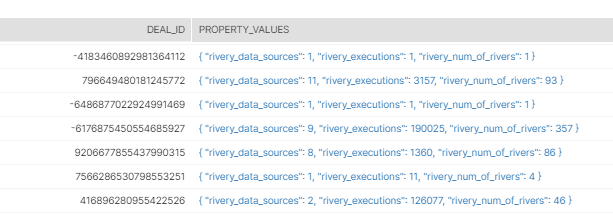
By utilizing Snowflake’s JSON-building functions, such as OBJECT_CONSTRUCT(), we can create the above object for each deal_id. This will give us the ability to pass both a deal_id and its corresponding properties into an Action River to make each update call.
Here is an example query using OBJECT_CONSTRUCT() function to produce desired results:
select
deal_id,
object_construct('rivery_num_of_rivers', rivery_num_of_rivers,
'rivery_executions', rivery_executions,
'rivery_data_sources',rivery_data_sources
) as property_values
from "INTERNAL"."AUTOMATION"."TRIAL_DEALS_PROPERTIES"
group by
deal_id,
rivery_num_of_rivers,
rivery_executions,
rivery_data_sources
;
Example Results:
Now, for the next Rivery part! Now we’ll add another logic step (following our first logic step from Step 1 of this guide) using the query above as the source query. However, instead of setting the Target value to be a table, we’ll store our results in a Variable instead.

This will store the results of the source query in the step into a river variable, that we can leverage in future logic steps in this river.
Remember to save this river as to not lose changes!
3. Create the API call using an Action
Using the Hubspot documentation for their update deal endpoint, we can fill out the REST template provided in a Rivery Action. (This is a new river that we will create so that we can leverage it in our existing logic river).
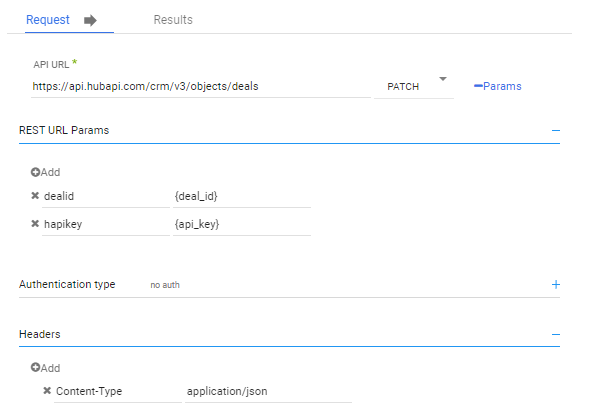
In the request body, we’ll define a variable called properties. Once we add the Action as a step in the Logic river, this body will contain the properties to update for each call.
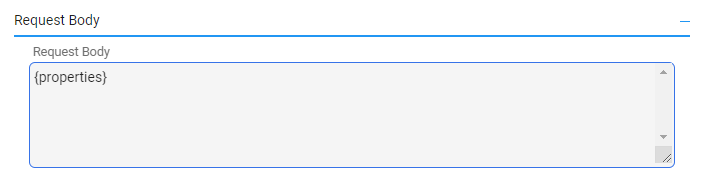
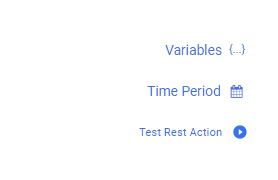
NOTE - In Rivery, variables are referenced by using the curly brackets, and must be first defined as variables (in the ‘Variables’ menu in the top right of the Actions screen).
Make sure to save your Action!
4. LAST STEP! Connect the dots.
Lastly, we need to add the Action we’ve just created to the logic river from steps 1 and 2. This will bring the whole process together.
In the logic river, we’ll add a third step, but use the ‘Action’ type of logic step, and select the Action river we just created in Step 3. In this example, it’s called ‘PATCH - Hubspot Deal Update’.
Next, click ‘Container Me’ on the Action Step to wrap this step in a container (this will be colored gray). Change the container type to ‘Loop Over’ from the dropdown on the top left. In this example, we need to send one request per deal_id, so in case of multiple deals, will need to loop over our Action Step.
The step will look something like this:
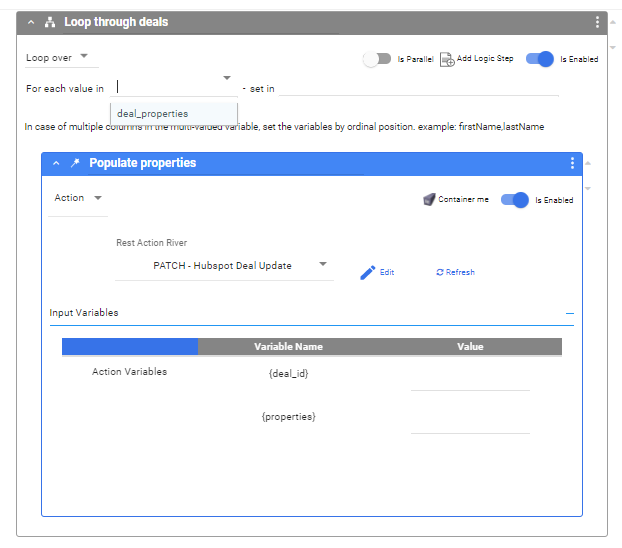
In the ‘for each value in’ dropdown, select the river variable created by the second logic step (called ‘deal_properties’ here).
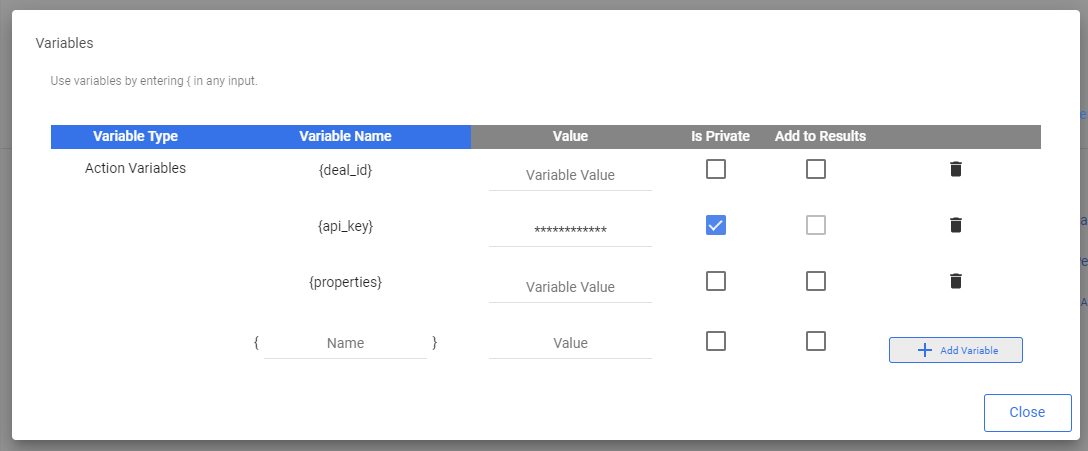
NOTE - In the Variables menu in the Logic River - make sure this variable is set to accept multiple values:

In the second window, create two iterators, one for the deal_id parameter and one for the properties. (NOTE - the order of these matters, they will be the same order as in the SELECT statement that defined the variable in the previous logic step).
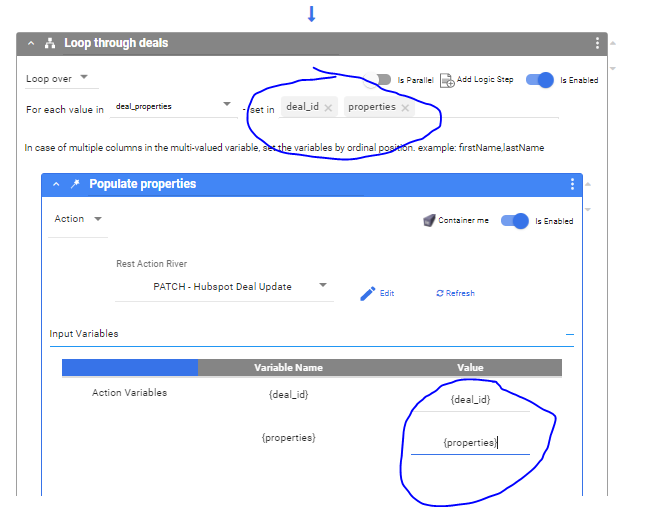
In addition, set the Input Variables in the Action Step to match the iterators created above. This is the key that will connect the data values stored in the river variable to the variables defined in the API request.
Now, test your process! Run the river.
With any shred of doubt - we're here for you! Contact Rivery Support by clicking the 'Support' icon in the Console.
Was this article helpful?