SFTP Walkthrough
- 5 Minutes to read
- Print
- DarkLight
- PDF
SFTP Walkthrough
- 5 Minutes to read
- Print
- DarkLight
- PDF
Article summary
Did you find this summary helpful?
Thank you for your feedback!
Introduction
Rivery provides a streamlined solution for establishing a secure SFTP connection and efficiently transferring data to your specified target, enabling you to uncover valuable insights within your datasets.
This document will walk you through the entire process, beginning with the creation of a new data pipeline within Rivery, followed by the selection of extraction techniques and the effective management of your data storage. By the conclusion of this guide, you will have a comprehensive understanding of how to effectively utilize Rivery's features to retrieve data from an SFTP server and seamlessly integrate it into your data ecosystem while ensuring secure and reliable data ecosystem.
Prerequisite
Before you can start extracting data from an SFTP server using Rivery, it's important to ensure that you have a configured SFTP server connection. Once this prerequisite is met, you can follow the step-by-step instructions outlined in this document to set up and execute a data extraction River.
Extracting Data from SFTP to Your Chosen Target
Let's initiate the process of pulling data from an SFTP server using Rivery and explore the various steps and considerations involved in this procedure:
Create a New River:
Go to the upper-left corner of the Rivery interface and choose "Create River."Choose River Type:
Select "Source to Target" as the River type.Locate "SFTP Server" in the list of available data sources under the "Storages & Files" section.
Click on SFTP Server.
Provide a name for your River.
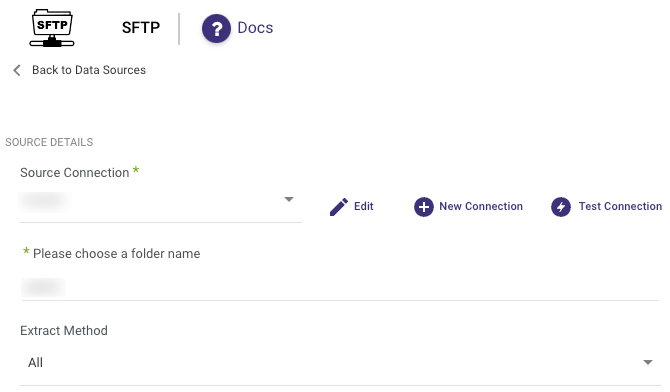
Under "Source Connection," select an existing connection or create a new one.
Select Folder:
Choose the desired folder from the list of available directories on the SFTP server.Choose Extraction Method.
Extraction Methods:
All
This method retrieves all data from the source and replaces all existing data in the target, regardless of time periods. It is useful when the source data is complete and up-to-date, and you want to create a fresh copy of the source data in the target.
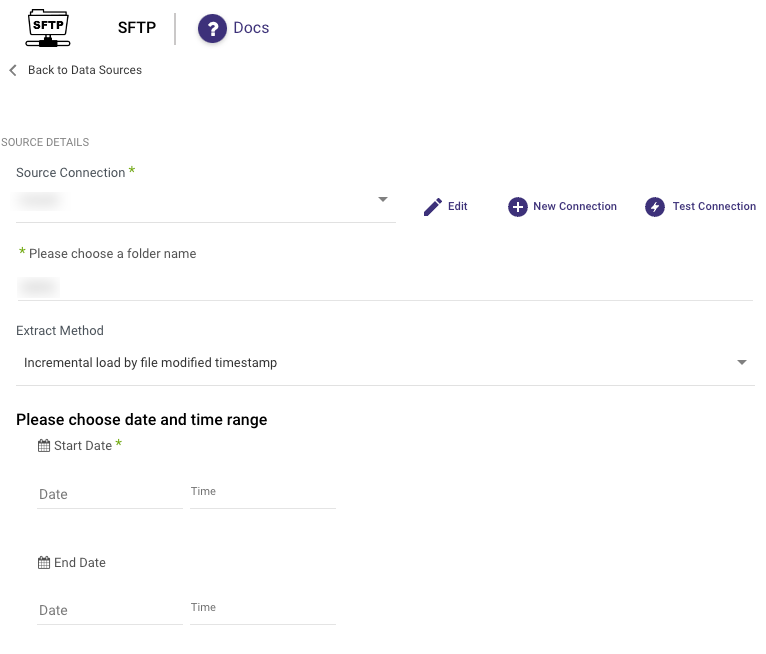
Incremental Load by File Modified Timestamp
The Incremental Load by File Modified Timestamp method allows you to control the date range of your data.
Please Note:
- Start Date is mandatory.
- Data can be retrieved for the date range specified between the start and end dates.
- If you leave the end date blank, the data will be pulled at the current time of the river's run.
- Dates are in UTC time.
- Utilize the "Last Days Back For Each Run" option to extend the starting date and retrieve data from a specified number of days before the selected start date.
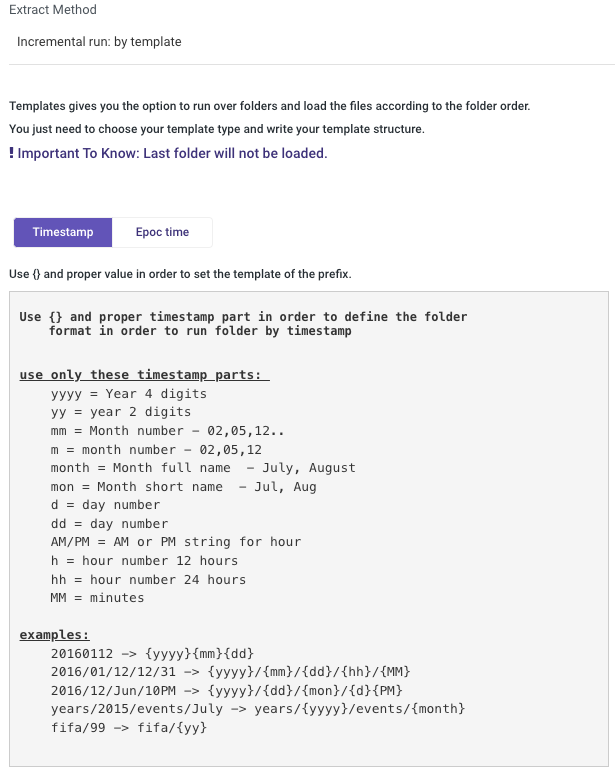
Incremental Run: By Template
Templates allow you to run over folders and load files in the order in which they were created.
Simply choose a template type (Timestamp or Epoch time) and a data date range.
Timestamp Template - Utilize {} and the appropriate timestamp components to establish the folder format.
Epoch Time Template - Incorporate {e} (for epoch) or {ee} (for epoch in milliseconds) fields to define the folder structure for running by epoch time. Enter the desired starting value and an optional ending value.
This approach applies to the entire library and is not applicable to individual files.
Please Note:
- Start Date is mandatory.
- Data can be retrieved for the date range specified between the start and end dates.
- If you leave the end date blank, the data will be pulled at the current time of the river's run.
- Dates are in UTC time.
- Utilize the "Interval Chunk Size" field when you intend to retrieve data over extended timeframes.
Continuing with the overall procedure:
Define the file path prefix and file pattern for filtering purposes.
A file path prefix, like "{social_dims_source_path}/snap/ads/", serves as a means to identify a group of files for retrieval. When a user supplies this file prefix, it directs the system to gather all files situated within the indicated directory structure that adhere to the specified filtering criteria.If the user appends "*.json" as the file pattern, this procedure entails scanning the designated directory structure to decide which files should be retrieved.
Select After-Pull Action:
- Retain the original location.
- Transfer to the archive path: Select the container name and specify the optional archived folder path.
- Delete.
- Choose the number of files to pull (Leave empty for all).
- Select the desired file type: CSV, Excel, JSON, or Other.
Please Note:
The procedure outlined in step 10 applies to both successful and failed Rivers. For instance, in the event of a failure during the upload to the Target, the Container will still be relocated from the Source to the archive path as specified.
File Types
CSV
CSV allows you to select the Delimiter, Quote character according to your preference.
Excel
In Excel, you can specify the sheet by its position, using a comma separator for multiple sheets.
Typically, the initial row serves as the header, but you have the flexibility to opt for different rows. If this scenario applies and your dataset begins after that particular row, please configure the "start loading rows from row number" to the subsequent row following the header.
An empty list signifies that all sheets will be included.
Towards the bottom of this section, you'll find the option to perform an "Auto Mapping" which allows you to visualize your file's structure.
JSON
Please note that the supported JSON format is jsonlines format only.
Other
When opting for "Other" files, Rivery accepts them in their original state, without any data transformation, and limits your Target selection to Storage exclusively.
- The only remaining step is to navigate to the Target tab and choose a Target warehouse.
"Is Compressed" Checkbox
For each file type, you can choose to include a compressed version by selecting the "Is Compressed" checkbox.
When referencing a file within another file, be sure to add the correct file extension in the prefix field; otherwise, Rivery won't be able to identify the correct file.
If two files share the same name, one compressed and one not, marking a file as compressed during execution could cause Rivery to select the uncompressed version, leading to an error.
To avoid this, it's recommended to use a prefix with the file format or provide the full file name along with its format.
Was this article helpful?