Snowflake as a Target
- 18 Minutes to read
- Print
- DarkLight
- PDF
Snowflake as a Target
- 18 Minutes to read
- Print
- DarkLight
- PDF
Article summary
Did you find this summary helpful?
Thank you for your feedback!
Introduction
Snowflake is a powerful data warehouse that can be used as a Target for data integration workflows. With Rivery, you can easily extract data from a variety of Sources and load it into Snowflake for analysis and reporting.
This document outlines how to work with Snowflake as a Target.
Before you use this guide, Please make sure you have a valid Snowflake account.
If you don't have any valid Snowflake account, please create one. If you or your company already has a Snowflake account, you can connect/create a Rivery user.
Setting up your Snowflake Environment
Rivery's Snowflake environment can be configured in two ways, but only one method for granting access must be chosen:
The first method will grant an existing user the SYSADMIN role, which will allow rivery access to all object in the database and will be able to extract from, and ingest to, new and existing tables.
The second method will either create or use existing user, role, database and warehouse depending on the settings, and will either give Rivery the ability to ingest data to and/or extract data from (depending on the settings) said objects.
First Method - Global Permission With Sysadmin Role
Snowflake allows a single user to have multiple roles. Rivery will need to execute various commands on Snowflake, so you must assign a SYSADMIN role to the Rivery user you’ll be leveraging:
Log in to your Snowflake console using a user with ACCOUNTADMIN role access.
Select the worksheet tab.
Run the following commands:
begin;

 /* Set variables for script, select an existing user or create a new one, replace the value after var_user with
 the name of the user, do not forget to replace {password} with the password of your choice
 if you are creating a new user. */

   set var_user = 'RIVERY_USER';
   set var_password = '{password}';

 /* switch to ACCOUNTADMIN role: only an ACCOUNTADMIN can set or unset a user’s role */
    USE ROLE accountadmin;

    /* Create a user for Rivery or use an existing one */
   create user if not exists identifier($var_user)
   password = $var_password;

    GRANT ROLE SYSADMIN TO USER identifier($var_user);
    ALTER USER identifier($var_user) SET DEFAULT_ROLE = SYSADMIN;
commit;
Second Method - Specific Permission With Custom Role
Copy the following script to your Snowflake console, make sure to change the variables to your desired variable and only run necessary steps, pay attention to the instructions on the script.
begin;

   /* Set variables for script, You can choose to work with the default suggested values in the script or use your own.
   Do not forget to replace {password} with the password of your choice if you are creating a new user. */
   set var_user = 'RIVERY_USER';
   set var_password = '{password}';
   set var_role = 'RIVERY_ROLE';
   set var_database = 'RIVERY_DATABASE';
   set var_warehouse = 'RIVERY_WAREHOUSE';


   /* Switch to securityadmin role:
Role that can manage any object grant globally, as well as create, monitor, and manage users and roles */
   use role securityadmin;

   /* Create role for Rivery */
   create role if not exists identifier($var_role);
   grant role identifier($var_role) to role SYSADMIN;

   /* Create a user for Rivery */
   create user if not exists identifier($var_user)
   password = $var_password
   default_role = $var_role
   default_warehouse = $var_warehouse;

   grant role identifier($var_role) to user identifier($var_user);

   /* switch to sysadmin role:
Role that has privileges to create warehouses and databases (and other objects) in an account. */
   use role sysadmin;

   /* Create a warehouse for Rivery, this step is optional */
   create warehouse if not exists identifier($var_warehouse)
   warehouse_size = xsmall
   warehouse_type = standard
   auto_suspend = 300
   auto_resume = true
   initially_suspended = true;

   /* Create database for Rivery, this step is optional */
   create database if not exists identifier($var_database);


   /* Grant Rivery role access to warehouse */
   grant USAGE
   on warehouse identifier($var_warehouse)
   to role identifier($var_role);

   /* grant Rivery access to database */
   grant CREATE SCHEMA, MONITOR, USAGE
   on database identifier($var_database)
   to role identifier($var_role);

   /* ATTENTION! if you are looking to ingest and extract data from objects created within Rivery
   and not objects that already exist you can stop the flow here */

   /* Grant access to all existing schemas on the database */
   grant ALL on all SCHEMAS IN DATABASE identifier($var_database) to ROLE identifier($var_role);

   /* Grant access to all  existing tables on the database, might take several minutes if there are many tables */
  grant ALL on ALL TABLES IN DATABASE identifier($var_database) to ROLE identifier($var_role);


 commit;
Please Note:
If you wish to add Masking Policy permissions for this user, please refer to the 'Enforce Masking Policy' section.
Snowflake Security Impact on Data Unloading
Certain Snowflake security settings may cause issues when unloading data to inline external locations, such as a Custom File Zone. While these security parameters are set to false by default, enabling them could prevent successful data unloading to inline external locations.
The affected parameters are:
ALTER ACCOUNT SET REQUIRE_STORAGE_INTEGRATION_FOR_STAGE_CREATION = true;
ALTER ACCOUNT SET REQUIRE_STORAGE_INTEGRATION_FOR_STAGE_OPERATION = true;
ALTER ACCOUNT SET PREVENT_UNLOAD_TO_INLINE_URL = true;
Issue Description
These security settings enforce stricter controls on data unloading operations:
- REQUIRE_STORAGE_INTEGRATION_FOR_STAGE_CREATION: Requires storage integration to be in place for creating stages.
- REQUIRE_STORAGE_INTEGRATION_FOR_STAGE_OPERATION: Requires storage integration for operations involving stages.
- PREVENT_UNLOAD_TO_INLINE_URL: Prevents unloading data to inline URLs, including file zones.
As a result, these settings may disrupt workflows that depend on unloading data to inline external locations.
Solution
To resolve this issue and enable data unloading to the specified Custom File Zone, refer to the Snowflake documentation for details on authorizing access under each parameter heading.
Create Network Policy for Rivery IPs [Optional]
In some cases, your Snowflake account may be access restricted by IPs or domains. In such cases, you must add Rivery IPs to your Snowflake Network Policy in order to connect successfully.
Note: Open Rivery IPs in Snowflake Network Policies may block any other unspecified IPs in the network policy. Make sure you've whitelisted all of your IPs in Snowflake’s network policies before creating Rivery's. Read more about network policies here .
In order to create a Network Policy for Rivery IPs:
Log into your Snowflake account.
Make sure the user is set to a ACCOUNTADMIN or SYSADMIN role
In the worksheet, run the following command:
CREATE OR REPLACE NETWORK POLICY RiveryIPs ALLOWED_IP_LIST = (Copy our most recent whitelisted IPs here)
Establishing a Connection
You can connect to Snowflake using one of 3 methods:
Basic Authentication
To connect to your Snowflake account using Basic Authentication, follow the steps below:
Go to the Connections menu in Rivery:
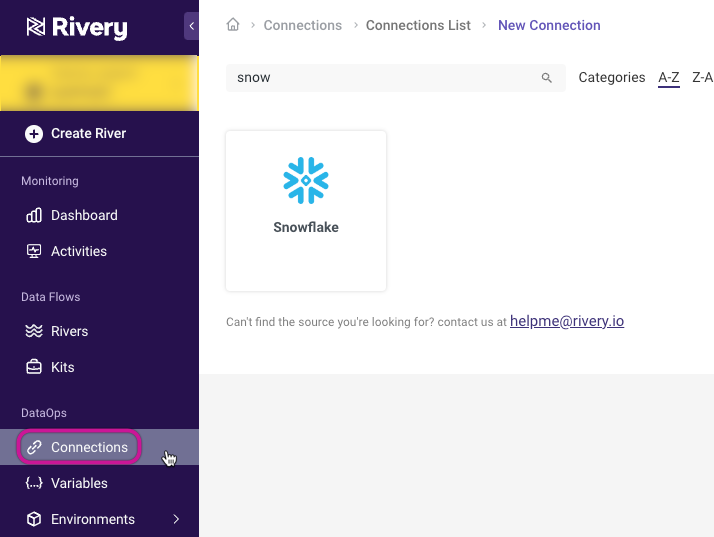
In Snowflake Connection form type in your Connection Name.
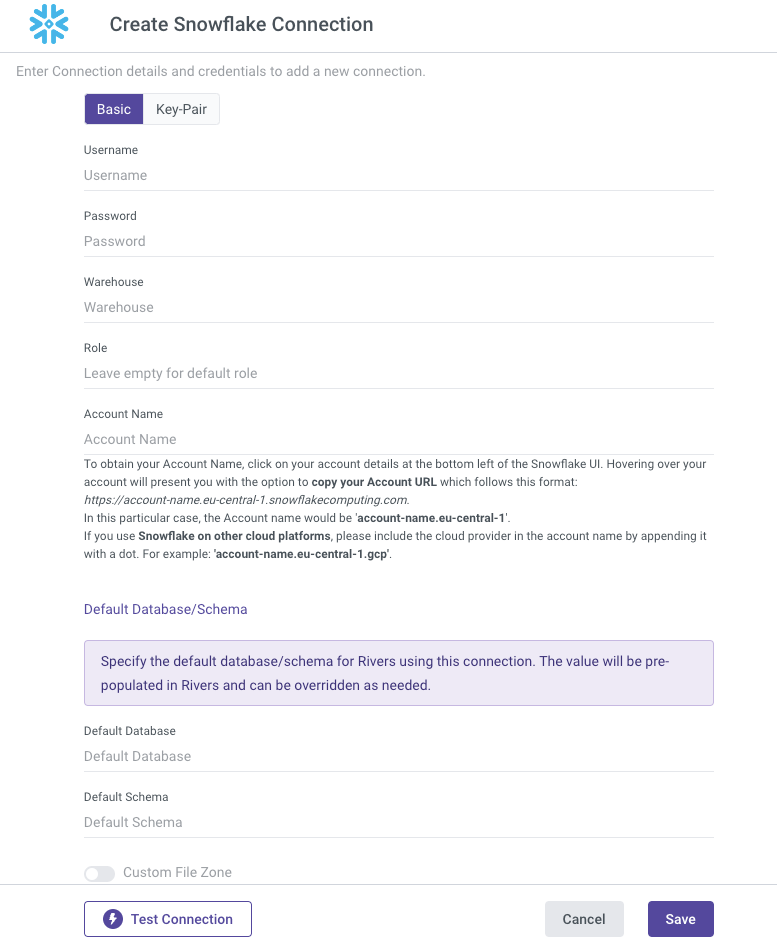
Select the Basic Authentication Type.
Enter your Username and Password.
Please note that Snowflake passwords are restricted from including special characters such as {, }, ", ?, /, #,*, and others.Enter the name of your Warehouse (mandatory).
Enter the name of your Role (optional).
Please Note:
If you leave it blank, the account's default one will be used, and in that case, the default Role must have access to the selected Warehouse, or the connection will fail.Input your Account Name (mandatory).
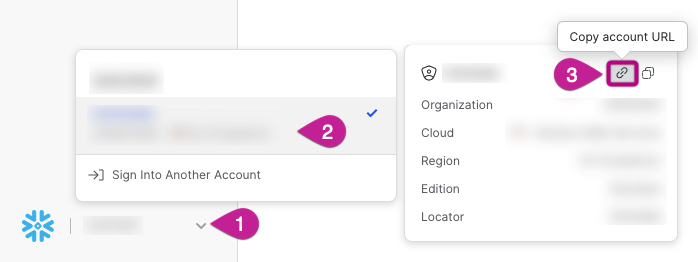
Please Note:
To obtain your Account Name, click on your account details at the bottom left of the Snowflake UI. Hovering over your account will present you with the option to copy your Account URL which follows this format: https://account-name.eu-central-1.snowflakecomputing.com.
In this particular case, the Account Name would be “account-name.eu-central-1”.
If you use Snowflake on other cloud platforms, please include the cloud provider in the account name by appending it with a dot. For example: "account-name.eu-central-1.gcp".
- The connection form includes a "Default Database/Schema" section. This allows you to specify the database and schema you want to work with, and the connection will automatically remember and use these as the default (Optional).
- Set your Custom FileZone to save the data in your own staging area (Optional).
- Use the Test Connection function to see if your connection is up to the task. If the connection succeeded, you can now use this connection in Rivery.
You can now pipe data to Snowflake by leveraging this connection in any River!
OAuth2 Authentication
Use OAuth2 authentication to write data to Snowflake. This setup requires a user with SYSADMIN role for table and schema creation.
This method supportswrite access only with SYSADMIN privileges.
Prerequisites
Create a custom OAuth integration in Snowflake with the following:
OAUTH_CLIENT = CUSTOM- Region-specific
OAUTH_REDIRECT_URI - Refresh token issuance enabled
ALLOWED_ROLESincludesSYSADMIN
Grant usage of the integration to the writing user:
GRANT USAGE ON INTEGRATION my_oauth_integration TO USER sysadmin_user;
Example: OAuth Integration for Write Access
CREATE SECURITY INTEGRATION my_oauth_target
  TYPE = OAUTH
  ENABLED = TRUE
  OAUTH_CLIENT = CUSTOM
  OAUTH_CLIENT_TYPE = 'CONFIDENTIAL'
  OAUTH_REDIRECT_URI = 'https://console.rivery.io/api/oauthcallback/snowflake'
  OAUTH_ISSUE_REFRESH_TOKENS = TRUE
  OAUTH_ALLOW_NON_TLS_REDIRECT_URI = FALSE
  ALLOWED_ROLES = ('SYSADMIN')
  OAUTH_REFRESH_TOKEN_VALIDITY = '90 days';
Redirect URIs by Region
| Region | Redirect URI |
|---|---|
| US | https://console.rivery.io/api/oauthcallback/snowflake |
| EU | https://eu-west-1.console.rivery.io/api/oauthcallback/snowflake |
| IL | https://il-central-1.console.rivery.io/api/oauthcallback/snowflake |
Required Fields
| Field | Description |
|---|---|
| Client ID | From the OAuth2 app |
| Client Secret | From the OAuth2 app |
| Account Name | e.g., xy12345.east-us-2.azure |
| Role | Must be SYSADMIN |
| Username | Snowflake user with SYSADMIN privileges |
Connecting Process
- Enter all required details.
- Click "Connect to Snowflake".
- Authenticate via the Snowflake login screen.
Upon successful connection, the integration securely stores:
- Access token – used for query execution
- Refresh token – used for maintaining session continuity
Please Note
- Client ID/Secret: Must exactly match your registered Snowflake OAuth app.
- Account Name: Use the format
<org>-<account>.<region>.<cloud>(no protocol or domain). - Role: Must be
SYSADMINand included inALLOWED_ROLES. - Username: Must have been granted usage and OAuth access.
- Redirect URI: Must exactly match the URI defined in your Snowflake integration.
Key-Pair Authentication
To connect to your Snowflake account using Key-Pair Authentication, follow the steps below:
Please Note:
Windows is not supported.
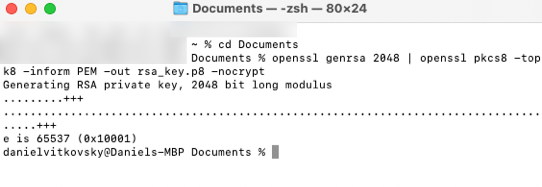
- Enter the following command into your Terminal window to download the Key file to your Documents folder:
cd Documents
Please Note:
To confirm the command, click the Enter key.
- Run the following command to generate a decrypted version of the Key:
openssl genrsa 2048 | openssl pkcs8 -topk8 -inform PEM -out rsa_key.p8 -nocrypt
Please Note:
Rivery does not support key-pair authentication with an encrypted private key.
- Create the Public key by referencing the Private key.
Simply copy and run it:
openssl rsa -in rsa_key.p8 -pubout -out rsa_key.pub
- This will allow you to generate a private key in PEM (Privacy Enhanced Mail) format:
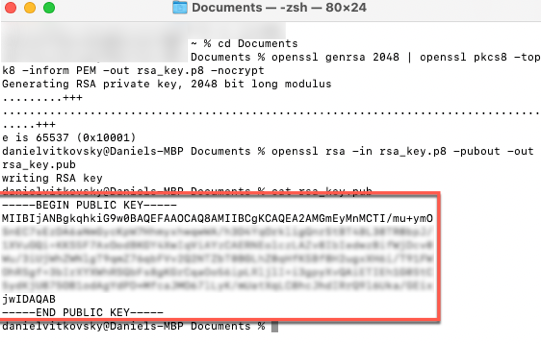
cat rsa_key.pub
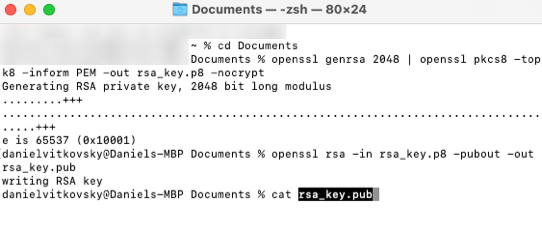
This is the PEM format:
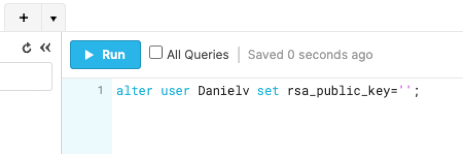
- To assign the public key to a Snowflake user, run the ALTER USER command in your Snowflake console:
Note:
Replace < Username > with your snowflake Username.
alter user < Username > set rsa_public_key='';
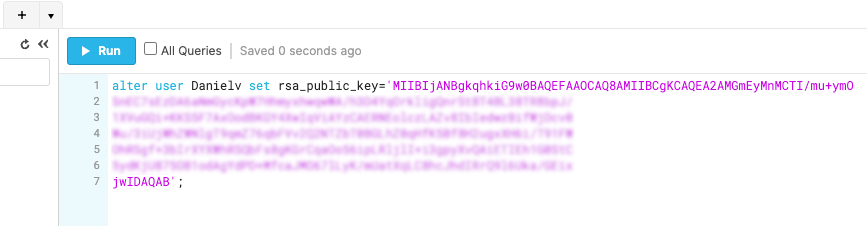
- Copy the PEM format from step 5 and paste it between the apostrophes in the Snowflake console code:
Go to the Connections menu in Rivery:
Fill out the Snowflake Connection form with the following information:
a. Type in Connection Name.
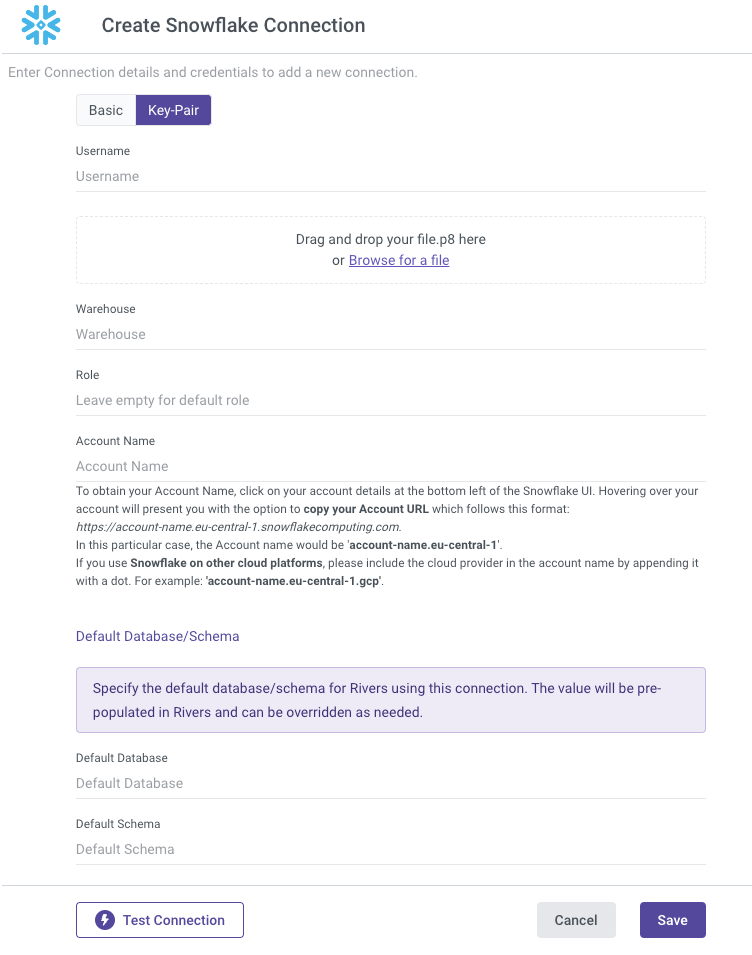
b. Select the Key-Pair Authentication Type.
c. Enter your Username.
d. Enter the name of your Warehouse (mandatory).
e. Enter the name of your Role (optional).
Please Note:
If you leave it blank, the account's default one will be used, and in that case, the default Role must have access to the selected Warehouse, or the connection will fail.
f. Input your Account Name (mandatory).
Please Note:
To obtain your Account Name, click on your account details at the bottom left of the Snowflake UI. Hovering over your account will present you with the option to copy your Account URL which follows this format: https://account-name.eu-central-1.snowflakecomputing.com.
In this particular case, the Account Name would be “account-name.eu-central-1”.
If you use Snowflake on other cloud platforms, please include the cloud provider in the account name by appending it with a dot. For example: "account-name.eu-central-1.gcp".
Drag the rsa_key.p8 file from your Documents folder to the label, or simply browse for it.
The connection form includes a "Default Database/Schema" section. This allows you to specify the database and schema you want to work with, and the connection will automatically remember and use these as the default (Optional).
Set your Custom FileZone to save the data in your own staging area (Optional).
Use the Test Connection function to see if your connection is up to the task.
If the connection succeeded, you can now use this connection in Rivery.
Consult the Snowflake documentation to generate an encrypted Key or for more information on the Key-Pair configuration process.
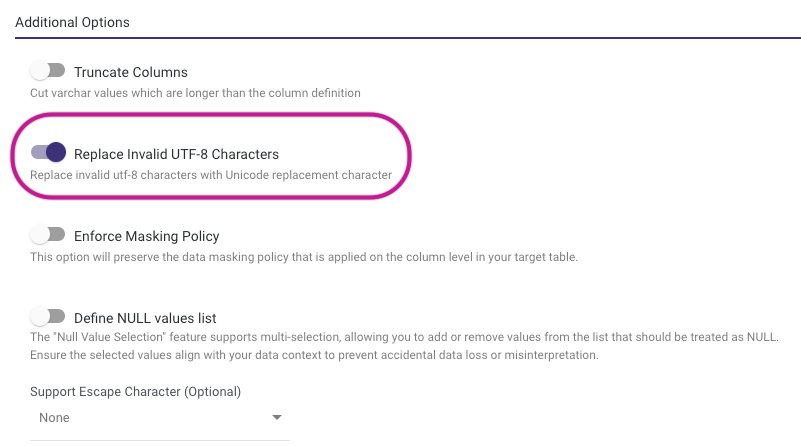
Replace Invalid UTF-8 Characters Toggle
"Replace Invalid UTF-8 Characters" (IGNORE_UTF8_ERROR) dictates how invalid UTF-8 characters are handled during data loading. It determines whether these characters should be replaced with the Unicode replacement character or if the loading process should stop and generate an error upon encountering invalid UTF-8 encoding.
Toggle Behavior
- TRUE: If "Replace Invalid UTF-8 Characters" is set to TRUE, Snowflake will perform a one-to-one character replacement, replacing each invalid UTF-8 character with the Unicode replacement character.
- FALSE: If "Replace Invalid UTF-8 Characters" is set to FALSE, Snowflake will not attempt to replace invalid characters but will instead halt the data loading operation and report an error upon encountering any invalid UTF-8 character encoding.
- Default Value: The default value for "Replace Invalid UTF-8 Characters" is FALSE. This means that by default, Snowflake does not replace invalid UTF-8 characters but rather raises an error when encountering them during data loading.
Use Cases
- TRUE: Setting "Replace Invalid UTF-8 Characters" to TRUE is useful in scenarios where data integrity is crucial, and it's preferred to replace invalid characters with a recognizable placeholder rather than halting the loading process.
- FALSE: Setting "Replace Invalid UTF-8 Characters" to FALSE is beneficial when strict data validation is required, and any invalid UTF-8 characters should result in an immediate error, preventing the loading of potentially corrupted data.
Enforce Masking Policy
A column-level security feature called Masking Policy employs masking strategies to selectively hide plain-text data in the Target table columns.
Masking policies in Snowflake are schema-level objects, hence a database and schema must exist in Snowflake before a masking policy can be applied to a column.
When this feature is selected, Rivery makes sure to confirm your masking policy and apply it to each location the column appears during the River run.
Prerequisites
To use the Enforce Masking Policy feature, you must have your account set up in Snowflake with the necessary permissions, and have this account listed under Snowflake Enterprise Edition.
To grant the permissions required to use this functionality, follow the steps below:
- If you set up your Snowflake Environment using the First Method, you are ready to go and your account has the required permissions.
- If you configured Snowflake using the Second Method, add the following query to the second method's query and run it in the Snowflake console after specifying your Role, Database, and Schema in the relevant variables:
begin;
   /* ATTENTION! Only Enterprise account holders that employ masking policies should use the script below. */

   /* Set variables for script */
   set var_role = 'RIVERY_ROLE';
   set var_database = 'RIVERY_DATABASE';
   set var_schema = 'RIVERY_SCHEMA';
   /*  Switch to Securityadmin role:
        Role that can create and control Users and other Roles as well as manage any        object. */
   use role securityadmin;
   /* Grant Masking Policies on a specific schema */
   grant create masking policy on schema    identifier($var_database).identifier($var_schema) to role identifier($var_role);
   grant apply masking policy on account to role identifier($var_role);
commit;
Working With Enforce Masking Policy
In Rivery, the Enforce Masking Policy option can be found in 3 different locations:
- Source to Target Rivers
- Predefined Reports / Multi-Tables Loading Mode
- Logic Rivers
Source to Target Rivers
When working with Source to Target Rivers, you get to choose you preferable River Mode. The Enforce Masking Policy Appears in 2 locations:
In Predefined Reports or Multi-Tables modes, the option appears in the Table Setting of a specific table:
Any other River mode will include it under Additional Options:
Logic Rivers
In Logic Rivers you can locate it under the Target section:
Enforce Masking Policy Limitations
- Please make sure not to use quotations while defining the Masking Policy Identifier value. It must also begin with an alphabetic character and cannot contain spaces or any other special characters.
- Your account must be configured with the proper permissions in Snowflake and listed under Snowflake Enterprise Edition.
- In the event that 'Enfore Masking Policy' was checked and there isn't a masking policy associated with the Target table, the River won't run.
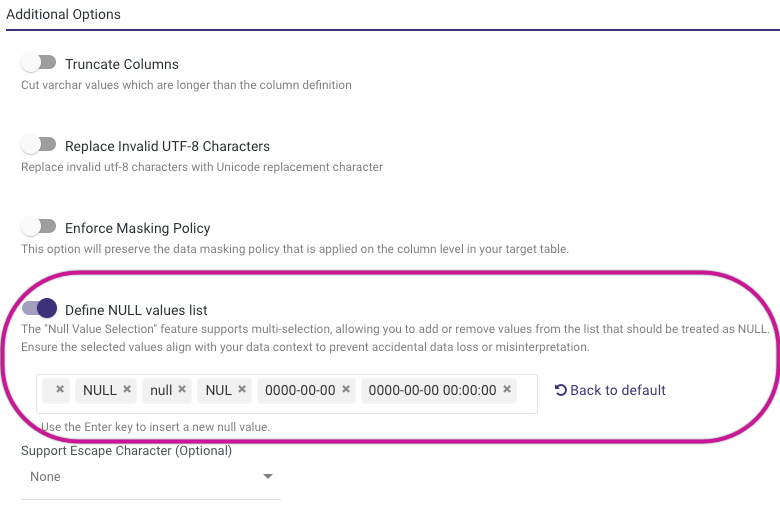
Define NULL Values List Toggle
Rivery ingests source data to Snowflake using a COPY command.
By default (if toggle is false), the following NULL_IF clause will be used:
NULL_IF=('', 'NULL', 'null', 'NUL', '0000-00-00', '0000-00-00 00:00:00')
Each value will be replaced with NULL. You can modify the list of values (without single quotes) by enabling this toggle.
Please Note:
- For CDC Rivers, the Null_If function is applied only during the initial migration phase. After the initial migration is completed, data loaded into Snowflake from the CDC stream will no longer be affected by Null_If.
- Making changes to existing running Rivers may necessitate performing an initial or full migration to ensure data consistency.
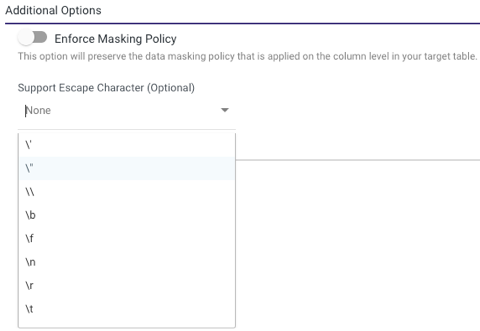
Escape Character (Optional)
Escape characters allow special characters in strings to be interpreted as literal characters, rather than as control characters. In SQL, escape characters are used to change the behavior of certain characters, such as the single quote ('), the double quote ("), the backslash (\), etc.
Working With Escape Characters
Rivery offers the option to use escape characters in Snowflake, making it easier to run complex SQL statements.
To activate this feature, navigate to the Additional Options section located at the bottom of the Target's tab screen, choose the escape character of your choice from the list, and Rivery will properly encode and run the statement in Snowflake.
Snowflake Connector for Python
Rivery makes use of the Snowflake Connector for Python, which enables Python developers to establish a connection to the Snowflake data warehouse and run SQL queries.
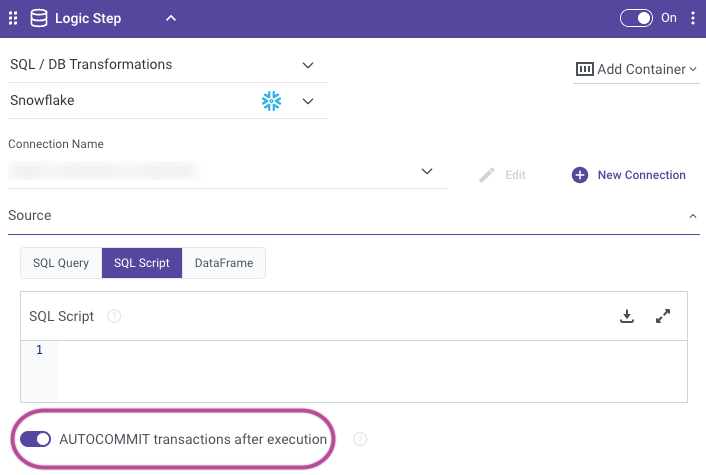
AUTOCOMMIT Toggle in Logic Rivers
In Snowflake, the AUTOCOMMIT session parameter dictates whether each SQL statement is committed automatically as a transaction. When AUTOCOMMIT is configured as TRUE, every executed statement is automatically committed, eliminating the need for explicit transaction commitment. On the contrary, if AUTOCOMMIT is set to FALSE, you must explicitly commit your transactions using the COMMIT statement. Successful statements are committed automatically, whereas failed ones are rolled back.
Toggle Behavior
Here's a brief explanation of both scenarios:
True
In this mode, each SQL statement is treated as a separate transaction, and it is automatically committed upon execution.
For example, if you run an INSERT statement, the data will be inserted, and the transaction will be committed immediately.
False
In this mode, you need to explicitly start and commit transactions using the BEGIN and COMMIT statements.
Changes made by SQL statements are not committed until you issue a COMMIT statement.
Please Note:
Setting the toggle to False is not recommended. When set to False, transactions should be fully managed within the Snowflake stored procedure. If the active transaction initiated and concluded implicitly in the stored procedure, Snowflake will roll back the active transaction and generate an error message.
Using Snowflake Stored Procedures in Rivery Logic Rivers
Rivery Logic Rivers allow users to perform advanced data transformations and custom operations by integrating Snowflake stored procedures. This section details the process of configuring, executing, and managing Snowflake stored procedures within Rivery Logic Rivers.
Prerequisites
Snowflake Database Setup:
- Ensure the Snowflake account has the stored procedure created and tested.
- Grant appropriate permissions to the Rivery connection user for executing the stored procedure.
Configuration Steps
Create or Identify a Stored Procedure in Snowflake
Add a Snowflake Logic River in Rivery
- Navigate to Logic Rivers in Rivery.
- Select Snowflake as the data warehouse option.
Define the Procedure Execution Task
- Click the Source field.
- Select SQL Script.
- Input the CALL statement to execute the stored procedure.
Example:
CALL SAMPLE_PROCEDURE();
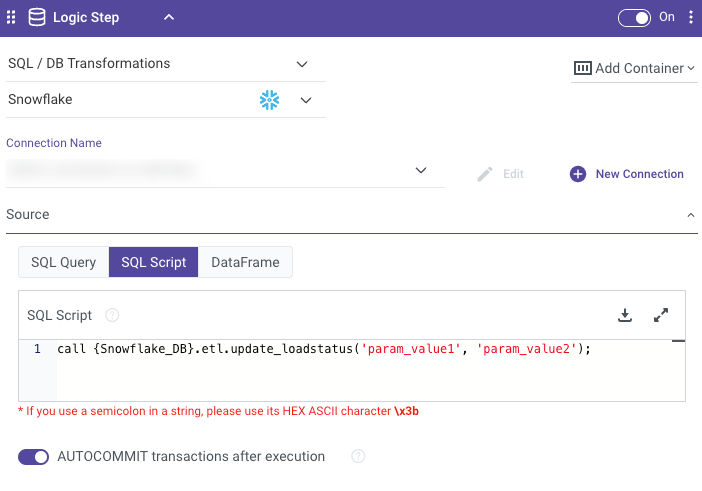
- Configure Parameters (Optional)
For stored procedures with input parameters:
Example:call {Snowflake_DB}.etl.update_loadstatus('param_value1', 'param_value2'); - Set Output Handling
Specify how to handle the output.
Important Notes
In the RECORD data type, fields are flattened into multiple separate fields, using the parent field(s) as prefixes.
Example:
company RECORD
   - id (string)
   - name (string)
This would result in two distinct columns in Snowflake, named company_id and company_name.
Naming Conflict:
Consider the following case:
company RECORD
   - id (string)
   - company_id (string)
Here, both the flattened company_id from the RECORD data type and the standalone company_id column are created, leading to a naming conflict.
Resolution:
If the Source is a REST API, the client has full control over defining the columns and can adjust the mapping accordingly. This flexibility is ideal for this scenario, particularly when columns may have different structures.
If the source is a fixed-schema database or other structured source where customization is limited, you can resolve the conflict by using renaming the columns.
For example, you could append or prepend a unique identifier to the conflicting column names (e.g.,company_flattened_idandcompany_id).
This ensures that the column names remain distinct while preserving the original data structure.
Limitation
By default, tables and schemas will be created using uppercase characters.
Rivery does not support lowercase table or schema names, and any attempt to use them will result in automatic conversion to uppercase.
Troubleshooting Snowflake Timeout Errors
When encountering timeout issues in Snowflake, follow these steps to diagnose and resolve the problem efficiently.
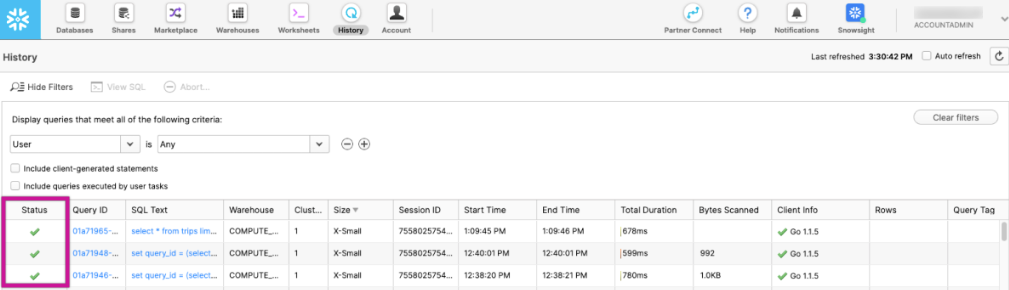
1. Analyze Query History in Snowflake
- Log in to the Snowflake console.
- Navigate to the History section in the main menu.
- Search for queries executed during the timeframe of the delay.
- Look for:
- Long-running queries.
- Queries stuck in Queued or Blocked status.
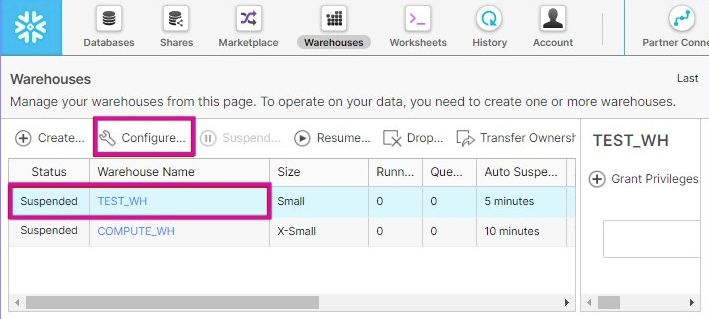
2. Evaluate Warehouse Performance and Scaling
- Go to the Warehouses section in Snowflake.
- Locate the warehouse used by the River.
- Check for performance issues, such as:
- Overloaded resources.
- High concurrency or insufficient size.
- If necessary:
- Adjust the warehouse size.
- Enable auto-scaling to handle variable workloads.
3. Examine Error and Event Logs
- Navigate to Account > Activity > Events in Snowflake.
- Review error and event logs for the River’s execution period.
- Look for any warnings or errors that might indicate the root cause of the timeout.
Was this article helpful?