Targets
- 11 Minutes to read
- Print
- DarkLight
- PDF
Targets
- 11 Minutes to read
- Print
- DarkLight
- PDF
Article summary
Did you find this summary helpful?
Thank you for your feedback!
Overview
In Rivery, a Target is a location to which data is being loaded or moved. Any storage system that can receive and store data qualifies, whether it's a database, data warehouse, etc. Connectors are used to link Targets to Rivery, enabling Rivery to work with the target and carry out operations, including loading data, building tables, and executing queries.
Rivery supports loading data into a variety of data storage and warehouse systems. You can set up connections to multiple targets as needed. For instructions on how to connect to specific types of Targets, refer to the relevant documentation:
The Process and Principles
Key Principles
ELT
Rivery's loading and transforming methods follow the ELT (Extract, Load, Transform) approach, which aims to minimize bottlenecks in the data transformation process by utilizing the high-performance capabilities of the target databases to perform the transformations directly within the DB.
Running Over Data Images
Rivery's pipeline process for loading and transforming data is designed to preserve the integrity of the target tables, by ensuring that the data they contain is an accurate reflection of the source data. To achieve this, Rivery never alters or modifies the target table or data in the event of failures or incomplete runs. This approach guarantees that the data and metadata in the target table will always match the definition specified in the pipeline, preventing data loss, incompleteness, or changes in the table structure.
Custom File Zone
Setting up a Custom File Zone in Rivery is an optional feature, with the default option relying on the Managed File Zone provided by the platform, which requires no setup.
The main advantage of setting up a Custom File Zone is the ability for organizations to ensure that data is stored within their own file zones, as opposed to being stored in Rivery's Managed File Zone. This also enables organizations to use the Custom File Zone as a data lake, where raw data can be stored before it is loaded into a Target cloud data warehouse. Furthermore, organizations have the ability to define their own retention policies for data stored in the Custom File Zone. Rivery's Managed File Zone (default) retains data for a period of 48 hours.
Rivery uses cloud storage services such as AWS S3, Google Cloud Storage, or Azure Blob Storage, known as the "File Zone," to store data during the loading process. This ensures that if there are any failures when loading data into the target databases, the data can be retrieved from the File Zone and loaded again without pulling it from the source system. This way, Rivery ensures that any failures during the loading step will not result in data loss and will retry loading from the File Zone.
Loading Modes
Rivery allows for 3 distinct options when it comes to the loading mode options:
- Upsert-Merge
- Append Only
- Overwrite.
Upsert-Merge
Rivery's Upsert-Merge method is a way to synchronize data between different Sources and Targets. It first checks if a record exists in the target table based on a specified key field (or set of keys). If the record does exist, this mode updates the existing record with the new data. If the record does not exist, the method creates a new record in the target table with the new data. This allows data to be kept up-to-date and consistent between different sources and destinations.
Supported Sources
Rivery's Upsert-Merge method is compatible with:
Amazon Athena
Amazon Redshift
Azure SQL
Azure Synapse Analytics
Databricks SQL
Firebolt
Google BigQuery
PostgreSQL RDS/Aurora
Snowflake
Treasure Data
Please Note: For Snowflake, Azure SQL, and Databricks, multiple Merge methods are available, each with distinct performance implications.
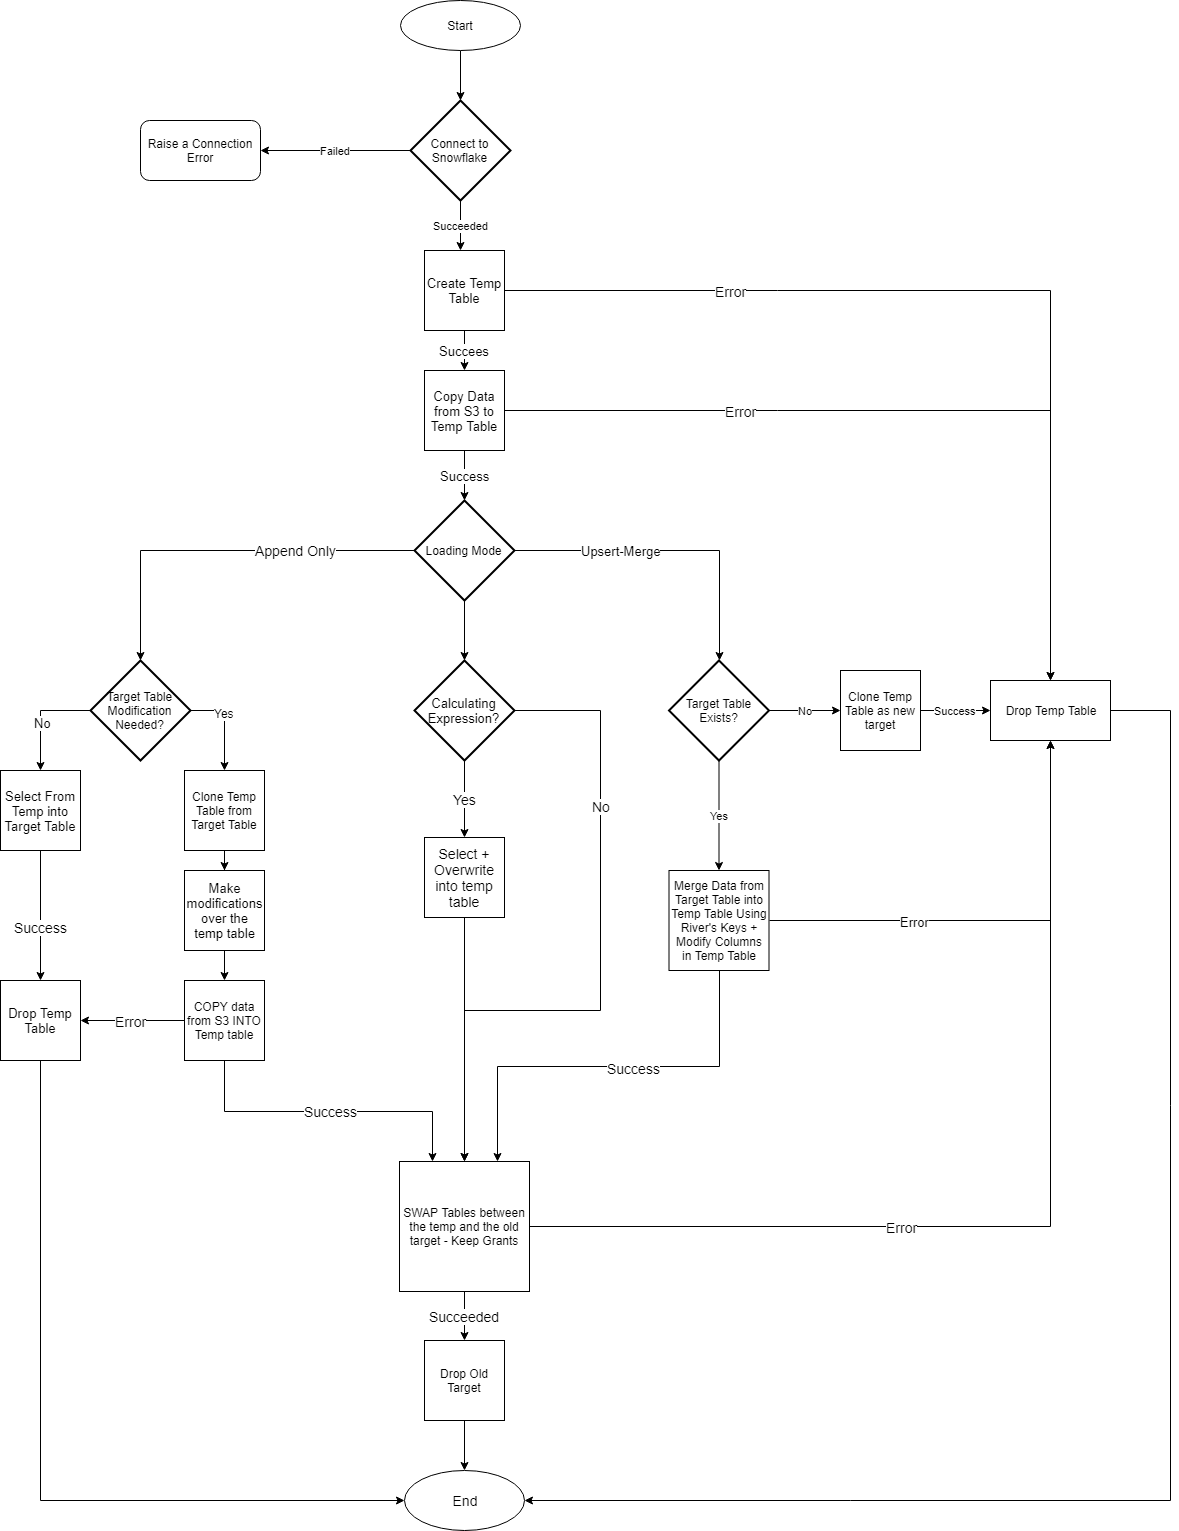
Upsert-Merge Method Flowchart
.png) The Steps
The Steps
1. Incoming data is loaded into a temporary table: This is done to make sure that the data is verified, cleared, and transformed (if necessary) before being put into the target table.
2. Destination table is truncated: All of the data rows in the table are removed. This step is essential to ensure the target table is empty before the new data is loaded. This guarantees that no redundant or outdated data is left behind.
3. Target table is updated with data from the temporary table: With the new information from the temporary table, this final stage of the overwrite procedure replaces the whole contents of the target table.
Append-Only
The append-only method ensures that data is added to a table or a dataset without modifying or deleting any existing data. When using this method, new data is appended to the end of the table or dataset, and the original data remains unchanged. This method is useful for maintaining a historical record of data changes and ensuring data integrity and consistency.
Append-Only Method Flowchart
.png) The Steps
The Steps
1. Identifying the table: The first step in the Append Only method is choosing the table to which new data will be inserted.
2. Extracting new data: New data is then taken from the source. You can accomplish this by reading a file, running a database query, or using any other data retrieval technique. After that, the extracted data is ready for validation.
3. Validating the data: The extracted data is then checked for errors or inconsistencies to make sure it is in the right format. To guarantee the accuracy of the data and avoid any problems with the data being added to the database, this validation phase is crucial.
4. Appending data to the table: After the data has been verified, it is added to the table's end, adding new rows for each new entry. The table contains the new data, but earlier iterations are not changed or removed.
5. Storing the data: The table now contains the new data, but prior iterations are left alone and unaltered. As a result, it is simple to keep track of changes made to the data over time and to preserve a history of those changes.
6. Repeat the process: The process is repeated each time new information has to be added to the table. As a result, new data can be continuously added to the database without changing or removing the data that is already there. This method makes it simple to keep track of any changes made to the data over time and preserve a record of those alterations.
Overwrite
The Overwrite method replaces the existing data in a table or dataset with new data. When using this method, the new data completely replaces the existing data, and the original data is permanently lost. This method is useful for updating and refreshing large data sets, but it should be used with caution as it can result in data loss if the new data is not accurate or complete.
Please Note:
When using the overwrite method, it's important to have a data backup before replacing it.
Overwrite Method Flowchart
.png)
The Steps
1. Begin: In Rivery, you have the option of configuring a pipeline using the Overwrite approach. This indicates that new data from the source table or file will be substituted for existing data in the target table or file when the River is executed.
2. The source table or file is identified and selected: Finding the source table or file that holds the data that will be used to overwrite the target table or file is the first step in the River. This might be a CSV file, a database table, or some other kind of file or data source.
3. The target table is identified and selected: This is to determine which table or file will receive the data from the source table or file and which will be replaced. This might be a CSV file, a database table, etc.
4. A table or file's data is moved from its source to its destination: In the following step, the data is moved from the source table or file to the target table or file. Writing data to the target table or file after reading it from the source table or file and formatting it as necessary.
5. The data in the target table is replaced with the data from the source table: The information from the source table or file is then rewritten in the destination table or file once the data has been transferred. Doing this will replace the old data in the target table or file with the new data.
6. Data is overwritten in the target table or file once the River is executed: The pipeline is executed and the data is overwritten in the destination table or file after all the configuration steps have been completed. Once the operation is finished, the new data from the source table or file is present in the destination table or file.
Loading Flowcharts
Source To Target River: Loading Data Into a Target Table
Using the above-mentioned core principles, Source to target Rivers are pipelines that take data from sources and load it into target databases. The Extract and Load phases of the ELT process are handled by these Rivers. Depending on the pipeline configuration, data can be loaded using a variety of modes, includingUpsert-Merge, Overwrite, and Append-Only. The File Zone is used to load the data.
Logic River:
The Logic River handles the Transform phase of the ELT process. It enables users to execute SQL queries and Python steps on a selected database, allowing them to manage and select query results stored in tables within the Data Warehouse or as files in the File Zone. The steps in the Logic River can be run in parallel, through a loop over a list, based on conditions, or one step at a time, and configured with variables.

Target Table Name Prefix
Rivery automatically detects when there are 2 tables sharing the same name but with different schemas. In such cases, we append the prefix of the schema name to the target table name for purposes of identification and tracking.
Add Calculated Columns Using Expressions
One of the key features of Rivery is the ability to add calculated columns using expressions. This powerful functionality allows the user to customize their output table beyond the limits of the raw metadata extracted from the Source by including expressions, mathematical or string operations, or simple functions to enrich and tailor the output to their use-case.
In this section, we will cover how to add calculated columns using expressions in Rivery.
Implementation Procedure
Column mapping refers to transferring data from Source columns to Target columns within a designated table. Rivery offers a user-friendly interface for column mapping that enables the use of expressions to modify data during the mapping operation. This feature is available in 3 distinct forms within Rivery:
- Expressionsin column mapping
- Add a Target Calculated Column
- Add a Calculated Column from either the Source or Target.
Expression Syntax:
Rivery supports a variety of expressions that are capable of performing a selection, condition, or mathematical operation on a different column. Essentially, any expressions that could be used after a SELECT statement in a basic query can be used within this feature.
Please Note:
- Depending on the syntax of the specific data warehouse being used, other basic functions may also be supported.
- Rivery does not support statements that change the table's granularity, such as JOINs, GROUP BYs, built-in functions, ALTER TABLEs, and CREATE TABLEs.
- If you need to create a column that results from more complex transformations, such as JOINs, GROUPings, or schema modifications, it is advisable to use a Logic River instead.
- When loading data into an existing table with custom fields in the schema, you can choose either the "Overwrite" or "Append" loading modes. The "Upsert-Merge" mode does not support changes to an existing table's structure. However, if you're loading data into a new table, custom fields can be added even when using the "Upsert-Merge" mode.
Expressions in Column Mapping
The capability of adding a column with a customized expression can be done across all Business Applications and Targets. If you want to use expressions in column mapping, please follow the steps below.
This is a console tour for working with 'Expressions'. Please hover over the rippling dots and read the notes attached to follow through:
Add a Target Calculated Column
The capability of adding a Target calculated column is supported by all databases that use Multi-Tables River mode and all Targets. To add a column, simply follow the steps outlined below.
Please Note:
* Ensure you exclusively use the SQL syntax specified by the Target.
* TargetCalculated Columns are incorporated during the compilation of the production table.
This is a console tour for working with 'Add a Calculated Column'. Please hover over the rippling dots and read the notes attached to follow through:
Add a Source Calculated Column
Adding a calculated column from the Source is supported only when using Oracle as the Source in Multi-Tables River mode, with any Target. This feature allows you to incorporate source-related fields into the original table structure. It also enables the use of source-specific functions such as stored procedures, hashing columns, concatenating columns to reduce data, or converting unstructured data in a column to structured data.
Please Note:
Source Calculated Columns are included during the compilation of the native source table and then transferred to the selected Target.
To add this type of column, please follow the steps below:
This is a console tour for working with 'Add a Calculated Column'. Please hover over the rippling dots and read the notes attached to follow through:
Stages of Release
We release connectors (Sources and Targets) in a staged manner to ensure we deliver the highest quality experience to our users. Below, we have detailed what users can anticipate at each stage of the release: