Setting Up Azure Synapse Analytics as a Target
- 4 Minutes to read
- Print
- DarkLight
- PDF
Setting Up Azure Synapse Analytics as a Target
- 4 Minutes to read
- Print
- DarkLight
- PDF
Article summary
Did you find this summary helpful?
Thank you for your feedback!
This connector is currently in Beta Stage.
Overview
Welcome to Getting Started with Rivery and Azure Synapse Analytics.
This guide will show you how to prepare your Azure environment for Rivery, create an Azure Blob storage for Azures's stage area, and how to set the right credentials for using Rivery. At the end of this guide, you will be able to connect to Azure Synapse Analytics from Rivery.
Preparing your Azure environment for Rivery
To set Azure Synapse Analytics as a target, Rivery requires creating or managing some Azure resources.
Prerequisites:
1. Azure account
2. Azure subscription
3. Azure resource group
4. Azure blob storage account
5. Azure Synapse Analytics
If you are missing one of the prerequisites above, use the guide below to fill in the gaps.
This guide will cover the following:
Create an Azure account with the compatible admin/management.
Create Azure subscription.
Create Azure resource group.
Create Azure Blob Storage account. *Optional
Create Azure Synapse Analytics
1. Creating an Azure account:
If you don't have an Azure account, you can follow the steps detailed here to create one.
2. Creating Subscription:
Azure subscription is the main billing and tiers accounts. You must have one to work with any resource at Azure portal or environment.
If you do not have a subscription in Azure, you can create it:
Login to your Azure portal
In the search box at the top right, search for subscriptions. Click on subscriptions in the result.
On the subscriptions screen, click on + Add button.
Follow the steps of the Microsoft subscription wizard.
Recommended: Create your subscription name with the name of <your-account>-rivery, so you can manage the billing using Rivery in Azure Synapse Analytics.
After the subscription is created, please save the Subscription Id from the subscription panel.
3. Creating a Resource Group
Resource Group is a semantic group in Azure, which lets you manage and define your permissions, users and the resources under it. Rivery requires the use of a Resource Group. If you don't have one already, please create it by following the below steps.
Important: Create a specific new Resource Group for Rivery. It will let you manage the users, permissions, and resources that Rivery will use, and watch the capacity and usage of the resource. The Resource Group name must be Rivery .
Click on Resource Groups in the main menu in the Azure portal:
Click on + Add button in the top panel.
In the form, name your Resource Group "Rivery". Choose your subscription (an existing one, or create one using the guide above) and choose your location.
4. Create a Blob Storage Account and Blob Storage Container
Follow the instructions here to set your own custom blob storage account.
5. Create an Azure Synapse Analytics
Follow the instructions detailed here to create your warehouse. Use the information detailed in the previous steps such Subscription and Resource group when needed.
Setting up the Azure Synapse Analytics
Create a Rivery user on the Azure Synapse Analytics
Using a client or via the Azure portal, connect to your Microsoft Azure Synapse Analyticsinstance.
Navigate to the master database and execute the following command (don't forget to replace the <password> with a strong password value):
CREATE LOGIN rivery WITH PASSWORD = '<password>';
CREATE USER rivery FOR LOGIN rivery;
Navigate to the warehouse and enter the following commands:
CREATE USER rivery FOR LOGIN rivery;
GRANT CONTROL ON DATABASE::<DATABASE_NAME> to rivery;
Whitelist Rivery IP addresses on Azure
If you are not using a connection via an SSH Tunnel you will need to Whitelist our IPs.
1. Sign in to the Azure portal
2. Select warehouses from the left-hand menu and then click on your warehouse on the SQL data warehouses page.
3. Click Show firewall settings.
4. Make sure the Allow access to Azure services is turned on.
5. Click Add client IP on the toolbar. When a firewall rule opens, enter one of the IP address as the start IP and end IP.
Repeat this step for all 4 IP addresses
6. Click save when done.
Create a connection in Rivery
To find your host name, do the following:
1. Sign in to the Azure portal .
2. Select SQL Data warehouses from the left-hand menu, and click your data warehouse on the SQL data warehouses page.
3. In the Essentials pane in the Azure portal page for your database, locate and then copy the Server name .
Additional information can be found here .
Creating the connection :
Log into Rivery.
Create a new connection for Azure Synapse Analytics:
Go to Connections.
Click on New Connection .
From the source list, choose ** Azure Synapse Analytics **
Enter the credential information created in the prior steps.
* Host.
* Database.
* Azure Synapse Analytics user name.
* Azure Synapse Analytics password.
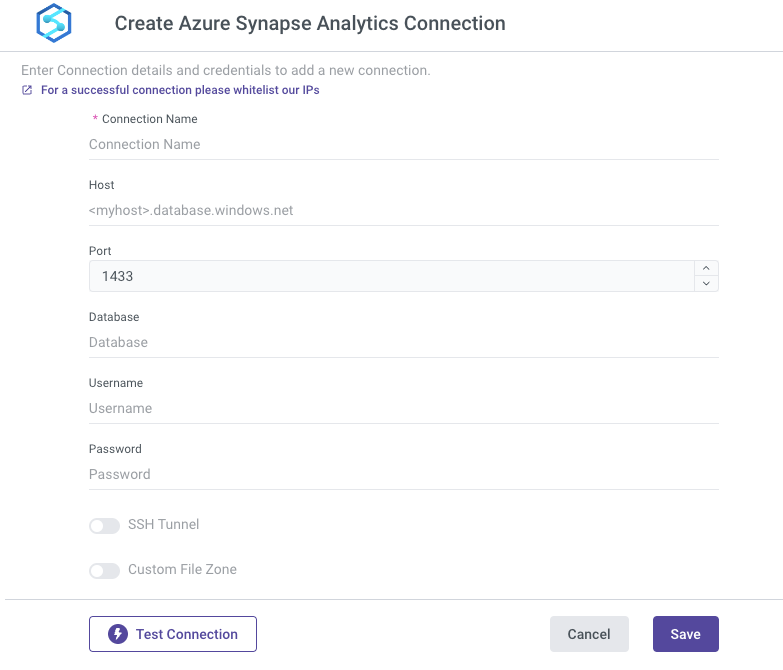
5. You can either set a Custom File Zone to have the data save in your own staging area or use our default FileZone.
6. You can test your connection by clicking Test Connection.
7. Save the connection .
Limitations
Connecting to Azure serverless instance is currently not supported.
Was this article helpful?