- 6 Minutes to read
- Print
- DarkLight
- PDF
MongoDB Walkthrough
- 6 Minutes to read
- Print
- DarkLight
- PDF
Introduction
This document aims to guide users through the process of creating a MongoDB instance, and performing basic database operations.
How to Work with MongoDB?
Step 1: Establish a Connection
Make sure you possess appropriate credentials for establishing a connection with a MongoDB database server.
Step 2: Choose the River Mode
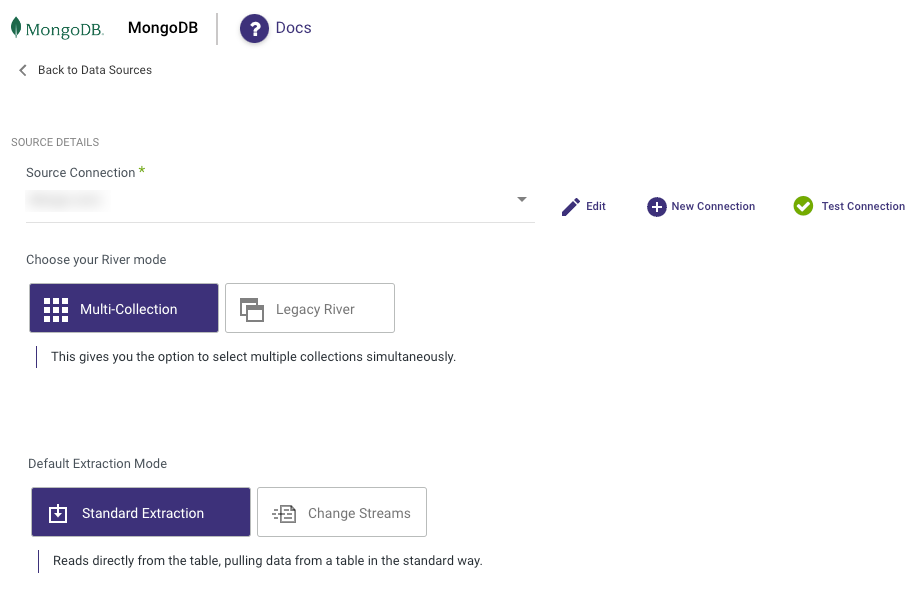
Once you have successfully established a connection to MongoDB, select the River mode to load data into a Target. There are 3 available options for you to choose from:
By clicking on the highlighted modes below, you will be taken to a relevant page that offers a comprehensive explanation and presents a Product Tour example showcasing the available features in MongoDB.
Multi-Tables : Simultaneously load multiple tables from MySQL to your desired Target. In this process, Rivery conducts a full ELT process which will extract the full structure of all selected tables before filtering and writing only selected columns to your target. This can result in data transferred being of a larger volume than data written to target.
- Standard Extraction - This River mode maps, transforms, and loads data from multiple tables into a unified schema. It uses SQL queries for transformations and can be scheduled or manually triggered.
- Change Streams - This mode monitors Source database logs, capturing and transforming changes in real-time. This ensures minimal data loss and low latency transfer when loading the transformed data into the target database, keeping it in sync with the Source.
Legacy River: Select a sole Source table for loading into a Target. Legacy rivers allow you to replicate fields in single or array mode to your target with a high level of granular control over data-type mapping, and filtering of nested objects.

Please Note:
- Incrementing columns with the '$' operator is not supported in Multi-Tables and Legacy River modes.
- The Timestamp datatype in MongoDB will return the timestamp value without milliseconds, displaying as 'YYYY-MM-DD HH:MM:SS'
Step 3: Run the River
Once you have successfully configured the River mode, selected the extraction method, and set up the scheduling, you are now ready to initiate the River and start its operation.
MongoDB Key Features
- Select Connection : Required . Select the connection that you’ve set before.
- Collection Name : Required.
choose the collection by entering the collection name
It is also possible to specify the collection name with the [database].[collection] format. This format can enable you create multiple Rivers without changing the connection.
But it is important that the connection URI will target the authSource database.
To enable this feature, the connection needs to target the database that is used for the authentication
Extract Method : Required.
All : pull the entire data in the table.
Incremental : pull data by incremental value. I.e: get only the data that had been changed since the last run.
In the Incremental extract method there are additional options:Incremental Attributes : Required. Set the name of the incremental attribute to run by. I.e: UpdateAt, UpdateTime .
Incremental Type : Required. Timestamp | Epoch. Choose the type of incremental attribute.
Choose Range : Required.
- In Timestamp, choose your date increment range to run by.
- In Epoch, choose the value increment range to run by.
- If no End Date / Value entered, the default is the last date/value available in the table. The increment will be managed automatically by Rivery.
Please note:
The Start Date won't be advanced if a River run is unsuccessful.
If you don't want this default setting, click More Options and check the box to advance the start date even if the River run is unsuccessful (Not recommended).

Include End Value : Should the increment process take the end value or not. The diffrences between Including the end value and discluding it are being explained in the following cases (#1,#2) -
Assumptions:
The Collection's Start date value is 01/01/2021.
INC_KEY stands for the collection's Incremental key.Case #1 - The Collection's Max Updatedate field's value - 01/01/2021 (maxupdate is equal to the start date)
"Include End Value" toggle Increment logic condition being tested River Outcome result checked SELECT * FROM TABLE WHERE INC_KEY>=01/01/2021 AND INC_KEY<=01/01/2021 All the data of the - 01/01/2021 will be pulled to the target table unchecked SELECT * FROM TABLE WHERE INC_KEY>=01/01/2021 AND INC_KEY< 01/01/2021 Done With Warning: Got No Results When Checking Increment Case #2 - The Collection's max Updatedate field's value - 02/01/2021 (maxupdate is grater than the start date)
State of "Include End Value" toggle Increment logic condition being tested River Outcome result checked SELECT * FROM TABLE WHERE INC_KEY>=01/01/2021 AND INC_KEY<=02/01/2021 All the data between the - 01/01/2021 and 02/01/2021 will be pulled to the target table, after the run the start date will be updated to 02/01/2021 unchecked SELECT * FROM TABLE WHERE INC_KEY>=01/01/2021 AND INC_KEY<02/01/2021 Only the data of the - 01/01/2021 will be pulled to the target table Interval Chunks : Optional . On what chunks the data will be pulled by. Split the data by minutes, hours, days, months, or years, It is recommended to split your data into chunks in the case of a large amount of returned data to avoid a call timeout from the source side.
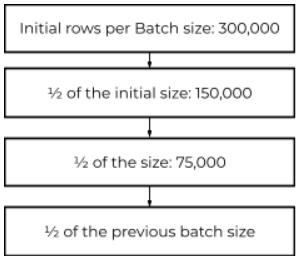
Max Rows In Batch : Optional.In the process of parsing the data in the file zone from BSON to a JSON file, as best practice, it is essential to add a batch max rows limit (the number of rows that will be read in a single batch before moving to the next one). In order to determine the size of the rows, you can follow the next principle:

After every 50% reduction, test the river and check if it is running successfully, follow this process up until you set a size that enable the river to run as expected.
- Filter : Optional. filter the data to pull. The filter format will be a MongoDB Extended JSON.
- Limit : Optional. Limit the rows to pull.
- Auto Mapping : Optional. Rivery will determine your table/query metadata. You can choose the set of columns you want to bring, add a new column that hadn’t got in Rivery determination or leave it as it is. If you don’t make any of Auto Mapping, Rivery will get all of the columns in the table.
Converting Entire Key Data As a STRING
In cases the data is not as expected by a target, like key names started with numbers, or flexible and inconsistent object data, You can convert attributes to a STRING format by setting their data types in the mapping section as STRING .
Conversion exists for any value under that key.
Arrays and objects will be converted to JSON strings.
Use cases
Here are few filtering examples:
{"account":{"
or another filter using date variables:
date(MODIFY_DATE_START_COLUMN) >=date("2020-08-01")
Common Errors
Loading to BQ Failed: Field XXXX is type RECORD but has no schema
This is relatively common generic error and the root cause is usually due to Schema settings that are not compatible with BQ. The error may vary depending on field and type.
To fix this simply clear the mapping, redo automapping and convert the column into STRING as described in the "Converting Entire Key Data As a STRING" section.
Limitation
If you use Snowflake as a Target and your Collection contains hyphens, those hyphens will be automatically replaced with underscores.
Consider the following scenario -
if the original Collection is as follows:
mongodb-collection-name
it will be automatically converted to mongodb_collection_name

