Oracle Walkthrough
- 1 Minute to read
- Print
- DarkLight
- PDF
Oracle Walkthrough
- 1 Minute to read
- Print
- DarkLight
- PDF
Article summary
Did you find this summary helpful?
Thank you for your feedback!
Introduction
This document aims to guide users through the process of creating a Oracle instance, and performing basic database operations.
How to Work with Oracle?
Step 1: Establish a Connection
Make sure you possess appropriate credentials for establishing a connection with a Oracle database server.
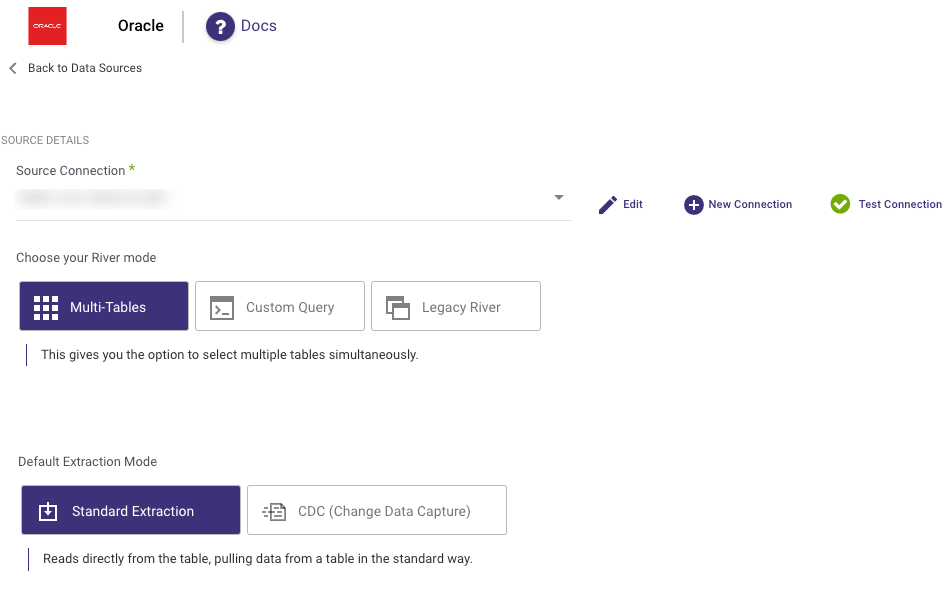
Step 2: Choose the River Mode
Once you have successfully established a connection to Oracle, select the River mode to load data into a Target. There are 3 available options for you to choose from:
Please Note:
By clicking on the highlighted modes below, you will be taken to a relevant page that offers a comprehensive explanation and presents a Product Tour example showcasing the available features in Oracle.
- Multi-Tables : Simultaneously load multiple tables from Oracle to your desired Target.
Standard Extraction - This River mode maps, transforms, and loads data from multiple tables into a unified schema. It uses SQL queries for transformations and can be scheduled or manually triggered.
Please Note:
Rivery supports the use of Tables, Views, Material Views and Synonyms Objects within Oracle.
Synonyms allow you to incorporate data from synonym table names in Oracle databases into your Rivers. Synonym tables will exclusively be accessible in Standard Extraction mode. It's important to note that Oracle's synonym functionality is not compatible with Change Data Capture (CDC).
If the schema is not displayed properly, try reloading the metadata and ensure the connection is correctly pointing to the appropriate database.
Advanced Options - Replace Newline Characters:
This will replace newline characters with a selected replacement value or a custom value of your choice.
Default Behavior: If this option is not enabled, newline characters are replaced with spaces by default.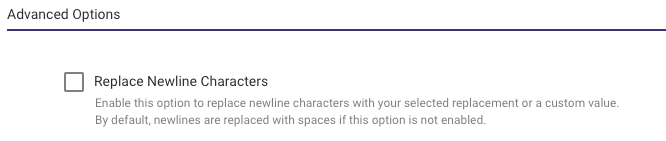
Change Data Capture (CDC) - This mode monitors Source database logs, capturing and transforming changes in real-time. This ensures minimal data loss and low latency transfer when loading the transformed data into the target database, keeping it in sync with the Source.
- Custom Query : Create a customized query and import it into your designated Target.
- Legacy River: Select a sole Source table for loading into a Target.
Step 3: Run the River
Once you have successfully configured the River mode, selected the extraction method, and set up the scheduling, you are now ready to initiate the River and start its operation.
Limitation
Rivery does not support quoted table or column names that use lowercase or mixed case.
Was this article helpful?