REST Action
- 15 Minutes to read
- Print
- DarkLight
- PDF
REST Action
- 15 Minutes to read
- Print
- DarkLight
- PDF
Article summary
Did you find this summary helpful?
Thank you for your feedback!
Introduction
This guide provides instructions on utilizing Rivery's Action River functionality to establish a connection with any REST endpoint and integrate it as a fresh data source. Despite Rivery continually incorporating native support for diverse data sources, there may be occasions when your required data source isn't included in Rivery's roster of supported options. In such situations, this guide can prove invaluable, allowing you to steer clear of unnecessary coding.
Towards the conclusion of this guide, you'll discover guidance on incorporating the newly created Action River into a Source to Target River using the Rest API Source.
What are Actions in Rivery?
Actions are the ability to connect anywhere on the web.
The REST Action is the place to send REST requests in order to get data from Web services (APIs etc.) or post data in Web services.
Create a REST Action
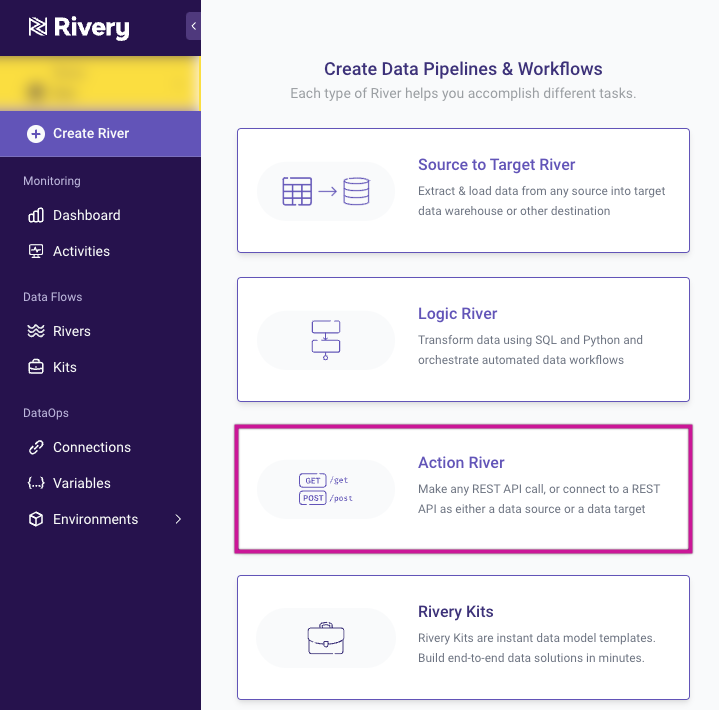
Click on “Create River” from any screen in Rivery and select the “Action” option.
An action in Rivery can be Multi-Action or a single REST Action.
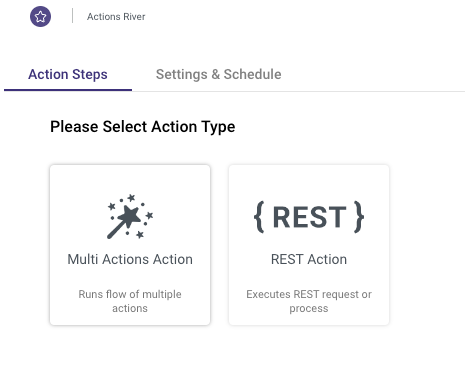
- Multi-Action is an action that is composed of multiple REST Actions, which allows for a single workflow with multiple endpoints, and the passing of values between endpoints.
- REST Action is a generic process that can be configured to send any kind of REST request.
Click on Rest Action in order to proceed to the REST Action screen.
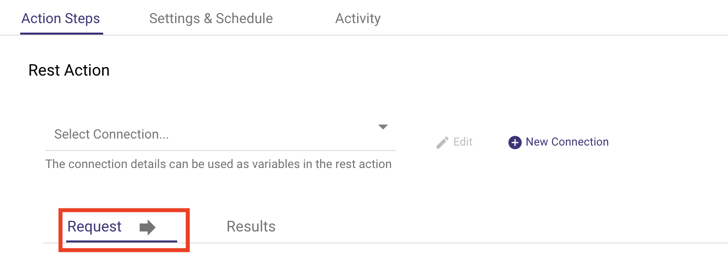
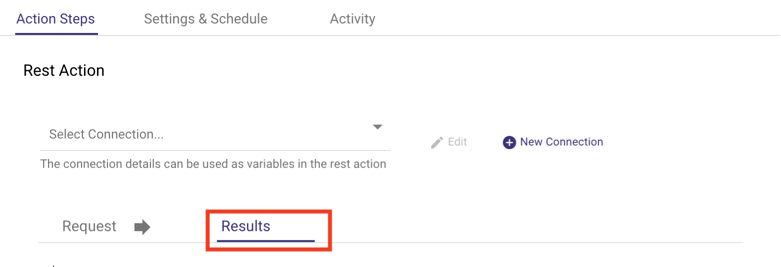
The REST Action is composed of two major parts: Request & Results.
In addition, the REST Action has its own Custom Connection, its own Variables, and Time Period inputs.
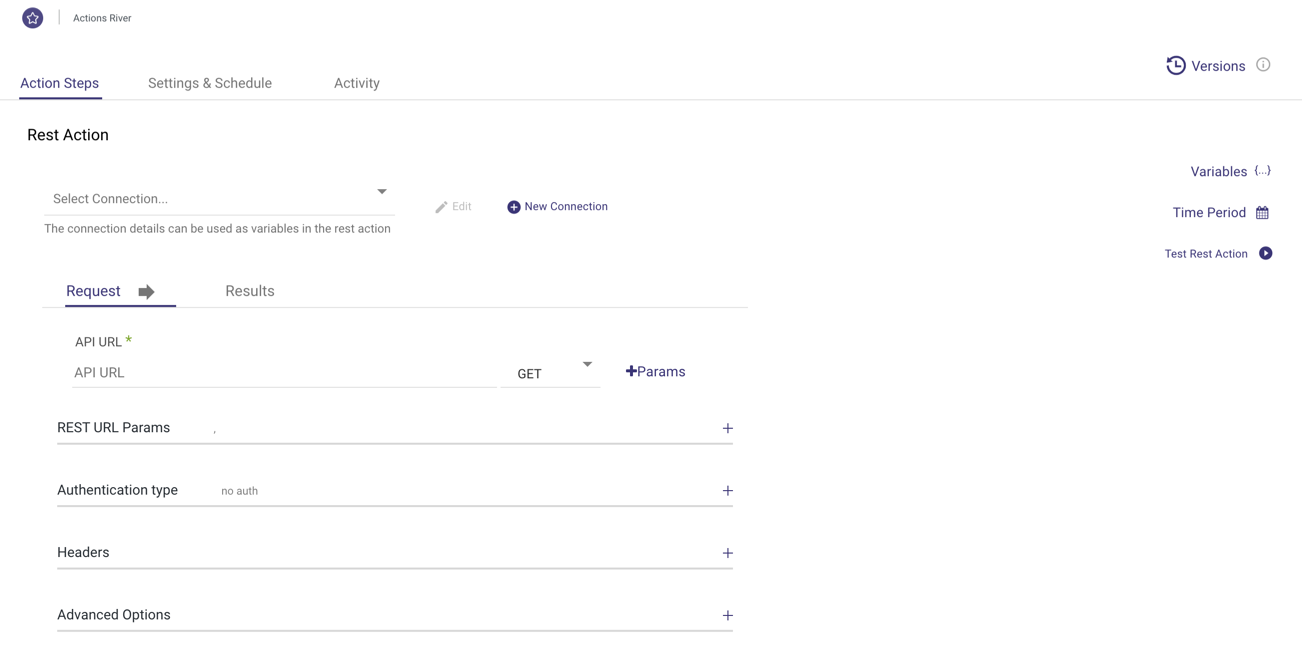
- Request Configuration has options to insert all the inputs related to the request of the REST Action such as the URL, parameters, headers, and more.
- Results Configuration contains the options for handling the results of the REST request.
- Custom Connection is an optional input to define the connection of the action. This connection can be reused in multiple Actions. All the details of the selected custom connection will be added to the variables of the action and can be encrypted in the connection.
- Variables menu allows for defining variables to be used in the Action. Variables can be used in any input in the Action.
- Time Period allows for defining a time range of the rest action. Select the type of the dates (DateTime or Date), and select the time format which is required for this request. Once a time range is defined, corresponding variables {time_range.start_date} and {time_range.end_date} will appear in the Variables menu.
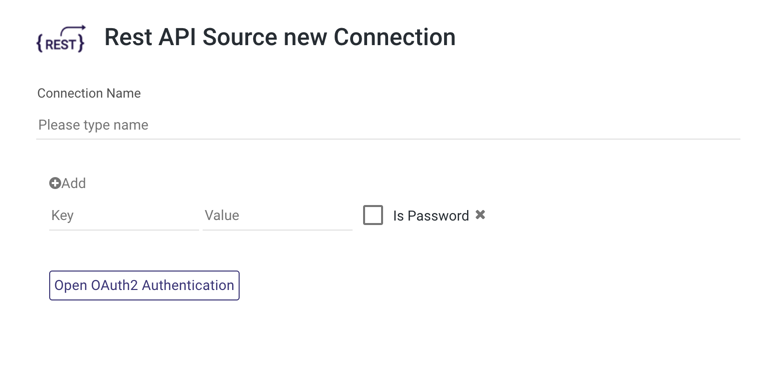
Custom Connection
Create or select an existing custom connection.
Please Note:
It is possible to leave the connection empty in case it is not required.
For the API Key value, check the ‘Is Password’ box to ensure that this value is kept private.
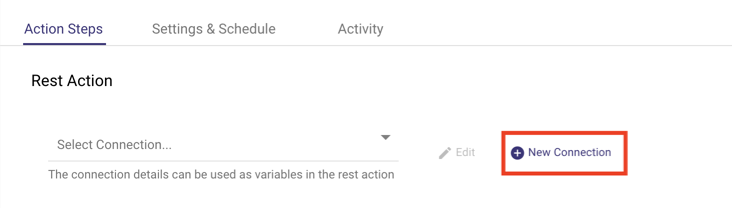
You should create a REST connection if either of following is true:
- Oauth 2.0 protocol is required for authentication.
- Sensitive values (i.e. a password) are required to authenticate.
To proceed, simply provide the required API key and its corresponding value. It's important to ensure that the key and value are both accurate and properly formatted to avoid any errors in the API connection process.
In some cases, additional information or parameters may also be necessary, so be sure to carefully review your API documentation for any specific requirements or instructions.
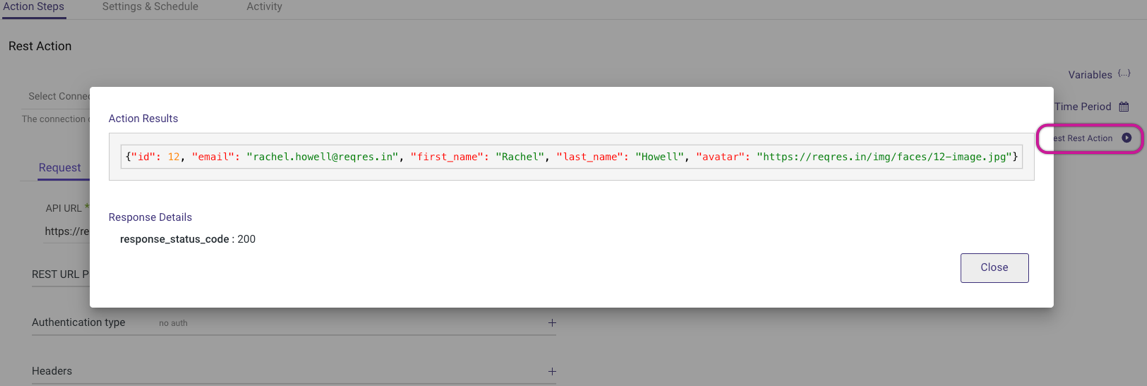
Testing the Connection
In this example, the user has access to an API endpoint that returns a list of users. By selecting the "Test REST Action" button, the user can verify the connection. This action provides a success code of 200 (connection succeeded) and a sample dataset.
Request Configuration
The Request section contains all the required settings for sending a proper REST request.
In any of the inputs, it is possible to use the variables that were configured in the Variables menu.
- API URL: The HTTP address of the service. This should start with “http://” or “https://”. If the request has parameters, these can be managed in the Params inputs.

- REST method of the request. Rivery currently supports in GET, PUT, POST, PATCH, and DELETE requests.
- Params - Click on the Params button in order to add parameters to the request.
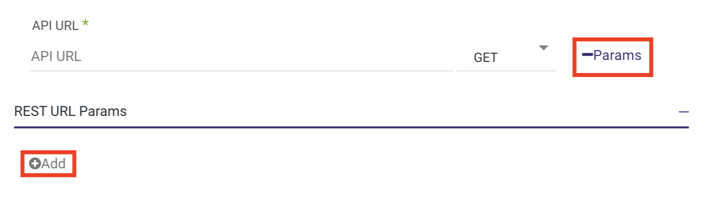
Click on the Add button to add the required parameters and their corresponding values.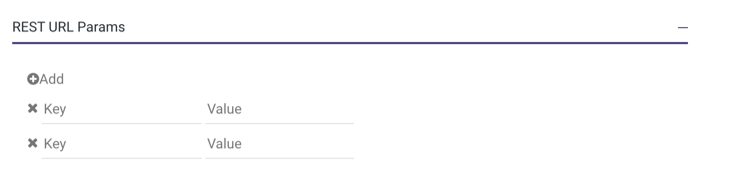 Important: The key of each parameter must be equal to the name of the parameter that the service is expecting.
The value of each parameter is the exact value that will be sent in the request. It is possible to use variables as values. - Authentication type - In some requests, it is required to add an authentication method to the request. Rivery currently supports Oauth2.0, Basic Auth, and No Auth. Use the 'No Auth' option if the API only requires some sort of authentication through the Headers, Parameters, or in the API URL.

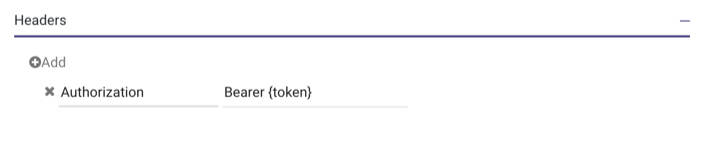
- Headers - The headers that will be sent in the request. (Leave this empty if no headers are required).
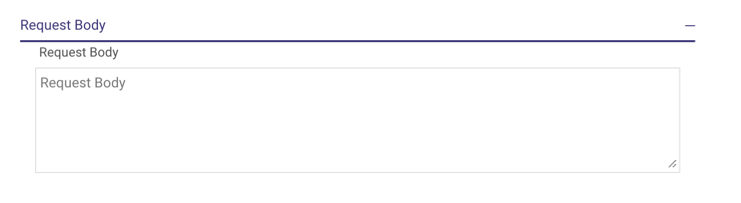
- Request Body (Available in all requests except "GET") - The body that will be sent in the request. The text must be in JSON format.
Supported Data Types in Request Body
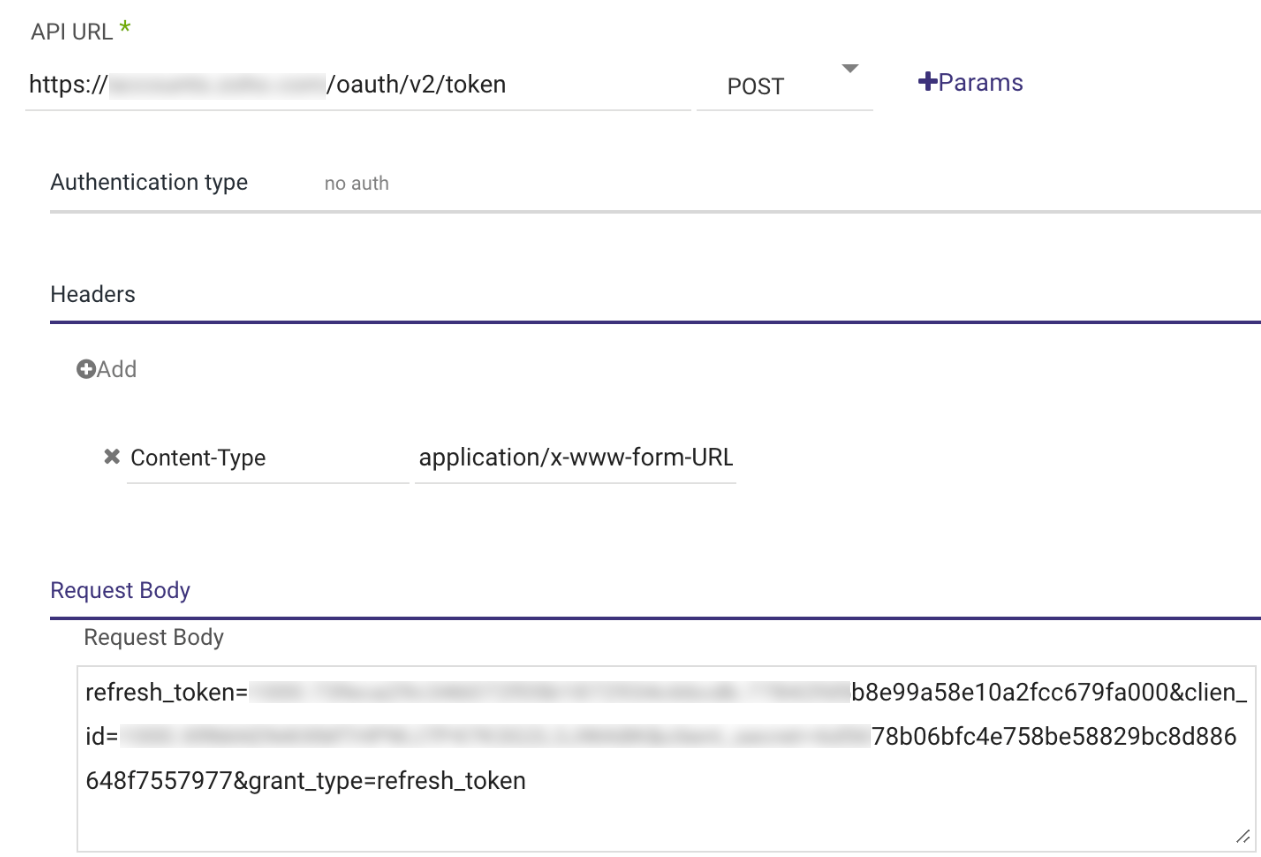
We support application/x-www-form-urlencoded, but it requires specific formatting:
Headers:
Content-Type: application/x-www-form-urlencoded
Body:
foo=bar&foo2=bar2
Advanced Options
Optional parameters that are not required when submitting a REST request but may be beneficial in some instances:
1. 'Sleep After Request' - Set the amount of time (in Seconds) Rivery will wait after sending the request.
2. 'Timeout_request' - specify the amount of time to wait for a response. The Action will return an error if the provided time has passed. The default waiting time is 300 seconds if the input is left blank.
3. 'Validate Http Certificate' - The Http/Https certificate will not be verified if this option is unchecked. Mostly used to obtain data from internal APIs.

Warning:
This is a less secure connection method, use it at your own risk.
Testing the Request
Once the request is configured, try the “Test Rest Action” button to determine if the request returns a successful response. This will send the request with all the configurations inserted in the request section and will return the response that was received for this request in the user interface.
If there is an error in the response it will be shown with the corresponding error code and the error message received from the API.
Results Configuration
The Results section contains all the required settings about how to get the results from the response that was received from the REST request.
Rest Actions can return one of the following types of results:
- Response - The action will only return the response code for the given request. If selected, no options will be shown except the advanced options. This option is most commonly used with POST and PUT calls.

- Variables - The action will return variables that store the values that were returned in the request’s response. This kind of action can be used inside a Multi-Action or a Logic River.
 Data Location(Available only if the Results Type is set to Variable or Data)
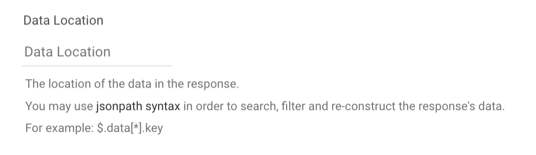
Insert the key in the response where the desired results are located. If the required data is the whole response, leave the data location empty. If the data is located in a nested key, use ‘.’ to indicate it.
For example, If the response looks like this and the desired results are in the 'data' array:
{‘results’:{‘data’: [....], ‘status’: ‘success’}}
The data location would be “results.data” to obtain only the response data located in the 'data' array.ImportantThe Data Location input uses standard JSON Path format as outlined here: https://github.com/json-path/JsonPath#operators.
Data Position(Available only if the Results Type is set to Variable or Data)
If the desired response is a JSON array and the required results are located in one of the elements, the data position should be set to the position of that item (starting from 0). If this is not the use case then leave this option empty.
Variables to return (Available only if the Results Type is set to Variable)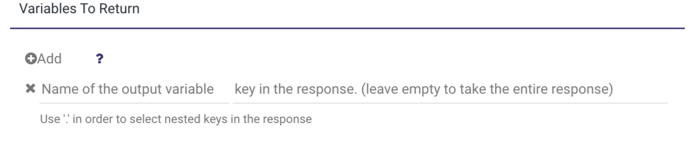 1. Click on “Add” to add variables to return.
2. Name of the output variable to return - Insert the desired name of the variable.
3. Key in the response - Insert the key in the response that contains the value to be stored in the variable. Leave this empty to store the entire response in the output variable.
Use ‘.’ notation if the value for this variable is located in a nested key in the response.
Example:
We would like to send a request to generate a token and return this token as a variable called new_token.
The response is:
Text
{"auth_res": {"token": "abcde12345", "expired_at":"2017-07-01 22:00:00"}}
In the data location input, we’ll insert auth_res (because the data we are interested in is located inside auth_res).
In the variables to return we’ll add a new variable with key: new_token and value token.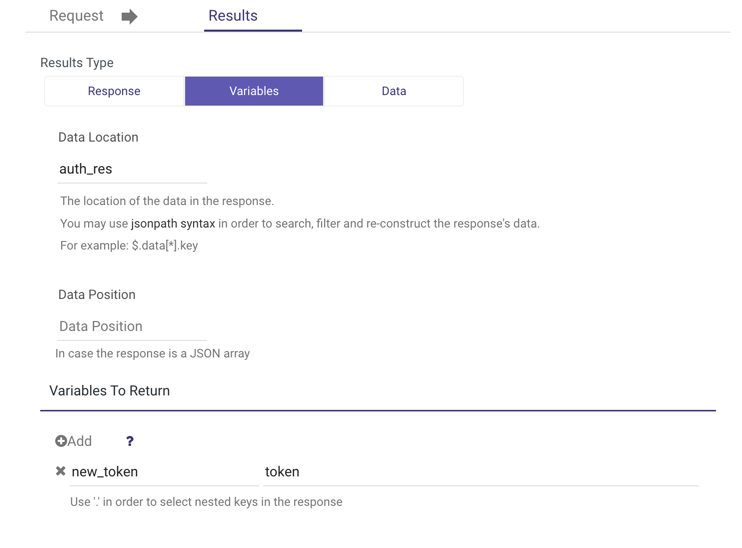
- Data - The action will return data that can be loaded into a Rivery-supported target. This is most commonly used with GET calls, and requires creating an additional Data Source to Target river, with the source set to 'REST API'. For this use case, the Action is used as a template for the Source to Target ingestion.

Results Details -(Available only if the Results Type is set to Data)
Select the results structure -
1. JSON Structure:If the data is in JSON structure (meaning a list of rows when each row is an object of key-value pairs)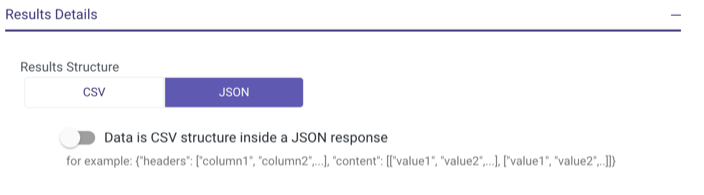
*CSV In A JSON Format - If the response is returned as JSON data, but the results data are in a CSV structure (as in the example below the toggle button in the screenshot) it is necessary to indicate where the headings of the data are located (fill the key of the JSON response - for example, headers ).
Note that this option requires filling both 'Headers Location' and 'Data Location' inputs.
2. CSV Structure: If the data is in a table structure. CSV can be the whole response if the response is just text or can be split to a key in the response which stores the heading and values separately.
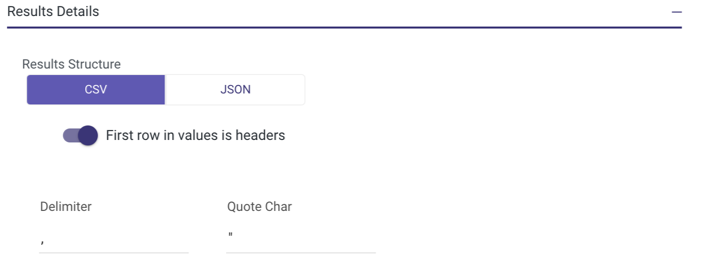
If CSV is selected, it is necessary to indicate where the headings of the data are located. If the headers are in the first row of the data, keep the 'First row in values is headers' toggle enabled. If the headers are in a different row, disable this toggle and fill in the header row number.
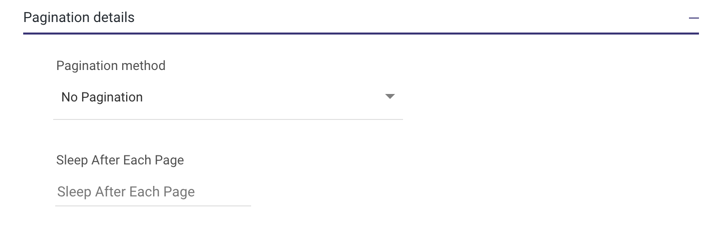
Pagination Details(Available only if the Results Type is set to Data)
Some services return the data in pages (also known as chunks) and require extra logic for 'paging' through the results. Pagination is the mechanism for pulling all of the results from the service if it is returned in pages.
Important:
The selected pagination will be in actual use only when running the action from a REST Source to Target River. When running the action, it will return only the first page as a sample of the data.
Pagination Methods
The REST Action supports the following pagination methods:
Paginate By Offset
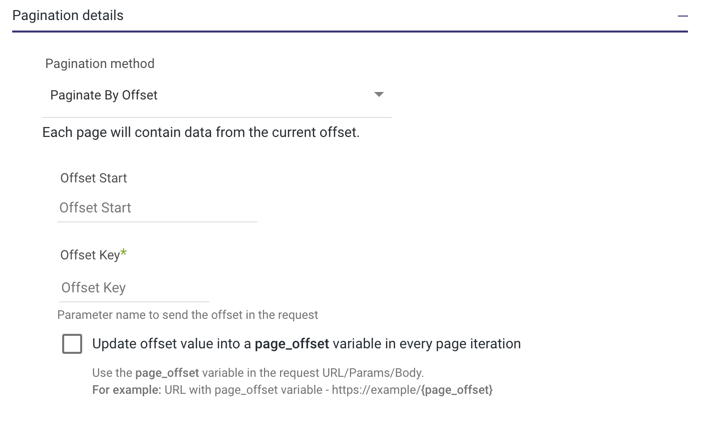
This pagination method uses an 'offset' to fetch data. The offset specifies the starting point of data retrieval.
1. Specify Offset Key: The starting position for data retrieval, typically 0 or 1.
2. Specify Offset Key: Identify the key name for the offset in the request, commonly named 'offset'.
3. Use the page_offset Variable:Enable the "page_offset" variable when the REST API requires a different approach for the offset value.
4. Handling Special Cases: check the {page_offset} variable checkbox when the REST API request requires different usage of an offset value than the typical 'offset' = N in a request URL parameter.
Example -

Use the {page_offset} variable in the request body, setting it with {page_offset}, 50 (with a decimal limit). The River will replace this with the offset value when iterating over pages.
Paginate By Page
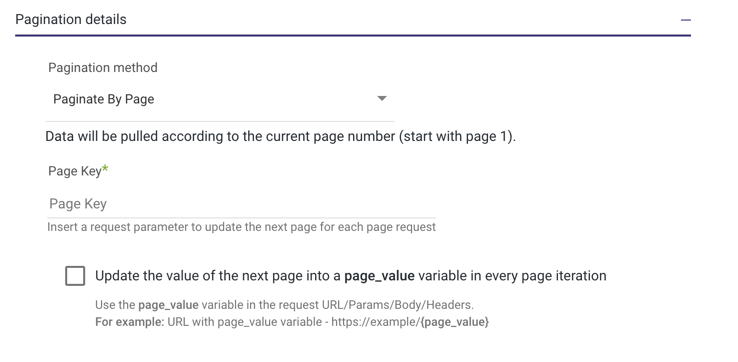
This pagination method splits the response data into pages, and each request contains the page number to pull, usually starting from 1.
Page key - The name of the URL parameter to update (usually called 'page').
page_value variable
Enable the page_value variable option when the REST API request requires the page value to be updated somewhere other than a URL parameter (such as the body or just an increasing number in the URL itself).
Paginate By Next page in Response
Each response contains the details of the next page to pull.
In this method, we need to indicate where to find this information in the response.
- Next Page Type
1. Static URL with param from the response
The response contains some value to be sent in the next request in order to pull the next page. The next request can be sent with the initial URL or with a new URL.
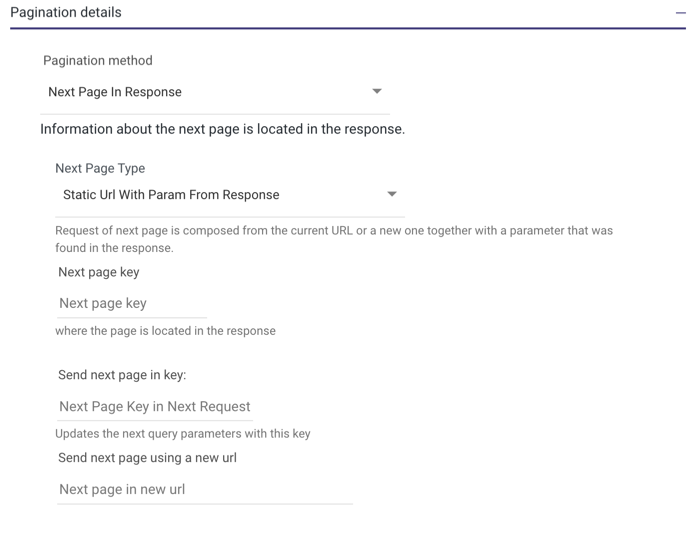
Next page key - the key in the response which contains the value to be sent in the next request.
Send next page in key - the parameter’s name in the next request to send the value of the next page.
Next page in new URL - The URL to send the pagination requests with. Leave empty if using the same URL.
- Url in response
The response contains a full URL ready to be sent to get the next page’s data.

Next page key - the key in the response that contains the URL of the next page.
Next page prefix - if your next page does not contain the URL prefix, it can be added here.
Example:
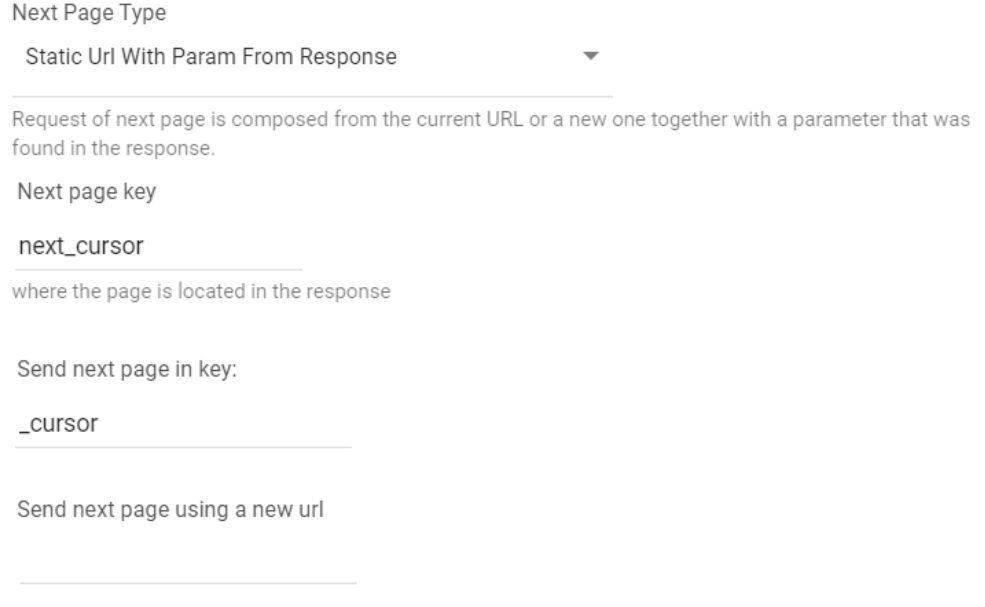
In the above snapshot, the next page cursor is found in key next_cursor, and we will use it in the next query parameter key _cursor. I.e.,
GET {url}?limit=50
response = {'data_to_yield': [....], 'next_cursor': 'df3DFsdffs3'}
Next paginated request:
GET {url}?limit=50&_cursor=response['next_cursor']
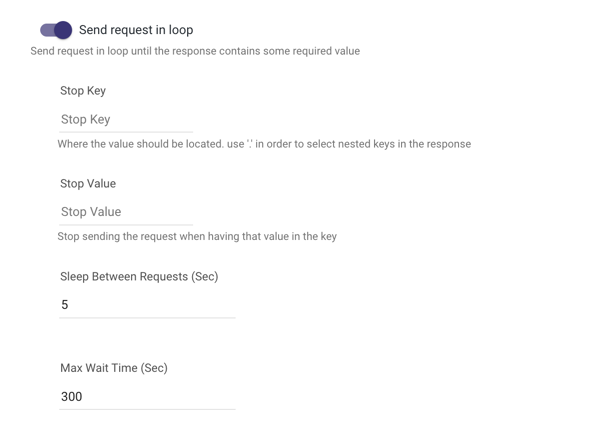
Stop according to
Select how to determine when the paging will end.

Page size - the pagination stops when the page size (in records) is smaller than the value that was inserted to the input of page size.

Key in response - the pagination will stop when the response contains a given value in a given key.

1. Insert the name of the key in the response which is supposed to contain the value. If the data is located in a nested key, use ‘.’ to indicate it.
2. Insert the value that should cause the paging to stop.
Sleep after each page
Hold the process for the given amount of seconds.
It is recommended to use that input in order not to overload the service with too frequent requests when using pagination.
Results Advanced Options
Replace invalid characters in headers
The "Replace invalid characters in headers" option automatically replaces any invalid characters, such as periods, in the source field names with underscores.
For example:
- Before: policy_dictionary_dim.created_by
- After: policy_dictionary_dim_created_by
Selecting this option enables effective handling of special characters in column headers.
After enabling it, return to the Source to Target mapping you created and re-run the auto mapping process. The column names should now appear correctly.

Add Dates Variables to Results Data
 This option will take the values passed through Time Period variables ({time_range.start_date} and {time_range.end_date}) and automatically populate them in the Column Mapping of the Data Source to Target river when the Action is set as the Source. This is especially useful for use cases where dates are required input parameters but the corresponding response data does not include the date values.
Additional Advanced Options
Insert the number of seconds to hold the process. Insert the name of the key in the response that is supposed to contain some value. Insert the value that should cause the process to hold.

- Insert the number of seconds to hold the process:Handling 50X Error Response Codes:
When interacting with APIs, you may encounter server-side error response codes such as 500 (Internal Server Error) or 502 (Bad Gateway). These 50X errors indicate issues on the server side of the API, which could be temporary or due to a problem that the server needs to resolve.
To improve the robustness and reliability of your data integration process, it is beneficial to implement a retry mechanism for handling these error responses. By adding a retry strategy within your action river, you can automate the process of retrying the request when encountering a 50X error. This approach helps ensure that transient issues do not disrupt the overall data flow and increases the chances of successfully retrieving the data.

- Insert the key in the response that is supposed to contain the value. Insert the value that should cause the process to exit.

- Insert the response code that should cause the process to exit.

Send a request in a loop
Designed for iterating over API requests
Keys to monitor
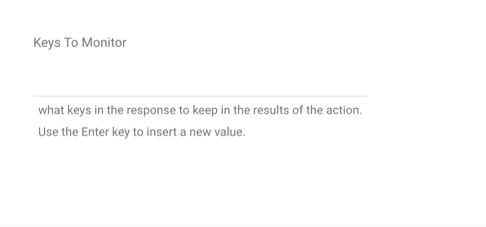
Insert any key in the response that you’d like to monitor during the Action’s run.
If the Action found that key in the response it will store its value and will return it in the action results and also in the activities screen (when opening the action details).
The keys to monitor can be useful when the response might contain messages about errors or the runs.
In that case, if the action failed, thanks to the “keys to monitor” you’ll have some information about the error when opening the action results in the activities screen.
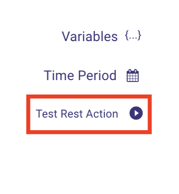
Test Rest Action
Once the results are configured, it is a good time to test the REST Action. This test will consider all of the configurations of the Action results, such as data location and position.
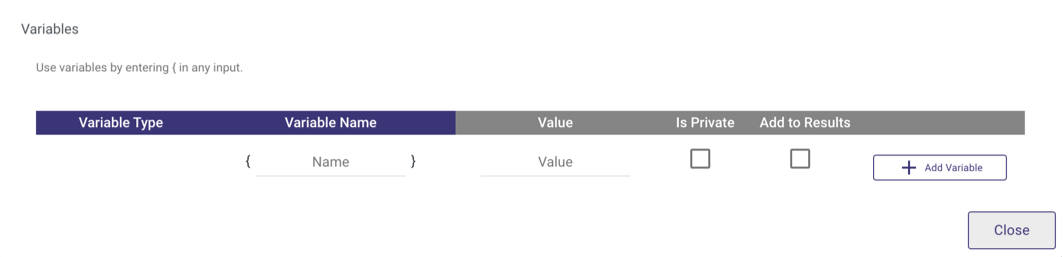
Variables
The Variables menu is available on the top right of the Actions screen.
Insert as many variables as required. These can be used as placeholders for dynamic values to be sent to the Action by a Logic River. In a Logic Step, an Action can be called and any variables defined will show up as possible input parameters.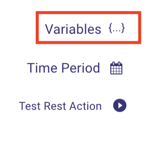
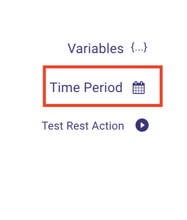
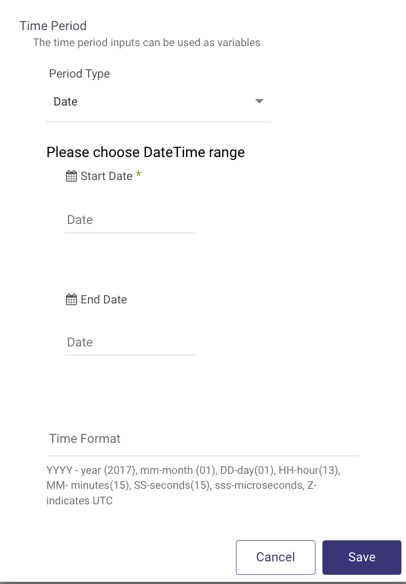
Time Period
The time period allows for defining a start date and end date of the request and is available by selecting the Time Period menu in the top right of the Action screen:
These two parameters will be automatically added to the variables list of the action and can be used anywhere in the action (usually will be sent as parameters in the request).
The time format input decides how those dates, when used in the action, will be sent in the request - this format should be the expected format of the service to which the request is being sent to.
If the required format is not in the list of the time formats, it is possible to insert manually the required time format according to python syntax.
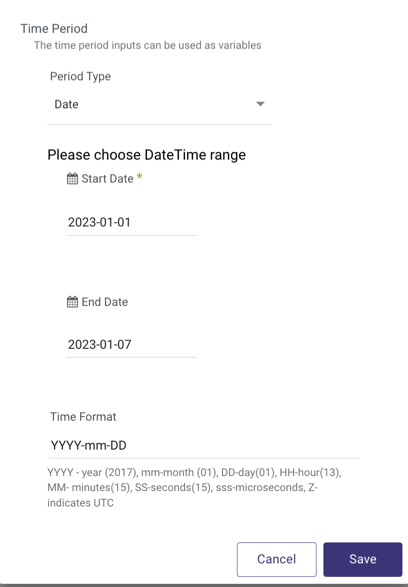
Creating a Dynamic Date Range
In order to pull a dynamic date range, select 'Time Period' on the top right of the Action screen and define the date format and initial start and end values:
Set the date period:
This will add 2 new parameters in the variables section:
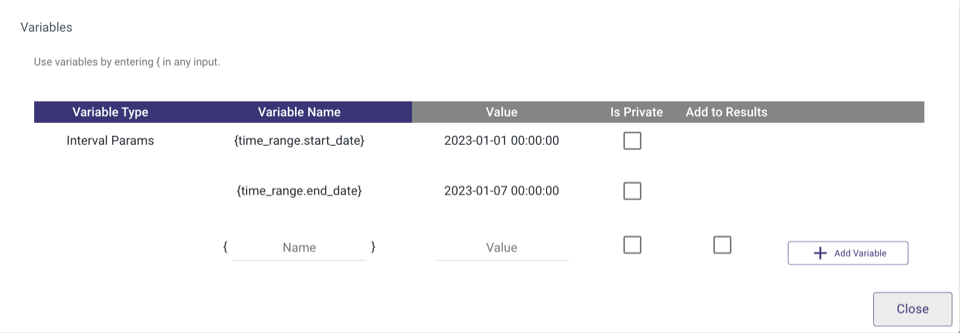
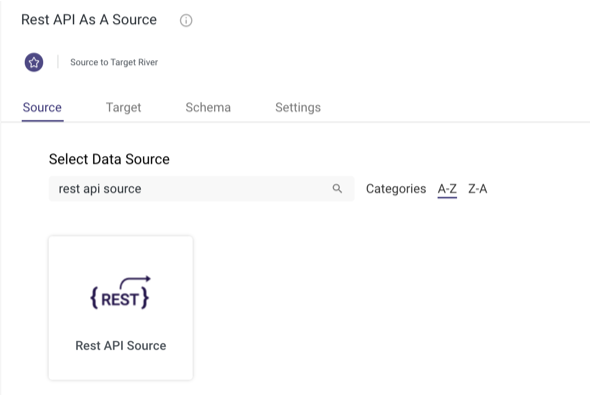
- Create a new Data Source to Target river and choose the REST API as the source.
 Then choose the desired date range:
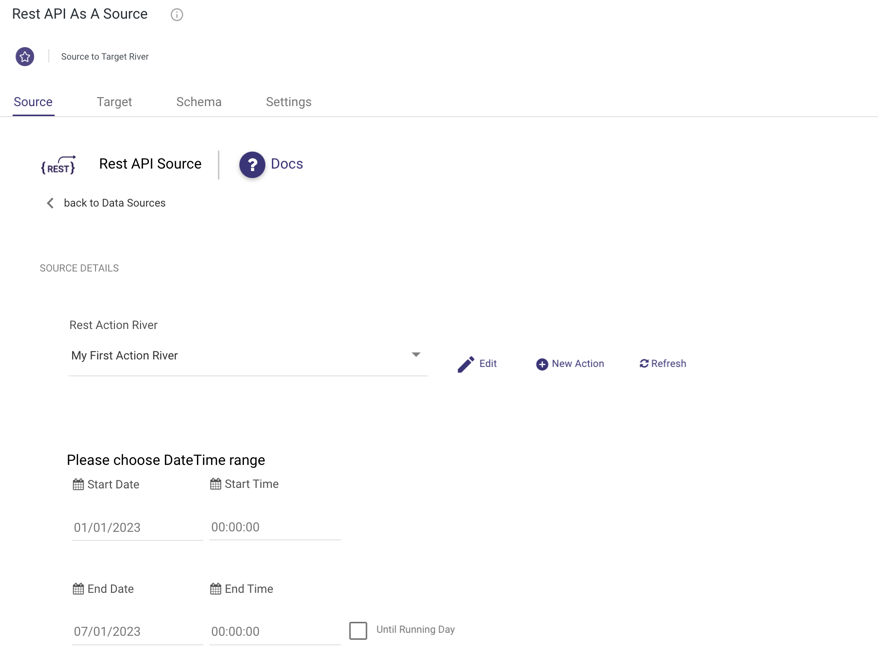
Rest Action That Returns Data
If the Action is meant to get data into a Rivery-supported target, this will require the creation of an additional Data Source to Target river, with the source connection set to 'REST API'.
In the Source tab of the Data Source to Target river, select the corresponding REST Action as the source. If any Time Periods or Variables were used as part of the configuration, these will be made available in the Source tab.
Finalize the REST Action
Once the test of the Action returns the expected results, the Action is ready to be used.
The Action created can be used in any of the following rivers in Rivery:
Data Source to Target River (only if this REST Action has “data” results type)
Limitation
The maximum response size is 100 MB. An error will be presented whenever a user tries to retrieve a file larger than 100 MB in a single response.
Was this article helpful?