The Trade Desk Walkthrough
- 2 Minutes to read
- Print
- DarkLight
- PDF
The Trade Desk Walkthrough
- 2 Minutes to read
- Print
- DarkLight
- PDF
Article summary
Did you find this summary helpful?
Thank you for your feedback!
Introduction
This guide will walk you through the process of importing data from The Trade Desk into Rivery, including setting up connections, selecting reports, and configuring time periods and filters.
Prerequisite
The Trade Desk Connection: Ensure that you have an active connection to The Trade Desk in Rivery.
Overview of Report Options
You can import data from The Trade Desk using either an Entity Report or an Existing Template Report.
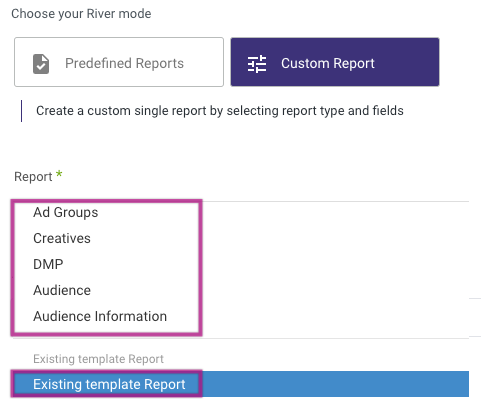
1. Entity Report
Selecting a Report
- Choose the desired report from the following list:
Applying Filters
- Select the appropriate filters to refine your report:
- Click on any input to see a list of available objects in The Trade Desk.
- Objects of a higher level will filter the objects of lower levels. For example, selecting an advertiser will filter the campaigns to only those related to that advertiser.
- Leave inputs empty to include all available values for the filtered higher levels.
Availabilities
- Choose the availability options for the report.
2. Template Report
Selecting a Template
- Choose the report template to use. If you select an Excel template, specify the report sheet number.
Applying Filters
- Apply filters as needed, similar to the Entity Report.
Configuring Report Formats
- Numeric Format: Choose between US and International formats.
- Date Format: Select the date format (US/International).
- Timezone: Specify the timezone for the report.
Scheduling Reports
The Trade Desk allows scheduling reports with a specified frequency. This option is useful if your river is set to run with permanent filters.
Steps to Schedule a Report
- Enable the Schedule Report option.
- Fill in the schedule frequency, date range, and start date.
- Leave the Schedule Start Date empty to start from the current time.
- Click Schedule Report to create the schedule.
- A success message will appear if the schedule is set up correctly.
Important Notes:
- Clicking Schedule Report will delete any existing schedule and create a new one.
- Save the river after setting up the schedule to retain the settings.
Canceling a Schedule
- Click the Cancel Schedule button to cancel an existing schedule in The Trade Desk.
Report Time Periods
For unscheduled reports that run only once, select the time period:
Time Period Options
Date Range
- Pulls data between the start and end date. Leaving the end date empty pulls data up to the current time.
- Use timezone offsets and "Last Days Back For Each Run" to adjust the date range.
Predefined Date
- Options include:
- Day: Yesterday
- Week: Various options from current to previous weeks
- Month: Various options from current to previous months
- Year: Year to date
- Options include:
Interval Chunks
Rivery supports chunking data to improve performance:
Chunking Options
- Don't Split: Pull data in one bulk.
- Daily: Chunk data daily.
- Monthly: Chunk data monthly.
- Yearly (Less Recommended): Chunk data yearly.
Was this article helpful?